How to Enable USB Debugging on Galaxy On6 [DEVELOPER OPTIONS]
The USB Debugging is an important aspect of the Android operating system and you must learn how to activate it. Basically, Debugging is related to testing and development purposes. For ordinary users, it makes possible to perform several operations. These operations include manual updates, flashing stock firmware, connecting the phone to Android Debugging tools and similar ones. In this tutorial, we’ll learn to activate the Developer Options and USB Debugging on Samsung Galaxy On6 so you can connect your phone computer and perform specific actions.
Whenever it comes to manual firmware installation/update procedure, the user needs to access the USB Debugging option and enable it. Otherwise, the computer and update software won’t detect this smartphone. The Android Operating system has many maintenance related modes and aspects. The USB Debugging is one of them. This menu is hidden within the Developer Options menu.
So, we gotta enable the Developer options on Samsung Galaxy On6 and we will get the USB Debugging option, then we can enable it only. Therefore, it becomes mandatory to learn about this so-called menu — Developer Options. Almost all the OEMs including Samsung, keep this menu hidden within the Settings options. The Developer Options is supposed to accessed and used by the developers for testing and development purpose. For ordinary users like us, it has many features that we could use to make our phone better in many aspects.
Whether you’re looking to improve the general performance or make your phone more productive, this menu has a plethora of such options. However, you shouldn’t use this menu carelessly. During this tutorial, we will learn both; how to activate the Developer option and USB Debugging on Galaxy On6 smartphone. That should help while you connect your phone to a computer for an update or some similar task.
Also see:
The USB Debugging required even using the Odin flashing tool. Basically, Odin is the most famous flashing tool for Samsung devices. Using it, users can easily flash stock firmware, OTA updates, recovery images and perform some other tasks. If you’ve been engaged with Samsung’s phone for a quite long time, then you must have heard about this tool. Using this tool, users could easily unbrick their phone.
So, if you intend to use this tool for some purpose on your phone, you need to enable the USB debugging first. Of course, tweaking improves user experience and doesn’t harm until we know the correct things to do and steps to follow.
Here we go, first, we will enable the Developer Option on this phone.
Enable Developer Options on Samsung Galaxy On6
There is no harm in getting this option enabled. And it doesn’t void the warranty on the phone either. You can enable this menu anytime you want and use.
The following instructions will help guide you further:
- Open the Settings menu on your phone.
- Tap on ‘About Phone’
- Tap on ‘Software Information’.
- Now, locate ‘Build Number’.
- Tap 7 times on the Build Number to activate the Developer Options.
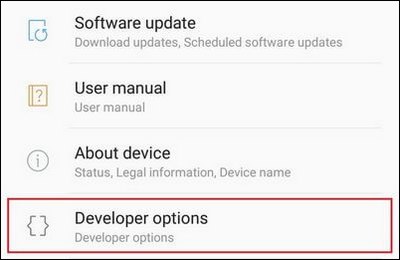
You’ll see this message “You’re Developer Now”, means this option is activated and you can access it from Settings->Developer Options.
Now, you can access this menu any time you want. You use this menu to speed up the performance of your phone. For reference, just follow the below guide:
Since we have activated the Developer Options, we can move further and activate the USB Debugging on this phone. Then, you’ll be able to connect this phone to ADB, Odin and other similar tools.
How to Enable USB Debugging on Samsung Galaxy On6
You just need to get into the Developer Options and access the USB Debugging entity. In that way, you can enable this option anytime want. Just follow the below steps:
- Open the Settings menu.
- Now, tap on the Developer Options.
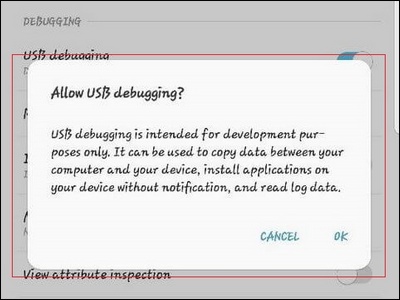
- Then, locate ‘USB Debugging’
- Tap on this entity to enable the ‘USB Debugging’, a popup will appear like this:
- Give your confirmation to enable this option.
- Exit this menu.
That’s it, you’ve successfully enabled the USB Debugging on your Samsung Galaxy On6 smartphone. Now, you’re ready to connect with Android Debugging, Odin and other similar tools.
Moreover, we recommend you to thoroughly explore the Developer Options, that can improve your Android experience very much. You can control animations, background processes, analyze running services, and a lot you could with the Developer Options.
That ends our tutorial on how to activate Developer Options and USB Debugging on Galaxy O6 smartphone. Use the comment section below to share your thoughts and views on this. We would love to hear your feedback. Stay connected with us with more useful content and tutorials.

