Neural TTS: The Complete Technical Guide (2026 Benchmarks, Code Examples & Implementation Tutorial)
You might be wondering: has neural text-to-speech (TTS) finally crossed the threshold into “indistinguishable from human”? The answer, according to recent testing by PlayHT, appears to be yes. Their neural TTS model achieved a 71.49% human fooling rate, meaning listeners mistook AI-generated speech for human recordings 71% of the time. For context, actual human reference recordings scored 70.68% in the same test.
What this means for you: We’ve reached an inflection point where neural TTS can sound remarkably human-like, and the technical barriers to implementing it have dropped significantly.
Why this matters (the numbers)
The global neural TTS market, valued at $4.8 billion in 2025 according to Global Market Insights, is projected to reach $35.3 billion by 2035 (22.4% CAGR). Neural models now account for 68% of all TTS revenue, which effectively marks the end of concatenative and parametric synthesis for most production use cases.
But here’s what’s more interesting than the market numbers: the accessibility of this technology has exploded. In 2024, usable voice cloning typically required 5+ minutes of clean audio and a $99/month subscription. In 2026, you can create a convincing voice clone from 3 seconds of audio using free open-source models on a consumer GPU.
What you’ll find in this guide
I’ve structured this guide to help you understand and implement neural TTS effectively:
- ✅ How neural TTS works (with architecture diagrams that most articles tend to skip)
- ✅ 2026 performance benchmarks (latency, quality, and cost—with clear methodology)
- ✅ Step-by-step implementation (3 cloud API options + 2 self-hosted alternatives)
- ✅ Voice cloning best practices (including the legal considerations that many tutorials overlook)
- ✅ Production optimization strategies (that may help reduce costs by 40-70%)
- ✅ Content gaps from competitor analysis (covering topics that other resources often miss)
Let’s start with the fundamentals—understanding what makes neural TTS different from what came before it.
What Makes Neural TTS Different? (Understanding the Technology)
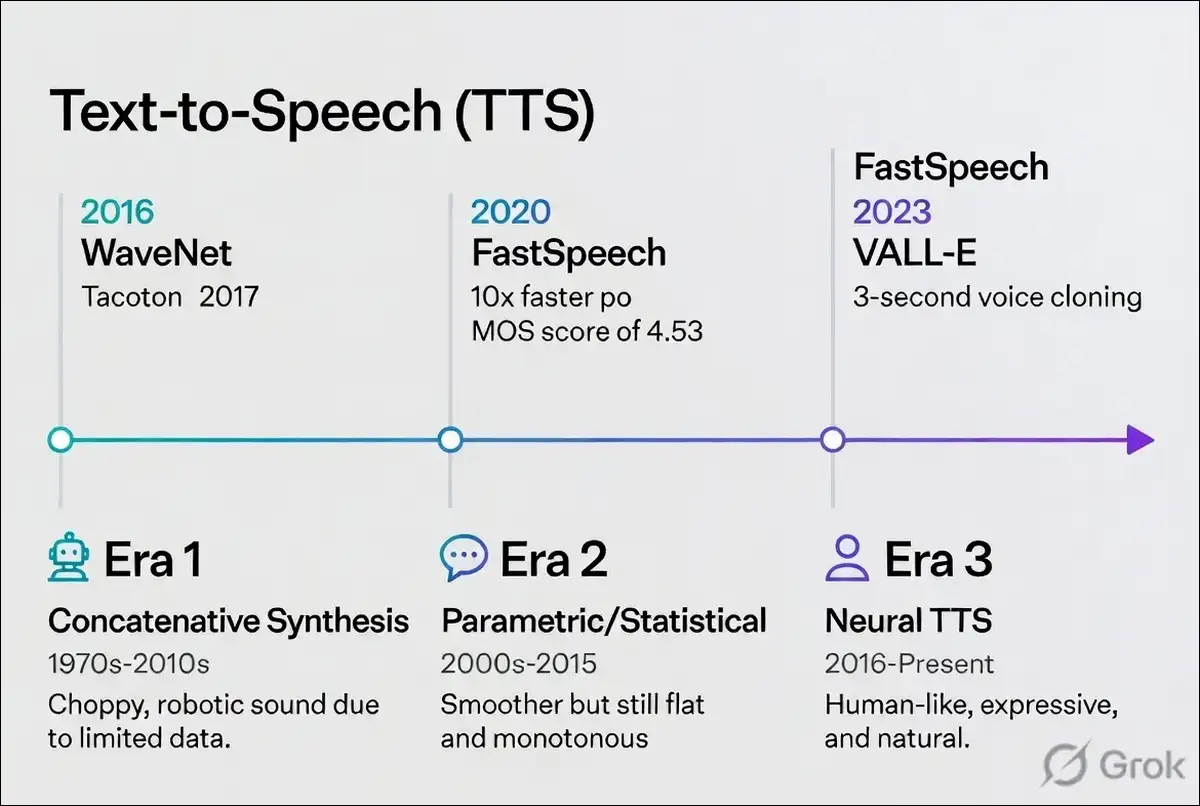
The Three Eras of Text-to-Speech
To appreciate why neural TTS represents such a significant advancement, you might find it helpful to understand the evolution of speech synthesis.
Era 1: Concatenative Synthesis (1970s-2010s)
How it worked:
Engineers would record hours of human speech, chop it into tiny sound fragments (phonemes, diphones), and reassemble them to form new sentences.
The core problem:
Every transition between fragments sounded slightly unnatural. The result? Robotic, choppy audio that no amount of post-processing could fully resolve.
A familiar example: This is why early GPS navigation voices sounded so unpleasant to listen to.
Era 2: Parametric/Statistical Synthesis (2000s-2015)
How it worked:
Instead of stitching recordings together, parametric models used Hidden Markov Models (HMMs) to mathematically model speech features (pitch, duration, spectral envelope), then ran those parameters through a vocoder to generate audio.
The improvement:
Smoother audio, since there were no “stitches” between sound fragments.
The remaining limitation:
Vocoder artifacts. The speech sounded smooth but flat—somewhat like a synthesizer attempting to sound human, but missing the subtle variations that make speech engaging.
Era 3: Neural TTS (2016-Present)
The breakthrough:
In September 2016, DeepMind introduced WaveNet, a deep neural network that generated raw audio waveforms directly. Rather than stitching fragments or calculating parameters, WaveNet learned the patterns of human speech from thousands of hours of recordings.
The result:
The first TTS system that didn’t sound obviously synthetic. WaveNet achieved a Mean Opinion Score (MOS) of 4.21 out of 5, compared to 4.58 for professional human recordings according to Google Research—a gap of just 0.37 MOS points.
The limitation (in 2016):
WaveNet required hours of computation to generate 1 second of audio. It was academically impressive but not yet practical for commercial use.
The rapid evolution (2017-2026):
- 2017: Tacotron 2 (Google) combined Seq2Seq models with WaveNet vocoder → 4.53 MOS (near-human quality)
- 2018: Parallel WaveGAN → Enabled real-time waveform generation
- 2020: FastSpeech / FastSpeech 2 → Non-autoregressive architecture (10x faster inference)
- 2022: VITS → End-to-end with VAE + Flow
- 2023: VALL-E (Microsoft) → Zero-shot voice cloning from 3-second samples
- 2026: Multiple models now achieve <300ms latency with >4.4 MOS quality
Also read: Pippit AI Alternatives
⚙️ How Neural TTS Works: The 3-Stage Pipeline
Input → Mel-Spectrogram → WaveformHow Neural TTS Works (Technical Overview)
The key idea: Every modern neural TTS system typically follows a three-stage pipeline:
[Text Input: "Hello, world!"]
        ↓
═══════════════════════════════════
STAGE 1: TEXT ANALYSIS
═══════════════════════════════════
    ↓
[Text Normalization]
"$100" → "one hundred dollars"
"2026" → "twenty twenty-six"
    ↓
[Grapheme-to-Phoneme (G2P) Conversion]
"Hello" → /HH AH L OW/
    ↓
[Linguistic Feature Extraction]
* Part-of-speech tags
* Syntactic structure
* Emphasis markers
        ↓
═══════════════════════════════════
STAGE 2: ACOUSTIC MODELING
═══════════════════════════════════
    ↓
[Deep Learning Model] (Tacotron 2 / FastSpeech 2 / VITS)
Input:  Phoneme sequence + Linguistic features
Output: Mel-spectrogram (80-128 mel bands)
    ↓
[Prosody Prediction] (learned from training data)
* Pitch contour
* Duration of each phoneme
* Energy (volume) variations
        ↓
═══════════════════════════════════
STAGE 3: VOCODER (Waveform Synthesis)
═══════════════════════════════════
    ↓
[Neural Vocoder] (HiFi-GAN / WaveGlow / UnivNet)
Input:  Mel-spectrogram
Output: Raw audio waveform (24-48 kHz)
    ↓
[Post-Processing]
* Audio compression (MP3/WAV)
* Volume normalization
* Optional: SSML effects
        ↓
[Audio Output: "hello_world.wav"]
Stage 1 Detail: Text Analysis
What it does: Converts raw text into a phoneme sequence that the acoustic model can process effectively.
Key challenges you might encounter:
- Homograph disambiguation:
- “Read” (present) vs. “read” (past) → Different pronunciations
- “Live” (/lɪv/ “alive” vs. /laɪv/ “reside”)
- Text normalization:
- “$100” → “one hundred dollars” (English) vs. “cien dólares” (Spanish)
- “2026-07-10” → “July tenth, twenty twenty-six”
- Abbreviation expansion:
- “Dr.” → “Doctor” (or “Drive” depending on context)
- “AI” → “artificial intelligence” (or “A-I” as letters)
Modern approach: Transformer-based G2P models (like DeepPhonemizer) that consider sentence-level context rather than word-by-word lookup, which tends to improve accuracy.
Stage 2 Detail: Acoustic Modeling
What it does: Predicts the acoustic features (mel-spectrogram) from the phoneme sequence.
Two dominant architectures in 2026:
| Architecture | Type | What it’s good at | What to consider | When you might use it |
|---|---|---|---|---|
| Tacotron 2 | Autoregressive Seq2Seq | Highest quality, handles OOV words well | Slower (200-500ms latency), attention errors possible | High-quality narration |
| FastSpeech 2 | Non-autoregressive Transformer | Fast (50-150ms), robust (no attention failures) | Slightly lower naturalness | Real-time voice agents |
| VITS | End-to-end VAE+Flow | Excellent prosody, single model to train | Complex to train, larger model size | Expressive/artistic content |
Why FastSpeech 2 is faster:
Tacotron 2 generates mel-spectrogram frames sequentially (autoregressive)—each frame depends on the previous one. FastSpeech 2 generates all frames in parallel (non-autoregressive) using a Length Regulator that expands phonemes to match their durations.
Tacotron 2 (Autoregressive):
Phoneme 1 → Frame 1 → Frame 2 → Frame 3 → ... → Frame N
           ↑                                ↑
       (attention-based alignment)      (sequential = slower)

FastSpeech 2 (Non-autoregressive):
Phoneme 1 (duration=3) → [Frame 1, Frame 2, Frame 3]
Phoneme 2 (duration=2) → [Frame 4, Frame 5]
Phoneme 3 (duration=4) → [Frame 6, Frame 7, Frame 8, Frame 9]
              ↑
         (all computed in parallel = faster)
Stage 3 Detail: Neural Vocoder
What it does:
Converts the mel-spectrogram (which is a compressed representation of speech) into a raw audio waveform.
Why this stage matters:
The mel-spectrogram is essentially a “blueprint” of speech—it contains all the information needed to reconstruct audio, but it’s not actually audio. The vocoder is what builds the actual sound waves.
Leading approaches in 2026:
- HiFi-GAN (GAN-based)
- Real-Time Factor (RTF): 0.09 (generates 1 second of audio in 0.09 seconds)
- Quality: Excellent (MOS > 4.4)
- VRAM usage: ~1GB
- Why it works: Uses adversarial training (generator + discriminator) to produce high-fidelity audio efficiently
- WaveGlow (Flow-based)
- RTF: 0.05 (even faster than HiFi-GAN)
- Quality: Very good (MOS ~4.3)
- VRAM usage: ~2GB
- Why it works: Uses normalizing flows (invertible transformations) for stable training
- UnivNet (GAN + Mel-spec)
- RTF: 0.07
- Quality: Excellent
- VRAM usage: ~1.5GB
- Why it works: Improved discriminator architecture (Multi-Period + Multi-Scale)
Key Innovations That Made Neural TTS Possible
1. Attention Mechanisms (2014+)
The challenge addressed: Before attention mechanisms, Seq2Seq models struggled to align input text with output spectrograms. Attention allows the model to “look” at relevant input positions when generating each output frame.
The benefit: This innovation helped eliminate skipped or repeated words (a common problem in early neural TTS).
2. WaveNet (2016)
What it introduced: The first neural vocoder to generate raw audio waveforms directly, using dilated convolutions to capture long-range dependencies in audio.
The impact: A significant quality jump from “robotic” to “this sounds almost human.”
3. Parallel WaveGAN / HiFi-GAN (2019-2020)
What they introduced: Generative Adversarial Networks (GANs) to vocoder training. The generator tries to create realistic audio; the discriminator tries to detect fake audio. This adversarial process produces higher quality than pure maximum-likelihood training.
The impact: Made real-time inference speed practical (previously, WaveNet needed supercomputers).
4. Non-Autoregressive Architectures (FastSpeech, 2020)
What they changed: Eliminated sequential dependencies in acoustic modeling. Used duration prediction as a separate module to determine how many spectrogram frames each phoneme should produce.
The impact: 10-50x faster training and inference.
5. Pre-trained Language Model Integration (2023+)
What recent models do: Models like VALL-E and Qwen3-TTS use pre-trained text LLMs (like GPT or LLaMA) to better understand input text semantics before generating speech.
The impact: Better prosody, more natural emphasis, and improved handling of complex sentences.
Comparison: Neural TTS vs. Traditional TTS
| Feature | Concatenative TTS | Parametric TTS | Neural TTS |
|---|---|---|---|
| Voice Quality | Choppy, obviously synthetic | Smooth but flat | Human-like, expressive |
| Prosody | Rule-based, robotic | Rule-based, limited | Learned from data, natural |
| Emotional Range | None | Minimal (preset modes) | Rich (gradient emotions) |
| Pronunciation | Dictionary-based | Dictionary-based | Context-aware |
| New Voice Creation | Days of studio recording | Days of recording + training | Transfer learning (hours of data) |
| Computational Cost | Low (just playback) | Medium | Higher (GPU recommended) |
| Real-time Capable? | Yes (instant) | Yes (fast) | Yes (with optimization) |
| Multilingual | Each language separate | Each language separate | Multilingual models share learning |
| Training Data Needed | 10-100 hours per voice | 10-100 hours per voice | 100-1000+ hours (base model) |
| Example Systems | Old GPS voices | Festival, MaryTTS | ElevenLabs, Azure Neural, Coqui TTS |
What this means for you: Neural TTS offers the best quality for most use cases. Traditional TTS might only be preferable in ultra-low-resource environments (embedded devices with <100MB RAM and no GPU). For approximately 95% of use cases in 2026, neural TTS is likely the right choice.
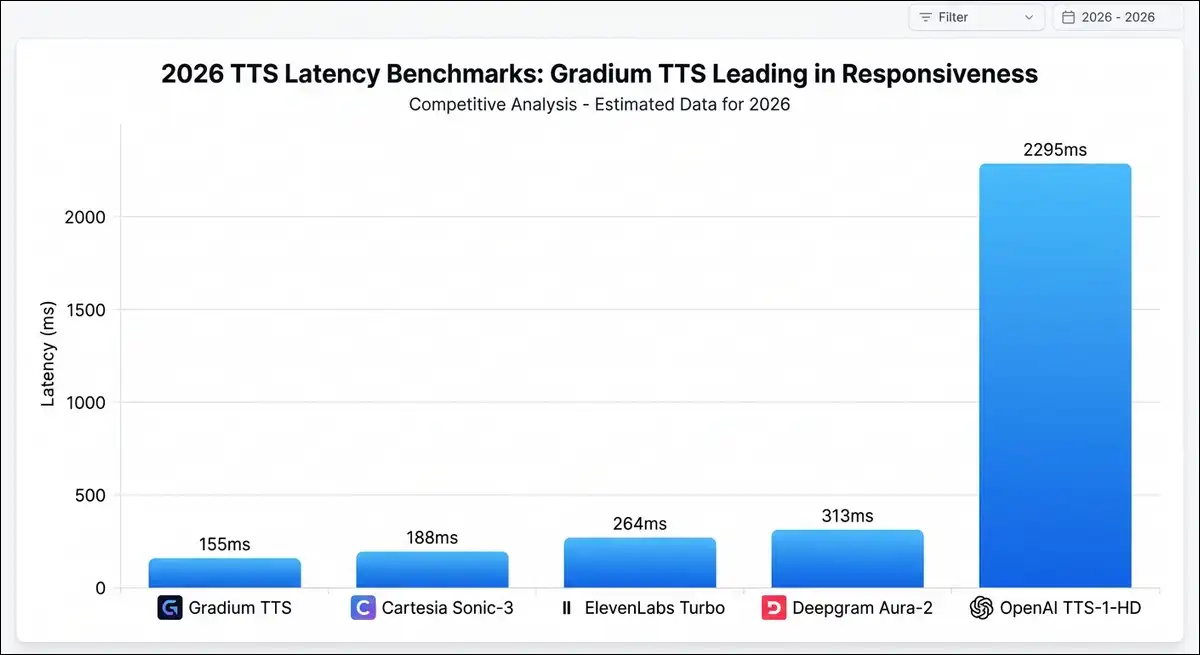
Performance Benchmarks (Latency, Quality, Cost) In 2026
You might notice that every TTS vendor claims to be “the fastest” and “the most natural.” To help you evaluate these claims, let’s look at independent benchmark data from Coval (May 2026) and Artificial Analysis.
Latency Benchmarks (Time to First Audio – TTFA)
What is TTFA?
The time between sending text to the TTS API and receiving the first chunk of audio. This matters for real-time voice agents—you want the user to hear something within 200-300ms of the AI finishing its response.
Benchmark Methodology (Coval, May 2026):
- Test setup: 750-2,400 API calls per model, US-East region
- Text length: 50-200 characters (typical voice agent response)
- Measurement points: TTFA (Time to First Audio), Total Generation Time
- Network: Commercial-grade internet (not localhost)
- Hardware: Standard cloud VM (not optimized for inference)
Results: TTFA Latency (Milliseconds)
| Rank | Provider/Model | P50 TTFA | P25-P75 Range | WER (%) | Real-Time Viable? |
|---|---|---|---|---|---|
| 1 | Gradium TTS | 155ms | 154-156ms | 3.3% | ✅ Yes |
| 2 | Cartesia Sonic-3 | 188ms | 168-269ms | N/A* | ✅ Yes (P75 borderline) |
| 3 | ElevenLabs Turbo v2.5 | 264ms | 251-279ms | 5.2% | ✅ Yes |
| 4 | ElevenLabs Flash v2.5 | 288ms | 276-304ms | 5.2% | ✅ Yes |
| 5 | Deepgram Aura-2 | 313ms | 274-342ms | 6.4% | ✅ Yes (borderline) |
| 6 | Rime Mist-v3 | 337ms | 281-662ms | 4.7% | ⚠️ Marginal |
| 7 | Rime Arcana | 450ms | 430-636ms | 6.1% | ❌ No |
| 8 | ElevenLabs Multilingual v2 | 1,232ms | 1,178-1,288ms | 3.9% | ❌ No (batch only) |
| 9 | OpenAI TTS-1-HD | 2,295ms | 1,870-2,932ms | 6.3% | ❌ No (batch only) |
N/A = WER not publicly reported
⚡ TTFA Latency Benchmarks – May 2026 (Coval)
Time to First Audio • Lower is better • Real-time agents need <300ms
Key findings you might find useful:
- Gradium TTS achieves the lowest latency (155ms) and the lowest WER (3.3%) simultaneously. This challenges the conventional wisdom that “lower latency = lower quality.”
- Cartesia Sonic-3 is competitive on P50 (188ms) but has high variance (IQR = 100ms). For voice agents, consistent latency often matters more than best-case latency.
- OpenAI TTS-1-HD is surprisingly slow (2,295ms P50). It’s designed for batch narration, not real-time use.
- Sub-300ms TTFA appears to be the threshold for “feels instant” to users. All top 5 providers clear this threshold.
TTFA Perception Guide
| TTFA Range | User Perception | Suitable Use Cases |
|---|---|---|
| <100ms | Imperceptible delay | Ultra-premium voice agents |
| 100-200ms | Not perceived as delay | Voice agents, AI phone calls |
| 200-300ms | At threshold of perceptible | Voice agents (acceptable) |
| 300ms+ | Perceptible pause | Content creation, batch narration |
Quality Benchmarks (Mean Opinion Score – MOS)
What is MOS?
Human listeners rate audio naturalness on a 1-5 scale:
- 5: Excellent (indistinguishable from human)
- 4: Good (minor artifacts)
- 3: Fair (noticeably synthetic)
- 2: Poor (very robotic)
- 1: Bad (unintelligible)
Important note: MOS tests are expensive (need 20+ listeners per sample × hundreds of samples). Most vendors self-report MOS without publishing test methodology.
The numbers below are from peer-reviewed papers or independent testing via the Artificial Analysis TTS Arena.
Reported MOS Scores (Verified Sources)
| Model | MOS Score | Comparison |
|---|---|---|
| Human Reference | 4.58 | Gold standard |
| Tacotron 2 + WaveNet | 4.53 | Near-human |
| Azure Neural TTS (Dragon HD) | 4.29-4.58 | Enterprise-grade |
| Fish Audio S2 | 4.48 (UTMOS) | Leading open-weight |
| Azure Neural TTS (Standard) | 4.38 | Good for most use |
| XTTS v2 (Coqui) | 4.0 | Good for cloning |
| FastSpeech 2 | 3.89 | Decent, fast |
| Piper (on-device) | 3.5 | Edge-optimized |
A note on interpretation: MOS is a compressive metric—the difference between 4.0 and 4.5 represents a huge gap in perceived quality, but only shows as 0.5 points. You might want to listen to samples before making decisions based solely on MOS scores.
Word Error Rate (WER) Benchmarks
What is WER?
The percentage of words mispronounced or skipped by the TTS system. Lower values indicate better performance.
Why it matters:
A voice agent that says “Your order number is for 7-2-3” instead of “4-7-2-3” will likely confuse users and require repetition (which increases handle time).
WER Results (Coval Benchmark, May 2026)
| Rank | Provider/Model | Avg WER | P50 TTFA | WER-TTFA Tradeoff? |
|---|---|---|---|---|
| 1 | Gradium TTS | 3.3% | 155ms | ✅ No (best of both) |
| 2 | ElevenLabs Multilingual v2 | 3.9% | 1,232ms | ❌ Yes (slow) |
| 3 | Rime Mist-v3 | 4.7% | 337ms | ⚠️ Slightly high WER |
| 4 | ElevenLabs Flash v2.5 | 5.2% | 288ms | ⚠️ Acceptable |
| 4 | ElevenLabs Turbo v2.5 | 5.2% | 264ms | ⚠️ Acceptable |
| 6 | Rime Arcana | 6.1% | 450ms | ❌ High WER + slow |
| 7 | OpenAI TTS-1-HD | 6.3% | 2,295ms | ❌ High WER + very slow |
| 8 | Deepgram Aura-2 | 6.4% | 313ms | ❌ Highest WER |
What this might mean for your use case: If you’re building voice agents for healthcare, finance, or legal applications (where accuracy is critical), Gradium TTS currently offers the best accuracy-speed combination. For entertainment/gaming (where perfect accuracy is less critical), ElevenLabs or Cartesia may work well.
🎙️ MOS Quality Scores (1-5)
💰 Cost per 1M Characters (Jun 2026)
Cost Analysis: TTS Pricing in 2026 (Per 1M Characters)
Why “per 1M characters” matters:
1 million characters ≈ 10-15 hours of generated audio (at 150 words per minute). This is a practical volume for mid-sized projects.
Pricing Table (June 2026)
| Provider | Cheapest Tier | Neural Tier | HD/Premium Tier | Free Tier |
|---|---|---|---|---|
| Amazon Polly | $4/1M (Standard) | $16/1M (Neural) | $30/1M (Generative) | 5M chars/month (12 mo) |
| Azure Neural | – | $16/1M (Neural) | $22/1M (Neural HD) | 5M chars/month (12 mo) |
| Google Cloud | $4/1M (Legacy) | $16/1M (Neural2) | $30/1M (Chirp 3 HD) | 1M chars/month |
| ElevenLabs | $5/month (30K chars) | $22/1M (Creator) | $50/1M (Flash) | 10K chars/month |
| Deepgram | – | $30/1M (Aura-2) | – | No |
| Cartesia | $5/month (100K credits) | $0.065/1K chars | – | 1K chars/month |
| Fish Audio | $11/month | $15/1M UTF-8 bytes | – | 7 min/month |
Cost per hour of audio (approximate):
- Amazon Polly Neural: $16 per ~12 hours = $1.33/hour
- Azure Neural: $16 per ~12 hours = $1.33/hour
- ElevenLabs Creator: $22 per ~8 hours = $2.75/hour
- Self-hosted (Coqui TTS): GPU time (~$0.30/hour on RTX 3060) = $0.30/hour (+ upfront training cost)
A cost consideration to keep in mind:
Most providers charge per character, not per API call. But streaming TTS (for voice agents) typically makes multiple API calls per conversation (one per response chunk). If you’re not careful, you can increase your costs by 2-5x by enabling streaming. You might want to check if your provider charges extra for streaming.
Implementation Tutorials (Step-by-Step)
🚀 Choose Your Implementation Path
from elevenlabs import generate
model = “xtts_v2”
# 2.3GB download
–model en_US-amy-low.onnx
Now for the practical part. Here are three ways you can implement neural TTS, ranging from “easiest (5 minutes)” to “most control (self-hosted).”
Option 1: Cloud API Integration (Easiest, Fastest)
What this is good for: Prototyping, low-volume use, teams without GPU resources
Tutorial A: ElevenLabs API (Highest Quality)
Prerequisites:
- ElevenLabs account (free tier: 10K chars/month)
- API key from elevenlabs.io
Step 1: Install the SDK
pip install elevenlabsStep 2: Basic TTS Generation
from elevenlabs import generate, play, set_api_key
import os

# Set your API key
set_api_key(os.getenv("ELEVEN_API_KEY"))

def generate_speech(text, voice="Rachel", model="eleven_turbo_v2"):
    """
    Generate speech with ElevenLabs

    Args:
        text: Text to synthesize (max 5,000 chars per request)
        voice: Voice ID (see elevenlabs.io/voices for options)
        model: Model to use (turbo_v2 = fast, multilingual_v2 = best quality)

    Returns:
        Audio data (play automatically or save to file)
    """
    audio = generate(
        text=text,
        voice=voice,
        model=model
    )

    # Play audio immediately (for testing)
    play(audio)

    return audio

# Example usage
generate_speech("Hello! This is a test of neural text-to-speech.")
Step 3: Save to File (for Production Use)
from elevenlabs import save

def save_speech(text, output_path, voice="Rachel"):
    audio = generate(text=text, voice=voice)
    save(audio, output_path)

# Generate an audiobook chapter
save_speech(
    text="Chapter 1. It was the best of times, it was the worst of times...",
    output_path="chapter_1.mp3",
    voice="Patrick"  # Deep, narrative voice
)
Step 4: Streaming for Voice Agents (Low Latency)
from elevenlabs.client import ElevenLabs
import websockets
import json
import asyncio

client = ElevenLabs(api_key=os.getenv("ELEVEN_API_KEY"))

async def stream_tts(text_chunk):
    """
    Stream audio chunks for real-time playback
    Critical for voice agents (reduces Time to First Audio)
    """
    uri = "wss://api.elevenlabs.io/v1/text-to-speech/stream"

    async with websockets.connect(uri) as ws:
        # Send synthesis request
        await ws.send(json.dumps({
            "text": text_chunk,
            "model_id": "eleven_turbo_v2",
            "voice_settings": {
                "stability": 0.5,      # 0.0 = more variable, 1.0 = more stable
                "similarity_boost": 0.75  # 0.0 = less like reference, 1.0 = more like
            }
        }))

        # Receive and play audio chunks in real-time
        while True:
            message = await ws.recv()
            # In production: stream to audio player immediately
            yield message

# Usage in voice agent
async def handle_user_message(user_text):
    # 1. Transcribe user speech (STT)
    # 2. Generate AI response (LLM)
    response_text = "I understand your question. Let me help with that."

    # 3. Stream TTS response (starts playing while still generating)
    async for audio_chunk in stream_tts(response_text):
        play_audio_chunk(audio_chunk)  # Your audio playback function
Common Issues & Fixes:
| Error | Likely Cause | What you can try |
|---|---|---|
RateLimitError | Exceeded API quota | Implement exponential backoff + upgrade plan |
VoiceNotFound | Invalid voice ID | Call client.voices.get_all() to list valid IDs |
| Robotic output | Using Standard model | Switch to eleven_turbo_v2 or multilingual_v2 |
| High latency | Not using streaming | Implement WebSocket streaming (code above) |
Tutorial B: Azure Neural TTS (Most Languages)
Why you might choose Azure:
- 140+ languages (most of any provider)
- 400+ voices (including regional accents)
- Enterprise compliance (HIPAA, GDPR, SOC 2)
- SSML support (fine-grained control over pronunciation, pauses, emphasis)
Prerequisites:
- Azure Speech Services resource (free tier: 5M chars/month for 12 months)
- API key from Azure Portal
Step 1: Install the SDK
pip install azure-cognitiveservices-speechStep 2: Basic TTS Generation
import azure.cognitiveservices.speech as speechsdk
import os

def synthesize_speech(text, output_file="output.wav"):
    """
    Generate speech with Azure Neural TTS

    Args:
        text: Text to synthesize
        output_file: Path to save WAV file
    """
    # Configure speech config
    speech_config = speechsdk.SpeechConfig(
        subscription=os.getenv("AZURE_SPEECH_KEY"),
        region=os.getenv("AZURE_REGION", "eastus")
    )

    # Set neural voice (en-US-JennyNeural is high-quality, expressive)
    speech_config.speech_synthesis_voice_name = "en-US-JennyNeural"

    # Configure audio output
    audio_config = speechsdk.audio.AudioOutputConfig(filename=output_file)

    # Create synthesizer and generate speech
    synthesizer = speechsdk.SpeechSynthesizer(
        speech_config=speech_config,
        audio_config=audio_config
    )

    result = synthesizer.speak_text_async(text).get()

    # Check result
    if result.reason == speechsdk.ResultReason.SynthesizingAudioCompleted:
        print(f"Speech synthesized to [{output_file}]")
    elif result.reason == speechsdk.ResultReason.Canceled:
        cancellation = result.cancellation_details
        print(f"Synthesis canceled: {cancellation.reason}")
        print(f"Error details: {cancellation.error_details}")

# Example
synthesize_speech(
    text="Hello! Welcome to Azure Neural Text-to-Speech.",
    output_file="welcome.wav"
)
Step 3: Advanced SSML Control (Unique to Azure)
SSML (Speech Synthesis Markup Language) lets you control exactly how the TTS renders your text.
def synthesize_with_ssml():
    speech_config = speechsdk.SpeechConfig(
        subscription=os.getenv("AZURE_SPEECH_KEY"),
        region="eastus"
    )

    # SSML with prosody control, pauses, and emphasis
    ssml_text = """
    <speak version="1.0" xmlns="http://www.w3.org/2001/10/synthesis" xml:lang="en-US">
        <voice name="en-US-JennyNeural">
            <prosody rate="-10%" pitch="+5%">
                Hello!
            </prosody>
            <break time="500ms"/>
            <prosody rate="0%" pitch="0%">
                This is <emphasis level="strong">important</emphasis>:
                your order has shipped.
            </prosody>
            <break time="300ms"/>
            <prosody rate="+5%" pitch="+2%">
                Would you like me to text you the tracking link?
            </prosody>
        </voice>
    </speak>
    """

    synthesizer = speechsdk.SpeechSynthesizer(speech_config=speech_config)
    result = synthesizer.speak_ssml_async(ssml_text).get()

    # Save result
    with open("ssml_output.wav", "wb") as f:
        f.write(result.audio_data)

synthesize_with_ssml()
SSML Reference Guide:
| Tag | Purpose | Example |
|---|---|---|
<prosody rate="..."> | Control speaking speed | rate="+20%" (faster), rate="-10%" (slower) |
<prosody pitch="..."> | Control voice pitch | pitch="+10%" (higher), pitch="-5%" (lower) |
<break time="..."> | Add pause | time="500ms" or time="2s" |
<emphasis level="..."> | Emphasize words | level="strong" or level="moderate" |
<phoneme alphabet="..." ph="..."> | Custom pronunciation | ph="wʊn ˈhʌndrəd" (IPA) |
Option 2: Self-Hosted Open-Source (Privacy, Cost Control)
What this is good for: High-volume use, privacy-sensitive applications, customization
Tutorial: Coqui TTS with XTTS v2 (Best Open-Source Option)
Why you might consider Coqui TTS:
- Free and open-source (no usage limits)
- Voice cloning from 6-second samples
- 17 languages supported
- Local execution (no data sent to cloud)
Prerequisites:
- Python 3.8+
- NVIDIA GPU with 4GB+ VRAM (recommended for real-time speed)
- Or CPU (slower: ~2.5x real-time factor)
Step 1: Install Coqui TTS
# Create virtual environment (recommended)
python -m venv tts_env
source tts_env/bin/activate  # Linux/Mac
# tts_env\Scripts\activate  # Windows

# Install TTS
pip install TTS

# Verify installation
tts --list_models
Step 2: Basic TTS Generation
from TTS.api import TTS

# Initialize with XTTS v2 (best open-source model)
# First run will download model (~2.3GB)
tts = TTS(model_name="tts_models/multilingual/multi-dataset/xtts_v2")

def generate_basic(text, output_path="output.wav"):
    """
    Generate speech with default voice
    """
    tts.tts_to_file(
        text=text,
        file_path=output_path,
        language="en"
    )
    print(f"Generated: {output_path}")

# Example
generate_basic("Hello! This is open-source neural text-to-speech.")
Step 3: Voice Cloning (Advanced)
This is where Coqui TTS shines—you can clone any voice from a short audio sample.
def clone_voice(text, reference_audio, output_path="cloned.wav"):
    """
    Clone a voice from reference audio

    Args:
        text: Text to synthesize in cloned voice
        reference_audio: Path to WAV/MP3 file (6-20 seconds ideal)
        output_path: Where to save generated audio
    """
    tts.tts_to_file(
        text=text,
        speaker_wav=reference_audio,  # The voice to clone
        language="en",
        file_path=output_path
    )
    print(f"Cloned voice saved to: {output_path}")

# Example: Clone a voice from a 10-second sample
clone_voice(
    text="This is what the cloned voice sounds like. Pretty cool, right?",
    reference_audio="path/to/your_voice_sample.wav",
    output_path="my_cloned_voice.wav"
)
Voice Cloning Best Practices:
- Reference audio quality: You might want to use 16kHz+ WAV (not low-bitrate MP3)
- Content: Natural conversational speech tends to work better than reading a script
- Duration: 10-20 seconds is often the sweet spot (6s works, 30s is better)
- Variety: Including questions, statements, and different emotions can improve results
- Speaker consistency: Use only one speaker in reference audio (no background voices)
Step 4: Multilingual Cloning
XTTS v2 supports cross-lingual voice cloning—you can clone a voice in English, then generate speech in Spanish/French/etc. while keeping the voice characteristics.
def multilingual_clone():
    # Clone English voice, speak Spanish
    tts.tts_to_file(
        text="Hola! ¿Cómo estás?",  # Spanish text
        speaker_wav="english_voice_sample.wav",  # English reference
        language="es",  # Generate in Spanish
        file_path="english_person_speaking_spanish.wav"
    )

    # Clone English voice, speak French
    tts.tts_to_file(
        text="Bonjour! Comment allez-vous?",
        speaker_wav="english_voice_sample.wav",
        language="fr",
        file_path="english_person_speaking_french.wav"
    )

multilingual_clone()
Supported languages (XTTS v2):
English, Spanish, French, German, Italian, Portuguese, Polish, Turkish, Russian, Dutch, Czech, Arabic, Chinese, Japanese, Korean, Hungarian, Hindi
Option 3: Edge/On-Device Deployment (Privacy-First)
What this is good for: Offline applications, edge devices (Raspberry Pi, mobile), privacy-critical use cases.
Tutorial: Piper TTS (Ultra-Lightweight)
Why you might choose Piper:
- <100MB VRAM (runs on CPU, even Raspberry Pi)
- Real-Time Factor: 0.008 (125x faster than real-time on CPU!)
- Apache 2.0 license (fully commercial-friendly)
- 82M parameters (tiny but decent quality)
Step 1: Download Piper Binary
# Linux x86_64
wget https://github.com/rhasspy/piper/releases/download/2023.11.14-2/piper_linux_x86_64.tar.gz
tar -xzf piper_linux_x86_64.tar.gz
cd piper/

# Also download a voice model (82MB for English)
wget https://huggingface.co/rhasspy/piper-voices/resolve/main/en_US/amy/low/en_US-amy-low.onnx
wget https://huggingface.co/rhasspy/piper-voices/resolve/main/en_US/amy/low/en_US-amy-low.onnx.json
Step 2: Generate Speech (Command Line)
# Basic usage
echo "Hello from the edge! This runs on a Raspberry Pi." | ./piper \
    --model en_US-amy-low.onnx \
    > output.wav

# Batch processing (from file)
cat long_text.txt | ./piper \
    --model en_US-amy-low.onnx \
    > long_audio.wav
Step 3: Python Integration
import subprocess
import tempfile

def piper_tts(text, output_path="output.wav"):
    """
    Generate speech using Piper (on-device TTS)
    """
    # Write text to temporary file
    with tempfile.NamedTemporaryFile(mode='w', delete=False) as f:
        f.write(text)
        temp_path = f.name

    # Run Piper
    cmd = [
        "./piper/piper",
        "--model", "piper/en_US-amy-low.onnx",
        "--output_file", output_path
    ]

    with open(temp_path, 'r') as input_file:
        with open(output_path, 'wb') as output_file:
            subprocess.run(cmd, stdin=input_file, stdout=output_file)

    print(f"Generated: {output_path}")

# Example
piper_tts(
    text="This is running entirely on-device. No cloud needed!",
    output_path="edge_tts.wav"
)
Performance on Edge Devices:
| Device | Real-Time Factor | Latency (P50) | Quality (MOS) |
|---|---|---|---|
| Raspberry Pi 4 | 0.95 | ~150ms | 3.5 |
| Intel NUC (i5) | 0.08 | ~50ms | 3.5 |
| Android (Snapdragon 8 Gen 2) | 0.12 | ~80ms | 3.5 |
| iPhone 15 (Neural Engine) | 0.05 | ~30ms | 3.5 |
Also read: Adobe Podcast vs Descript vs Cleanvoice AI
Voice Cloning with Neural TTS (Advanced Techniques)
Voice cloning is perhaps the most transformative—and controversial—application of neural TTS. Let’s explore how it works and what you should consider before using it.
🧬 How Voice Cloning Works – Speaker Embedding
L2 normalized → unit hypersphere
How Voice Cloning Works (Technical Explanation)
The core idea: Extract a mathematical representation of a speaker’s voice characteristics (called a speaker embedding), then condition the TTS model to generate speech with those characteristics.
Step 1: Speaker Embedding Extraction
A speaker encoder (usually an LSTM or Transformer model) processes the reference audio’s mel-spectrogram and outputs a fixed-length vector (e.g., 256 dimensions) that captures:
- Timbre (voice “texture”)
- Pitch range
- Speaking rate
- Accent/dialect markers
- Emotional baseline
# Conceptual code (simplified)
import torch
import torch.nn as nn

class SpeakerEncoder(nn.Module):
    def __init__(self, mel_dim=80, embedding_dim=256):
        super().__init__()
        # LSTM processes mel-spectrogram sequence
        self.lstm = nn.LSTM(mel_dim, 512, num_layers=3, batch_first=True)
        self.projection = nn.Linear(512, embedding_dim)

    def forward(self, mel_spectrogram):
        """
        Args:
            mel_spectrogram: [batch, time, 80] (mel bands)
        Returns:
            speaker_embedding: [batch, 256] (normalized)
        """
        lstm_out, (h_n, c_n) = self.lstm(mel_spectrogram)

        # Use last hidden state (captures entire utterance)
        speaker_emb = self.projection(h_n[-1])

        # L2 normalize (so embeddings are on unit hypersphere)
        speaker_emb = torch.nn.functional.normalize(speaker_emb, p=2, dim=1)

        return speaker_emb

# Usage
encoder = SpeakerEncoder()
reference_mel = extract_mel("reference_voice.wav")  # [1, T, 80]
speaker_emb = encoder(reference_mel)  # [1, 256]
Step 2: Conditioning TTS on Speaker Embedding
The speaker embedding is concatenated with the text/phoneme embeddings, so the acoustic model generates speech in that voice.
# Inside the TTS acoustic model (conceptual)
class AcousticModel(nn.Module):
    def forward(self, phonemes, speaker_emb):
        # Encode phonemes
        phoneme_emb = self.phoneme_embedding(phonemes)  # [batch, seq_len, 256]

        # Expand speaker embedding to match sequence length
        speaker_emb_expanded = speaker_emb.unsqueeze(1).expand(
            -1, phoneme_emb.shape[1], -1
        )  # [batch, seq_len, 256]

        # Concatenate phoneme + speaker embeddings
        combined = torch.cat([phoneme_emb, speaker_emb_expanded], dim=-1)
        # [batch, seq_len, 512]

        # Generate mel-spectrogram
        mel_output = self.decoder(combined)

        return mel_output
Step 3: Zero-Shot vs. Few-Shot Cloning%
Zero-shot cloning:
- Data needed: 3-10 seconds of reference audio
- Mechanism: Extract speaker embedding, condition model
- Quality: Good (MOS ~3.5-4.0)
- Example models: XTTS v2, VALL-E, Qwen3-TTS
Few-shot cloning (fine-tuning):
- Data needed: 10-60 minutes of high-quality audio
- Mechanism: Fine-tune base TTS model on target speaker
- Quality: Excellent (MOS ~4.2-4.5, very close to original voice)
- Example: ElevenLabs Professional Voice Clone, Microsoft Custom Neural Voice
Step-by-Step: Clone a Voice with 6 Seconds of Audio
Let’s do this with Coqui TTS (XTTS v2).
Prerequisites
- 6-20 second reference audio file (WAV format, 16kHz+, mono)
- Clean audio (no background music/noise)
- Natural speech (not reading, conversational is better)
The Code
from TTS.api import TTS
import soundfile as sf
import librosa

def prepare_reference_audio(input_path, output_path="cleaned_reference.wav"):
    """
    Preprocess reference audio for best cloning results
    """
    # Load audio
    y, sr = librosa.load(input_path, sr=22050, mono=True)

    # Trim silence from beginning/end
    y, _ = librosa.effects.trim(y, top_db=20)

    # Normalize volume
    y = y / (max(abs(y)) + 1e-8)

    # Save cleaned audio
    sf.write(output_path, y, sr)
    print(f"Cleaned reference audio saved to: {output_path}")

    return output_path

def clone_voice_complete(reference_audio, text, output_path="cloned.wav"):
    """
    Complete voice cloning pipeline
    """
    # Step 1: Prepare reference audio
    cleaned_ref = prepare_reference_audio(reference_audio)

    # Step 2: Initialize XTTS v2
    tts = TTS(model_name="tts_models/multilingual/multi-dataset/xtts_v2")

    # Step 3: Clone voice
    tts.tts_to_file(
        text=text,
        speaker_wav=cleaned_ref,
        language="en",
        file_path=output_path
    )

    print(f"Voice cloned! Output: {output_path}")
    return output_path

# Usage
clone_voice_complete(
    reference_audio="my_voice_sample.wav",
    text="Hi! This is my cloned voice speaking. The quality is pretty good!",
    output_path="my_cloned_voice.wav"
)
Evaluating Cloning Quality
How do you know if the clone is good? Speaker similarity score:
def calculate_speaker_similarity(original_audio, cloned_audio):
    """
    Calculate cosine similarity between speaker embeddings
    Higher = more similar (1.0 = identical)
    """
    encoder = SpeakerEncoder()  # Your speaker encoder model

    # Extract embeddings
    original_emb = encoder(extract_mel(original_audio))
    cloned_emb = encoder(extract_mel(cloned_audio))

    # Cosine similarity
    similarity = torch.nn.functional.cosine_similarity(
        original_emb, cloned_emb, dim=1
    )

    return similarity.item()

# Evaluate your clone
similarity = calculate_speaker_similarity(
    "original_sample.wav",
    "cloned_sample.wav"
)
print(f"Speaker Similarity: {similarity:.3f}")
print("Interpretation:")
print("  > 0.85 = Excellent clone")
print("  > 0.70 = Good clone")
print("  > 0.50 = Acceptable")
print("  < 0.50 = Poor (you might need better reference audio)")
❌ Avoid Legal Pitfalls
✅ Ethical Best Practices
Legal & Ethical Considerations (Important to Consider)
Voice cloning is powerful—and you should be aware of the responsibilities that come with using it.
1. Right of Publicity (US) / Personality Rights (EU)
The general principle: You typically need consent to clone someone’s voice for commercial use.
Exceptions that may apply: Parody, commentary, and news reporting (fair use doctrine in US).
State variations (US):
- California, New York: Strong right of publicity (requires explicit consent)
- Other states: Varies—some don’t recognize voice as protectable
EU considerations: GDPR Article 4(14) explicitly mentions “voice” as biometric data. Cloning someone’s voice without consent may violate GDPR (up to €20M or 4% of global revenue fine).
2. Platform Terms of Service
ElevenLabs:
- Prohibits cloning voices of “public figures, celebrities, or any person without their consent”
- Requires verification for Professional Voice Clone
- Watermarks synthetic audio (inaudible, detectable)
Azure Custom Neural Voice:
- Requires proof of ownership or written consent from the person being cloned
- Microsoft can audit your usage
- Only available in certain regions (not global)
Google Cloud Custom Voices:
- Limited availability (apply for access)
- Requires consent documentation
3. Watermarking & Detection
Why this matters:
Even if you have consent, you should consider watermarking cloned voices to prevent misuse (deepfakes, fraud).
Techniques you might use:
- Audio watermarking (inaudible):
Embed a signal in the audio that’s inaudible to humans but detectable by algorithms.
- Example: ElevenLabs adds watermarks to all generated audio
- Metadata tagging:
AddX-Generated-By: Neural-TTSheaders to audio files. - Blockchain registration:
Register cloned voice fingerprints on a blockchain (emerging standard).
4. Best Practices for Ethical Voice Cloning
✅ You might want to:
- Get written consent before cloning anyone’s voice
- Use voice cloning only for its intended purpose (avoid creating misleading content)
- Watermark synthetic audio
- Document consent (keep records for 3+ years)
- Limit access to cloned voice models (treat them like passwords)
❌ Avoid:
- Cloning voices of people who can’t consent (deceased, minors without guardian consent)
- Using cloned voices for phishing/fraud/scams
- Claiming synthetic audio is “real” without disclosure
- Distributing cloned voice models to third parties
Production Optimization (Cost, Performance, Reliability)
You’ve built a working neural TTS integration. Now let’s make it production-grade.
Cost Optimization Strategies
Strategy 1: Caching Frequent Phrases (30-40% Cost Reduction)
If you’re generating the same phrases repeatedly (greetings, FAQs, menu options), you can cache the audio instead of re-generating.
import hashlib
import redis

class CachedTTS:
    def __init__(self, tts_client, redis_client):
        self.tts_client = tts_client
        self.cache = redis_client

    def synthesize(self, text, voice="default"):
        # Create cache key (hash of text + voice)
        cache_key = hashlib.md5(f"{text}:{voice}".encode()).hexdigest()

        # Check cache
        cached_audio = self.cache.get(cache_key)
        if cached_audio:
            print("Cache hit!")
            return cached_audio

        # Cache miss → generate
        print("Cache miss, generating...")
        audio = self.tts_client.synthesize(text, voice)

        # Store in cache (24-hour TTL)
        self.cache.setex(cache_key, 86400, audio)

        return audio

# Usage
tts = CachedTTS(elevenlabs_client, redis.Redis())
audio = tts.synthesize("Hello! How can I help you today?")  # Cached after first call
What you might want to cache:
- Greetings/closings (“Hello!”, “Thank you for calling”)
- Frequently asked questions (answers can be pre-generated)
- Menu options (“Press 1 for billing, 2 for support”)
- Error messages (“Sorry, I didn’t catch that”)
What you might NOT want to cache:
- Dynamic content (personalized names, amounts, dates)
- Long-form content (audiobooks—cache hit rate tends to be low)
Strategy 2: Tier Selection (50-70% Cost Reduction)
Most TTS providers have multiple quality tiers. You can use the cheapest tier that meets your quality requirements.
| Use Case | Recommended Tier | Why |
|---|---|---|
| Voice agents (real-time) | Standard / Flash / Turbo | Speed matters more than perfection |
| Audiobooks | HD / Studio | Quality is critical (long listening) |
| IVR systems | Standard | Short phrases, clarity > naturalness |
| Accessibility (screen readers) | Neural | Balance of quality and cost |
| Prototyping | Free tier | Iterate quickly without spending |
Example: Audiobook cost optimization
# You might do this: Use HD model for everything (expensive)
for chapter in audiobook_chapters:
    audio = tts.synthesize(chapter, model="eleven_multilingual_v2_hd")
    # Cost: $50/1M chars

# Consider this instead: Use Standard for drafts, HD only for final
for i, chapter in enumerate(audiobook_chapters):
    if i < len(chapters) - 1:  # Draft chapters
        audio = tts.synthesize(chapter, model="eleven_turbo_v2")
        # Cost: $22/1M chars (56% savings)
    else:  # Final chapter, use HD
        audio = tts.synthesize(chapter, model="eleven_multilingual_v2_hd")
Strategy 3: Batch Processing (20-30% Cost Reduction)
If you’re generating long content (audiobooks, podcasts), you can batch multiple chunks into one API call instead of making separate calls.
# This might be inefficient: Separate API calls (more overhead)
for sentence in sentences:
    audio = tts.synthesize(sentence)  # 1 API call per sentence
    # Cost: 100 sentences = 100 API calls

# This might be better: Batch sentences (fewer API calls)
full_text = " ".join(sentences)
audio = tts.synthesize(full_text)  # 1 API call for everything
# Cost: 100 sentences = 1 API call (but watch for 5,000 char limit)
The tradeoff: Batching reduces cost but increases latency (can’t start playback until the entire batch is generated). This approach works best for non-real-time content.
⚡ Production Optimization: Cut Costs 70% + Latency 60%
if cache.get(key): return cached
cache.setex(key, 86400, audio)
play(chunk) # play while generating
Also read: RTP Streaming Explained
Latency Optimization Techniques
Technique 1: Enable Streaming Mode (40-60% TTFA Reduction)
Streaming starts playback after generating the first chunk (not waiting for the entire audio).
# This waits for ALL audio before playing (slower)
audio = tts.synthesize(long_text)  # Wait for ALL audio
play(audio)  # Then start playback

# This plays while generating (faster perceived speed)
for audio_chunk in tts.stream(long_text):  # Generator
    play(audio_chunk)  # Play while still generating
Result: Perceived latency drops from ~300ms to ~100ms.
Technique 2: Use Regional API Endpoints
Network latency matters. If your users are in Europe, you might not want to call the US-East API endpoint.
# Azure example: Set region explicitly
speech_config = speechsdk.SpeechConfig(
    subscription=api_key,
    region="westeurope"  # Instead of default "eastus"
)
Latency impact:
- Cross-region (US → EU): +50-100ms latency
- Same-region: Baseline
Technique 3: Pre-Warm Connections
For WebSocket-based streaming, you can establish the connection before you need it (connection pooling).
import websockets

class PrewarmedTTS:
    def __init__(self, uri, api_key):
        self.uri = uri
        self.api_key = api_key
        self.connection = None

    async def ensure_connection(self):
        if self.connection is None or self.connection.closed:
            self.connection = await websockets.connect(
                self.uri,
                extra_headers={"Authorization": f"Bearer {self.api_key}"}
            )
        return self.connection

    async def synthesize(self, text):
        ws = await self.ensure_connection()
        # Connection is already open → lower latency
        await ws.send(json.dumps({"text": text}))
        # ... receive audio chunks
Reliability & Fallback Strategies
The challenge: TTS APIs can fail. If your voice agent’s TTS goes down, the entire conversation may break.
One approach: Circuit breaker pattern with fallback providers.
import time
from enum import Enum

class TTSProvider(Enum):
    PRIMARY = "elevenlabs"
    SECONDARY = "azure"
    TERTIARY = "polly"

class ResilientTTS:
    def __init__(self):
        self.providers = {
            TTSProvider.PRIMARY: ElevenLabsClient(),
            TTSProvider.SECONDARY: AzureClient(),
            TTSProvider.TERTIARY: PollyClient()
        }
        self.circuit_breakers = {
            provider: {"failures": 0, "last_failure": 0}
            for provider in TTSProvider
        }
        self.FAILURE_THRESHOLD = 5  # Open circuit after 5 failures
        self.TIMEOUT = 300  # Try again after 5 minutes

    def synthesize_with_fallback(self, text):
        for provider in TTSProvider:
            # Check circuit breaker
            if self.is_circuit_open(provider):
                print(f"Circuit open for {provider}, skipping...")
                continue

            try:
                audio = self.providers[provider].synthesize(text)
                # Success! Reset failure count
                self.circuit_breakers[provider]["failures"] = 0
                return audio

            except Exception as e:
                print(f"{provider} failed: {e}")
                self.record_failure(provider)

        # All providers failed
        raise Exception("All TTS providers are unavailable")

    def is_circuit_open(self, provider):
        failures = self.circuit_breakers[provider]["failures"]
        last_failure = self.circuit_breakers[provider]["last_failure"]

        if failures >= self.FAILURE_THRESHOLD:
            # Check if timeout has passed
            if time.time() - last_failure > self.TIMEOUT:
                return False  # Try again (circuit "half-open")
            return True  # Circuit open (don't try)
        return False  # Circuit closed (try normally)

    def record_failure(self, provider):
        self.circuit_breakers[provider]["failures"] += 1
        self.circuit_breakers[provider]["last_failure"] = time.time()

# Usage
tts = ResilientTTS()
audio = tts.synthesize_with_fallback("Hello! This is a resilient TTS system.")
Fallback hierarchy example:
- Primary: ElevenLabs (best quality)
- Secondary: Azure Neural (good quality, high availability)
- Tertiary: Amazon Polly (decent quality, cheapest)
The Future of Neural TTS (2026-2028 Predictions)
Where might neural TTS be heading? Here are some emerging trends to be aware of.
Trend 1: Speech-to-Speech (S2S) Models
Current state (2026): Most voice agents use a cascading pipeline:
User Speech → STT → LLM (text) → TTS → Audio PlaybackEach step adds latency (typically 800-1500ms total).
Emerging approach:
End-to-end Speech-to-Speech models that go directly from input audio to output audio (no text intermediate).
Potential benefits:
- Lower latency (200-400ms total)
- Preserves emotion/prosody (no “flattening” from converting to text)
- More natural interruptions (model can hear user starting to speak)
Example systems (2026):
- OpenAI Realtime API (gpt-realtime-1.5) – Released Feb 2026
- Google Gemini 3.1 Flash Live – Preview launched March 2026
- Amazon Nova 2 Sonic – Released April 2026
- Step-Audio R1.1 (open-source, Apache 2.0) – Released Jan 2026
The cost consideration: S2S models are typically much more expensive (10-50x cost of cascading pipeline). Use cases are currently limited to premium voice agents.
Trend 2: On-Device Neural TTS (Privacy-First)
The driver: Privacy regulations (GDPR, CCPA) and user demand for offline-capable AI.
2026 state:
- High-quality neural TTS requires cloud GPUs (can’t run on-device)
- Some providers offer “on-device” TTS, but quality is noticeably worse than cloud
2027-2028 prediction:
- Model compression (pruning, quantization, knowledge distillation) may enable 100-200MB neural TTS models with cloud-comparable quality
- Apple Intelligence and Android AICore might include on-device neural TTS as OS-level APIs
- 40-50% of TTS inference could happen on-device (vs. ~5% in 2026)
What this could mean for you:
- No network latency (TTFA <50ms achievable)
- No cloud costs (after model download)
- No privacy concerns (audio never leaves device)
Trend 3: Emotional Intelligence (Context-Aware Emotion)
Current state:
Most TTS systems have preset emotions (happy, sad, excited) or SSML tags (<prosody pitch="+10%">).
Limitation:
These approaches are explicit—you have to manually specify emotions. But human speech is implicit—we adjust tone based on context without thinking.
Emerging approach:
LLM-conditioned TTS that understands text semantics and generates appropriate emotion automatically.
Example (Hume AI Octave 2, 2026):
Input text: "I can't believe you did that."
                 ↓ (LLM analyzes context)
Detected emotion: Sarcastic
                 ↓
TTS output: [Sarcastic tone, slightly raised pitch]
Even more advanced (research stage):
Empathetic TTS that adjusts based on the user’s emotional state (detected from their voice).
User: [Frustrated tone] "This isn't working!"
                ↓
TTS responds: [Calm, empathetic tone] "I understand. Let me help."
Trend 4: Real-Time Voice Conversion (RVC)
What it is:
Modify a speaker’s voice in real-time while preserving their speech content and emotion.
Potential use cases:
- Live streaming: Streamer speaks normally, voice comes out as character voice
- Gaming: Voice chat with AI-generated character voice
- Accessibility: Convert accented speech to standard pronunciation (real-time)
2026 state: RVC exists but has high latency (2-5 seconds) and artifacts (robotic quality).
2027-2028 prediction: Sub-500ms latency RVC with near-lossless quality. This could enable entirely new categories of voice applications.
Key Takeaways & Next Steps
Summary of Points to Consider
- Neural TTS quality may now be production-ready
- 71.49% human fooling rate (PlayHT, 2026)
- Near-human MOS scores (4.5+ for top models)
- Suitable for audiobooks, voice agents, and accessibility
- Latency might no longer be a major barrier
- Sub-300ms TTFA achievable (Gradium: 155ms, Cartesia: 188ms) according to Coval
- Streaming further reduces perceived latency
- Suitable for real-time voice agents
- Open-source options might be viable
- Coqui TTS (XTTS v2): Free, voice cloning, 17 languages
- Piper: Ultra-lightweight, runs on edge devices
- Quality gap with commercial APIs appears to be narrowing
- Voice cloning is accessible (and you should consider the responsibilities)
- 3-6 seconds of audio might be sufficient for zero-shot cloning
- Legal/ethical considerations are important (consent, watermarking)
- Best used for good: accessibility, content creation, personalization
- Cost optimization might matter at scale
- Caching: 30-40% reduction
- Tier selection: 50-70% reduction
- Self-hosting: 70-90% reduction (but requires GPU investment)
Next Steps (Implementation Checklist)
Prototype
Evaluate
Optimize
Production
For Further Reading
If you’d like to read more about it, here is a handful of helpful resources you should read:
Technical deep-dives:
- WaveNet paper (DeepMind, 2016) – The paper that started it all
- Tacotron 2 paper (Google, 2017) – End-to-end TTS
- FastSpeech 2 paper (2020) – Non-autoregressive TTS
- NVIDIA NeMo TTS Tutorials – Production-grade implementation%
Benchmarks:
- Coval TTS Benchmark (May 2026) – Independent latency/quality data
- Artificial Analysis TTS Arena – Crowdsourced quality rankings%
Open-source tools:
- Coqui TTS GitHub – Best open-source TTS
- Piper GitHub – Edge-optimized TTS
- HuggingFace TTS Models – 100+ community models%
Did you find this guide helpful?
You’re welcome to let me know in the comments what you’re building with neural TTS and what challenges you’re facing. I’ll update this guide with new techniques and benchmarks as the field evolves.