How to repair / unbrick Samsung Galaxy J8 with stock firmware
Although, the Android operating system has been developed very well, but still we end up end-up bricking it sometimes. Usually, it happens while we tweak our smartphone. The very common reasons are custom firmware, mods, and applications. While we try to improve the user experience aspects, we sometimes brick the Android software. In this tutorial, we’ll help you unbrick/repair the bricked Samsung Galaxy J8 using the stock firmware. That will restore the health your phone, it will work again like it was before it got bricked. Also, we refer to this process as downgrading the smartphone to its native state.
Since we are using the official stock firmware, specifically built for Samsung Galaxy J8, it ensures that your phone comes back to its normal working condition. Until the problem is related to the Android software, we can somehow resolve it. If that’s not that the case or problem is somewhat related to the hardware, you better ask service center to help you. That would the correct the action that you must take. Flashing the stock firmware on Samsung Galaxy J8 would restore this completely. The downgrading process turns the device to its very native state, just the like the factory fresh piece.
The process goes through cleaning your phone completely. If anything is stored, it will be deleted and there is no way to get it back anyhow. Thus, if possible, try creating a backup of your important stuff. You follow our guide — how to backup Samsung Galaxy smartphones. This backup guide covers steps that you require to backup things on your phone. You should start by saving your photos, videos, messages, contacts and other documents. Flashing the stocking firmware on Samsung Galaxy J8 will remove all the custom aspects. If you’re using a custom firmware or recovery, those will be replaced with the stock aspects.
Must see:
Moreover, all your custom settings will set to the default values. This helps to recover the phone serious problems like boot loops, boot stuck, unusually restarts, app crashes, and extensive loss in the performance. If you’re facing some performance related issues, then performing some touch-ups can help you. We have already created some useful methods to cure the dip in the performance, follow our guide — tips to speed up Samsung Galaxy J8. Most of the problems/bugs can be resolved through simple troubleshooting solutions.
While we troubleshoot your smartphone and revive it back, we should discuss the things that you required and the risks involved in this procedure. Read all the prerequisites that we mention below thoroughly and prepare thing accordingly.
Prerequisites
- This tutorial and files we mentioned here restricted to Samsung Galaxy J8 smartphones only. The user mustn’t use them on any other smartphone. That can make things even worse. You better check the device model number before you proceed further. Tap on the Settings>About phone ->Model number.
- Doing this will remove all sorts of custom aspects including custom firmware, recovery image, and mods. If you’re using a custom firmware, developed by third-party developers, then that will be removed. All aspects will be replaced by the official stock ones.
- This process goes through a complete Wipeout of your phone. The internal memory will be deleted and there is no way to revert this action. If possible, try saving all your important stuff on other devices like a computer or other smartphone.
- We will use the Odin Tool to flash the official stock firmware on your phone. Thus, you required a Windows-based computer (laptop/desktop) with a working USB cable of your phone.
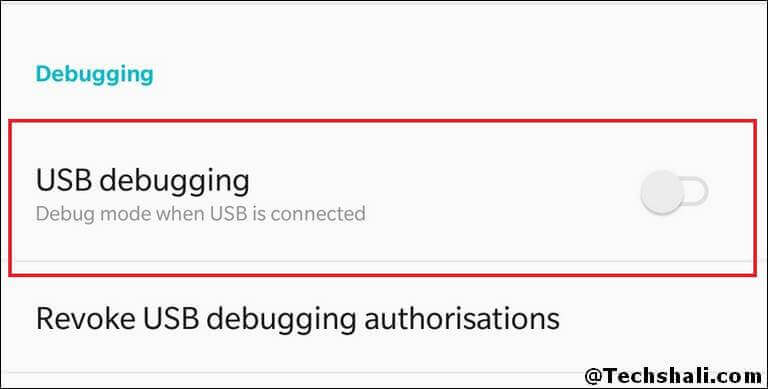
- Since we about connecting your phone to a computer, you must enable the USB Debugging on your phone. That will ensure that your phone gets connected to the computer properly. To enable this option, follow our guide — Enable USB Debugging on Samsung Galaxy J8.
The completes the prerequisites section. You must complete the above things in order to successfully revive your dead Galaxy J8 smartphone. Next, we’ll follow the procedure to unbrick your smartphone by flashing the stock firmware.
How to unbrick Samsung Galaxy J8 with stock firmware
You must follow the steps exactly as we mention below. While performing these steps, make sure that you void distractions complete all steps in the first try. To flash the stock firmware on Galaxy J8 smartphone, follow the instructions we mention below:
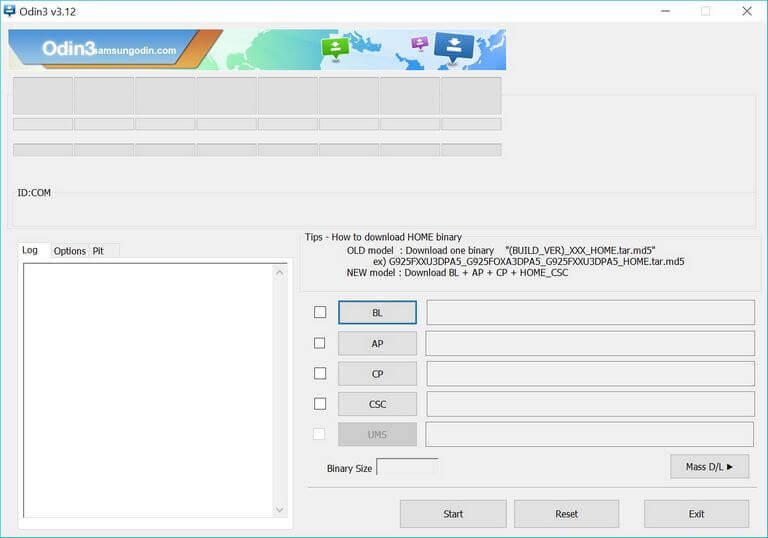
- Get the Odin flashing tool for Samsung smartphones from →here. Extract the content of the zip package on your computer to obtain an executable file. Run the Odin program on your computer. It looks the below one:

- Next, download the stock firmware for Samsung Galaxy J8 from →here. Use the model number to find and download the correct firmware file. You can find your model number: Settings->About Phone->Model number. Extract the content of the package file to obtain a .md5 file (firmware file).
- Now, turn OFF your phone using the power button. Then, boot into the download mode — press and hold the Volume Down and Power buttons until the Samsung logo appears. Then use the Volume Up button to select and enter into the download mode.
- Use the USB cable to connect your smartphone to the computer. The Odin tool will detect your phone. The ID:COM section will turn to blue. If nothing happens, make sure to install the USB drivers of your phone. And connecting it again.
- Tap on ‘AP’ button and load the downloaded firmware file.
- The, tap on the ‘Start’ button to start the flashing process.
- On the completion, you’ll see a PASS! message on the Odin.
- Then, take off your phone.
That will reboot your phone. For the first startup, it can take several minutes. That is natural and happens most of the time.
You’ve successfully unbricked/repaired your Samsung Galaxy J8 using the stock firmware. Post booting up, it will bring a welcome screen. There, enter your Google account details to start using your phone. We hope that our readers would appreciate our efforts in bringing this tutorial.
If you stuck anywhere in this process or have any question, feel free to write to us. You can drop your comments below. We will try our best to bring the best solution for you.