How to Enable USB Debugging on Samsung Galaxy A9 [2018]
The USB Debugging comes into existence when we update our phone manually or connect it with different Android tools like Odin, ADB, and fastboot. Intentionally this option has been injected for development purpose and generally used by the Android developers. In this tutorial, we’ll help you to enable USB Debugging and Developer Options on Samsung Galaxy A9 smartphone. So, you would be eligible to connect your phone to Android tools and perform both, official and custom operations. It comes pretty helpful most of the time while we flash stock firmware on Samsung phones.
If you ever wish to downgrade, install TWRP, or update your phone manually, in such cases you gotta enable this option first. After that, your phone will be able to communicate appropriately with Odin and similar tools. Thus, you can complete that action easily. In order to enable the USB Debugging on Samsung Galaxy A9, first, you need to enable the Developer Options. After that, you can access many useful options including the USB Debugging. Basically, Developer Options come hidden on phone by default. There are certain steps you need to follow to activate this option on your phone.
Activating the Developer Options won’t hurt your phone in any manner. Instead, you got a multi-folds of useful options to optimize and customize the phone. You can use the Developer Options to improve performance and other aspects related to the user experience. Not only it serves an option to enable USB Debugging, but you also get the most options to improve overall productivity and experience on your phone. You can customize animations, screen density, background processes, USB configuration and many more. You must read our tutorial on making the best of use of the Developer Options on Samsung Galaxy phones to get the most out of this menu.
If you love to customize your phone, you better read off the above tutorial about this menu. You would be surprised to know its abilities and features. So, once we enable the Developer Options Samsung Galaxy A9 then we would activate the USB Debugging. There are many tools like Odin, Samsung Kies, Smart Switch, ADB tools, etc., require the USB Debugging to enabled. With this option, you won’t be able to use these tools and perform certain actions. Sooner or later, you might need this option enabled on your phone.
In regards of that, we have this step-wise-step tutorial. You just need to read all the steps carefully and apply them sequentially. First, we would start with Developer Option and then the USB Debugging. It becomes necessary to enable this option in many incidents. Whether you want to use Odin to push a custom recovery image or an OTA update, you need this option first. After that, the phone will be able to communicate properly with the given tool. For the backup purpose, the Samsung users rely on Smart Switch application which also requires this option. Therefore, you better learn how to enable both; Developer Options and USB Debugging on your Samsung Galaxy A9 smartphone.
Most importantly, you can implement this tutorial on other Samsung devices running Android Oreo operating system. There’s nothing different in other devices except their hardware configuration. These two are basic things and are common among almost all smartphones. Now, we should get started with the main purpose of this tutorial.
How to Enable Developer Options on Samsung Galaxy A9
- Tap on the Settings icon on your phone.
- Then, scroll down and tap on About Phone option and tap on it.
- Now, tap on Software Information.
- Then, locate Build Number and tap 7 times on it.
- That will activate the Developer Options on your phone and you can access it through Settings->Developer Options.
This is the essential part that you gotta compete in order access and enable USB Debugging option. Now, you can access the Developer Options directly from the Settings menu anytime you want.
Now, you can use this menu to enable USB Debugging and other things on your phone. We highly recommend you to thoroughly research this menu. I’m pretty sure that it would help you in many ways. With the help of Developer Options, it becomes possible to enable USB debugging, control animations for better performance, set the default USB configuration, and many more things.
The following instructions will help you to enable USB Debugging on your phone.
How to Enable USB Debugging on Samsung Galaxy A9 [2018]
- Open the Settings.
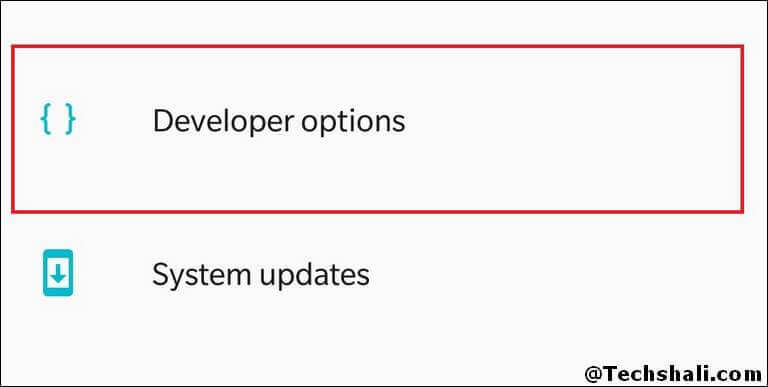
- Now, tap on Developer Options.
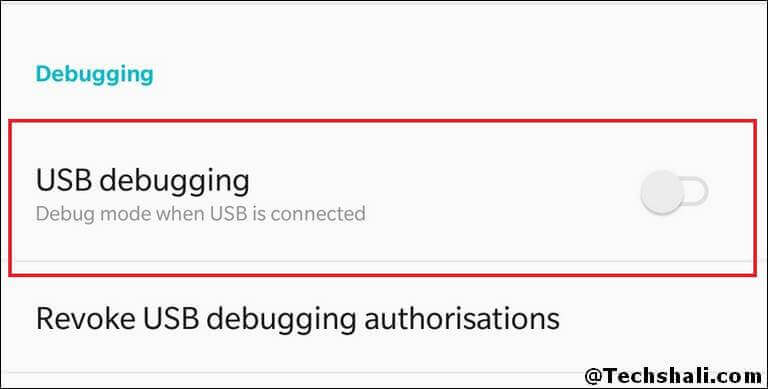
- Under this menu, look for ‘USB Debugging’ and tap on it:
- That will enable this menu.
- Exit this menu.
That’s how you can easily enable this option on your phone. Now, you’re ready to connect your phone with different Android tools like Odin, Google Android Debugging tool, Smart Switch, Samsung Kies and similar ones. This is the most common thing that users do after activating the Developer Options.
The USB Debugging plays an important role in apps/game development. It allows developers to test and debug apps/games. That helps them to build useful stuff people like us. For ordinary users, it allows users to perform different custom and official operations on our Android phone.
That ends our tutorial on how to enable Developer Options and USB Debugging on Samsung Galaxy A9 smartphone. We hope that Android users would use this tutorial and option effectively. If have any problem or issue regarding this smartphone, do let us know through your comments, We would be glad to provide troubleshooting solutions to that problem.

