How to clear cache on Galaxy Note 8
Clearing the cached data is one of the important tasks that every Android users should perform at least once in two or three months. The cache files are usually generated by applications that boot the user experience. However, this memory becomes excessive as it affects the overall performance of the phone. Thus, it becomes important to get rid of this memory. In this tutorial, we’ll help you to clear the cache memory on the Samsung Galaxy Note 8 through different methods. That should help you fix different problems like App crashes, unusually boots, restarts, abnormal user interface, and many similar issues.
Basically, applications buffer some temporary files in the cache partition to serve them as quick as possible to users. And of course, it’s important to sustain the user experience. Most of the social applications like Facebook, Instagram, Reddit, etc., rely on this phenomena to work. However, there’s a stutter as well. If the internal memory goes on low, this cache memory affects the usual functions of the Android OS. That outcomes many annoying issues like lags, app crashes, unusual behavior, etc., Therefore, for maintenance purpose, it’s suitable to remove this clutter data frequently.
Such problems often happen after using the phone for several months. The cache memory has been found to be the most possible cause that lower down the performance and stability of the mobile. Over time, the cache partition becomes so colossal that affects the device negatively. As results, the user faces many annoying problems. During this tutorial, we will discuss some substantial solutions to cure those problems through clearing the cached data on the Samsung Galaxy Note 8 smartphone. That will remove the clutter from your phone, make it lighter, improve performance and free some considerable amount of internal memory.
Also see:
The Android OS uses different partitions for different purposes. Like all system, files are stored under System partition. Likewise, users files are stored under the User partition and cache files are stored under the cache partition. Also, the Android users have privileges to wipe the entire cache partition. That removes all junk and clutter files at once. And calibrates the overall performance through a single flick. Depending upon the problems you’re facing, we discuss different solutions.
Like, if you see that problem is linked to one or more apps, there is no need to clear whole cached data. And something bad is going around the whole UI, probably, clearing cache of individual files won’t make any difference. To be more precise, we discuss different ways to clear cache on Galaxy Note 8. Therefore, you can apply one of them considering issues that you’re facing. There’s one that we should clear to you. While we get rid of the cached files, it won’t affect the apps, games, files, etc., stored on your phone.
The only purpose is to remove the cached files. However, it removes the login details, app/game progress, and data. If you’re still worried about your data, we suggest you to backup. Follow our guide; how to back up Samsung Galaxy smartphones using the Smart Switch application. Through this guide, you can back up photos, videos, contacts, messages, and documents to other devices like computer, mobiles, etc. We hope you’re done with this backup process. Now, you can proceed further and clear cache on your phone.
Method 1: Clear App cache on Samsung Galaxy Note 8
This is the most advocated solution to those facing problems linked to one or more applications. For example, you open an application and it crashes most of the time or freezes for no reason. That’s where you can implement this troubleshooting.
While you clear the cache memory related to individual apps, it removes all the files/login details/cached data/clutter/junk files that might be causing this app to malfunction and behave abnormally. After that, that application should work fine.
Whenever you see that particular is crashing or behaving unnaturally, you can clear its cache memory to see if that works. Most probably, it works. The following instructions are set to carry out this task:
- Open the Settings menu on your phone.
- Now, tap on the Apps, then open the Apps list.
- Tap on the appropriate app that you want to clear its cache memory.
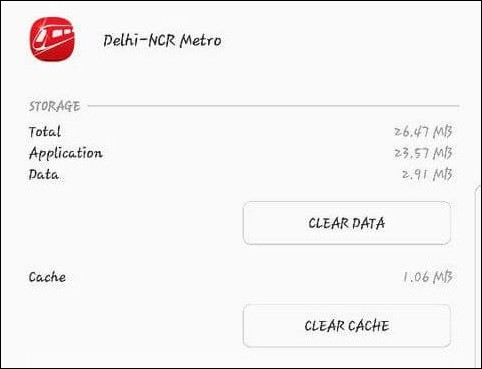
- Now, tap on the Storage option.
- Finally, tap on CLEAR CACHE.
- Repeat the same for other applications that you think might be causing problems.
That should settle the problems and issue related to those applications. That’s how we generally delete the app cache on the Samsung Galaxy Note 8.
For social media applications like Facebook, Instagram, etc., we suggest you perform this action once in a month. These applications accumulate most of the cached data and cause problems. That will keep the Android OS stable and run smoothly all the time.
Next, we would of broad issues that require that whole cache data to be cleared.

Method 2: Clear All Cached Data on Galaxy Note 8
You gotta perform this action when you’re certain that major problems are happening on your phone. If you observe that overall performance has been sunk down and stability related problems are coming forth, you can clear all the cached data to fix them.
It generally happens when the free internal memory becomes very low. That’s the reason people would use SD card for storing apps and files to keep internal memory free as possible. If you’re using the phone for a long period then you must have observed the low performance.
The cache memory keeps on accumulating when we use our phone for a long time and slowly keeps affecting the performance and eventually cause different problems. Thus, it becomes important to sever this cached data. That will also free a good amount of internal memory that will boost the overall performance of your phone.
Just follow the below instructions to remove this clutter data from your phone:
- Open the Settings menu on your phone.
- Tap on the ‘Device maintenance’ option.
- Tap on ‘Storage’
- Under this menu, tap on ‘CLEAN NOW’ button.
Wait for a few minutes while it removes all the clutter/junk files from your phone. You’ll be amazed to see how much free internal memory you’ll receive after you perform this action. I’m pretty sure that it will sort all the existing problems and bugs on your phone.
Now, going something advance, there’s one more way to do this even more thoroughly. The next method guides you to wipe the entire cache partition.
Method 3: Wipe Cache Partition on Samsung Galaxy Note 8
Here’s one more way delete the cached data from your phone more precisely. The Android OS uses the cache partition to store all the cache files gathered by applications including system and third-party ones. That’s why it is a more effective way to clear the junk and clutter files from the phone.
In order to wipe the cache partition, we will get into the recovery mode and have this action performance. Just like other smartphones, the Galaxy Note 8 comes with the stock recovery that offers plenty of useful features.
So, we will make use of the recovery mode to wipe this cache partition. Now, follow the below steps to perform this action on your phone:
- Turn OFF your phone using the power button.
- Now, get into the recovery mode using this guide or following steps:
- Press and hold Volume Up, Bixy and Power buttons all together for a few seconds.
- Release these keys once the Samsung Logo appears.
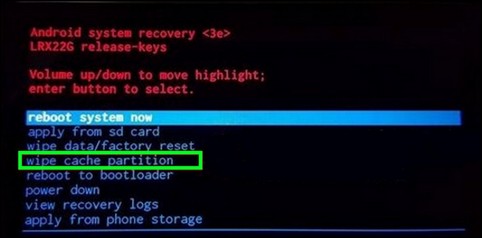
- You should enter into the recovery mode. Use Volume Up/Down to navigate and Power key to select.
- Now, tap on. ‘Wipe Cache partition’.
- Perform this action using the On-screen instructions.
- Exit the recovery mode.
The mobile should reboot and take you to the home screen soon. You should observe that performance and stability are restored. The problems and bugs should have been wiped out after this action.
That ends our tutorial here on how to clear cache Samsung Galaxy Note 8. We highly hope that users would use this guide to troubleshoot different problems. Also, check out our list of games that you can play on you can phone.
If you have any issue or problem related to this phone, do let us know. The comment section is below. We would try best provide an appropriate solution to questions.