How to Enter Recovery Mode on Galaxy Note 9 [+How to Use it]
The Samsung Galaxy Note 9 comes with a stock recovery that provides some important tools for maintenance purpose. Therefore, it is important for you to be certain of this mode and how to use it. This mode can help you fix many problems on your phone. In this tutorial, we’ll help you to enter the Samsung Galaxy Note 9 into the recovery mode. Will will also discuss this mode thoroughly and how you can use it effectively to maintain performance, stability, remove issues and bugs from your phone. Sooner, or later, you might want to boot your phone into this mode. Thus, you should keep reading this tutorial.
Basically, the recovery mode is an independent runtime environment that contains some important tools for Android OS. These options/tools are present mainly for maintenance purpose. For Android users, this mode helps to reset their phone, flash update/firmware, clear cache partitions and a few more options. On your Samsung Galaxy Note 9, you can directly boot into the recovery mode and perform any of these actions, like you can factory reset, update firmware or clear its cache partitions. That helps in restoring the phone and calibrates the performance. If you’re having some serious problems with your phone, you can boot into this phone and factory reset it. That will clean your phone and remove the bugs and issues.
There are different ways to boot into the recovery mode on Galaxy Note 9. Either, we can use the physical buttons, or ADB commands to enter into this mode. For advanced users, entering into this mode far easier. If you’ve rooted your phone, then you can use root specific applications to switch to this mode or do many other tasks. The root users have many privileges that ordinary users don’t have. No matter, there are three different ways to get into this mode. We would discuss these three methods thoroughly in this tutorial. Also, we should explore more about the recovery mode and its options. Certainly, that will help you get started with this mode easily.
It’s often that people use the buttons to get into this mode. And certainly, it becomes the last resort for unresponsive smartphones. This method works until all the buttons we mention function correctly. If that’s not suitable for you, then stepping to the next method would ideal for you. In the second method, we will establish a connection between your phone and ADB tool (Fastboot tool), and put some commands to get into the recovery mode. That comes helpful when the user is unable to use physical buttons or something bad had happened to them. Thus, this tutorial covers most of the methods that you need to know when it comes to boot the Samsung Galaxy Note 9 into the recovery mode. Lets explore these methods comprehensively.
How to boot Samsung Galaxy Note 9 into Recovery Mode
- Power Off your phone using the power off menu.
- Once is turned off completely, press and hold Volume Up, Bixy and Power buttons altogether.
- Release all the buttons once the Samsung Logo appears on the screen.
- Now, use the Volume Up and Down button to navigate and Power button to select the Recovery Menu.
- You should be in recovery mode now.
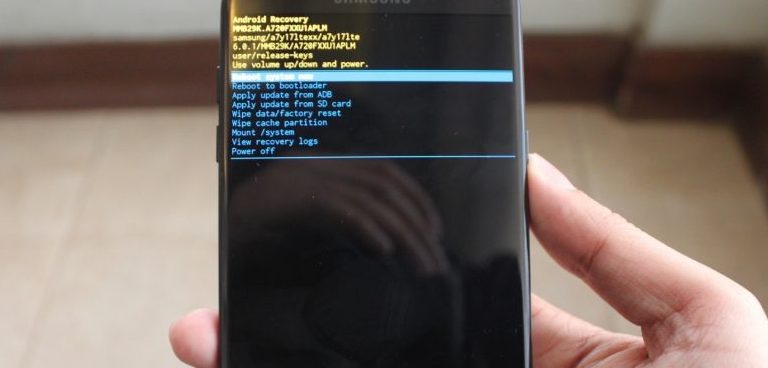
The Samsung Galaxy Note 9 comes with stock recovery having some essential options. This stock recovery on this phone looks like this:
Using this menu, you can apply updates, flush the cache memory, perform a factory reset and a few more things.
That’s the most common way to boot into the recovery mode. And this method works all the time. Below we discuss important features of this recovery mode. So, you can use this recovery mode effectively on your Samsung Galaxy Note 9 phone.
How to Use Recovery mode on Galaxy Note 9
This stock recovery has some limited options. If you want to expand them, you can try a custom recovery like TWRP. That will serve you the most options to use this mode effectively.
Below we discuss some important options available for you.
- Reboot system now – Use this option to exit this menu anytime you want. If that doesn’t work for some reason, just press and hold the Power button for a few seconds.
- Reboot to bootloader – Another Android mode built for development purpose. Mostly, the developers access this mode. This will come handy to you while flashing the stock firmware through tools like Fastboot tool or ADB.
- Apply Update from ADB – A rarely used thing that helps to apply update or firmware through ADB sideload. Until you’re tech-savvy kinda person, you wouldn’t stumble upon this option.
- Apply Update from SD Card – Use this option to flash updates manually on your phone. You can use this to flash firmware as well.
- Wipe data/factory reset – Most often people use this option to factory reset their Android phones. Especially, when your device becomes unresponsive, use this option to calibrate it.
- Wipe cache partition – Another option that you might want to use. When cache memory becomes overloaded on your phone, use this option to clear the entire partition of it. That removes all the bugs and problematic issues and improves performance.
The rest of the options aren’t much popular. The above options enough to maintain your phone and perform mentioned actions.
Now, let’s proceed with our next methods.
2. Through ADB commands
This method is ideal for those who are unable to use the physical buttons to access the recovery mode. If any of the buttons has malfunctioned, then this method will help you boot Galaxy Note 9 into the recovery mode.
For this purpose, you need some preparations.
In order to perform this action, you need a Windows-based computer, laptop/desktop.
Since we are connecting your phone to the computer, you must install the USB Drivers of your phone on your computer. Download the Samsung USB drivers from →here.
You must enable USB Debugging on your phone. You need this option enabled so the ADB tool (we will use its minimal version- fastboot tool). Follow the below guide:
How to Enable USB Debugging on Samsung Galaxy Note 9
Now, let’s get started with this task:
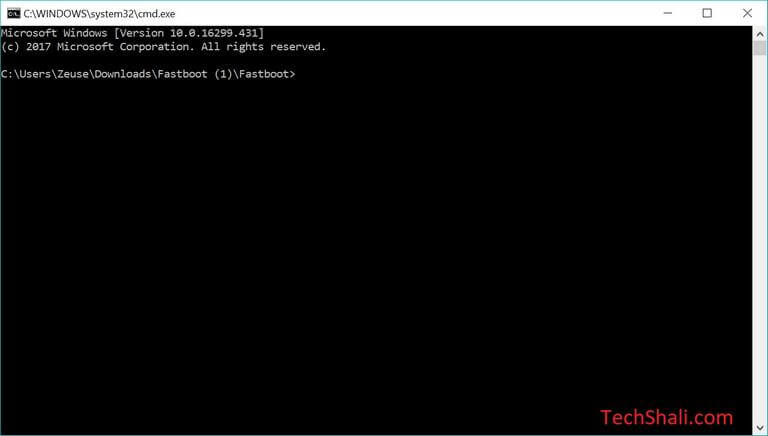
- Download the Fastboot tool (ADB tool) from →here. Extract the content and double tap on Run me.bat file to open the Fastboot tool on your computer. This will open a command prompt like below:
- Now, connect your phone to the computer using the USB cable.
- Type the following command on the command prompt:
- adb reboot recovery
- Your phone will reboot to the Recovery mode.
Now, you can detach your phone. You’re in recovery mode. That’s how you can get into this mode through this ADB mode.
The next method is for root users.
3. Through a Quick Reboot application
For root users, there are countless opportunities for improvements. You can make many things easier and improve the productivity of the phone.
It becomes seamlessly easier to switch between different Android modes. There are bounteous applications to bring such functionalities.
The Quick Reboot app is one of them. Through this app, you can switch to different Android modes in no time. This application adds several boot options like Recovery, Bootloader, and Safe mode.
The extended menu appears while you press and hold the Power button. Thus, if you’re having a root access on your phone, we recommend you to use this application to boot into the recovery mode.
This application is free to use available on the Google Play store.
Wrap Up
These are the different ways to access the recovery mode on Samsung Galaxy Note 9. We hope that our readers would find these methods helpful. Since this smartphone has fabulous hardware specification, we suggest you to play the PSP games on it using the PPSSPP emulator. Must check out the below guide:
- Best PPSSPP Setting for Android – Play your favorite PSP games on your phone.
Do share your thoughts and feedback about this tutorial in the below comment section. If you have any question or problem regarding this phone, do let us know. We will help you with the best available solution.


