How to delete cache on Samsung Galaxy S7
Launched in the year 2016, still, the Samsung Galaxy S7 has been one the most popular smartphone released by Samsung so far. With this release, Samsung brought us the Edge display screen. If you’ve been using this smartphone for a long time, then you might be experiencing some performance and stability issues related. Most of the time, these issues are linked to the cache memory, so you should get rid of it. In this tutorial, we’ll help you to delete or clear cache memory on the Samsung Galaxy S7 and S7 Edge to remove bugs, improve performance, fix app crashes and free good amount of internal memory.
Basically, the cache memory is accumulated by the apps installed on the phone. Each time we open an application, it generates some amount of temporary data. This data makes possible for this application to buffer content and present it to the user as fast as possible. However, this data remains in the memory for the whole time until we manually get rid of this data. Applications like Facebook, Reddit, Instagram, etc., can generate a huge amount of cache files in a week or two. And eventually, the cache memory becomes so huge that it starts affecting the performance of the phone.
Therefore, you might be facing multiple problems on your phone. The cache memory not merely cause a performance dip, you might app crashes, unresponsiveness, lags, stability issues, and similar ones. Thus, it becomes important for you to clear cache on Samsung Galaxy S7 at least once in two or three months. That will keep this smartphone running smoothly all the time. This way you can maintain your phone for better performance and stability.
Clearing the cache memory won’t require much effort. The Android OS facilitates many procedures that help us take care of our smartphone with no third-party app intervention. We will use the inbuilt tools to the cache memory. While we get rid of these cached files, it won’t remove any of your applications, files, or documents stored on your phone. This procedure won’t impact the phone’s internal memory. Actually, Android uses different partitions for different storage purpose. All cached files and data are stored under the cache partitions.
So, while we clear the cache on Galaxy S7, it won’t impact on any other aspects. It will wipe the cache data like login details, game/app progress, preferences, etc. Therefore, you could perform this method without worrying about your files and storage. There are two things we could do. Either, we could clear cached files related to the individual app or clear the whole cache files at once. Here come the important things you should. Both the methods are good and do the work. However, it’s important to know when to clear the cache of individual app/apps or clear the whole cache partitions.
When to CLEAR CACHE on Samsung Galaxy S7 and S7 Edge
The cache memory keeps on growing and over the time it becomes so large that it affects the overall performance of the phone. Therefore, it becomes necessary to get rid of this excessive memory. Otherwise, you might experience some bugs and issues. There are greater chances that phone suffers from low performance, lags, app crashes and other similar issues.
Also see:
If you’re facing such issues, you must clear the whole cached data on your phone. That will remove this clutter stored on your phone, improve performance and remove different issues from your phone. If you see that issues/problems are rotating around one or two applications. Like whenever you open them, they keep crashing or do some unusual. So, for such problems, you can clear the cache of only these applications.
That should make these apps work on your phone properly. Or if that doesn’t work, you might want to remove and install them again. If the performance of your phone is dramatically low and you face different problems on your phone, then clearing the entire cache memory could help you fix these problems. The cache is problematic, and sure it impacts the overall performance of the phone in different ways.
In such cases, you should clear the whole cache. We hope that now it is clear, whether you should clear the cache of individual apps or clear it all at once. Now, move further and learn these methods.
How to CLEAR CACHE on Samsung Galaxy S7
1. Clear App cache
If you find that only apps are problematic and cause issues, you can individually clear their cache data. That could resolve those problems. Sometimes it happens that one or more apps become unstable, unresponsive and behave abnormally.
The symptoms are easily seen. As we open these applications, they tend to close automatically, crash and do annoying things. So, in such cases, you can clear the associated cache memory to see if the problem is resolved.
The following instructions will take you through the required steps:
- Open the Settings menu on your phone.
- Tap on ‘App’
- Tap on the All Apps tab to open the list of applications.
- Now, tap on the app that you want its cache memory to be cleared.
- Then, tap on Storage.
- Tap CLEAR CACHE button and give your confirmation.
That’s how you clear the cache memory of an individual app/apps. Therefore, the problem related to that particular app should have fixed now.
Most of the social apps like Facebook, Snapchat, Instagram, etc., accumulate a huge amount of cache memory within a few weeks. So, you should take care of the cache memory generated by these applications frequently.
Next, we will learn to clear all the cached data present on your phone.
2. Clear All Cached Data
If you find that issues are occurring sitewide on your pheon, consider clearing all the cache data present on your phone. That ensures bugs and affected files have been cleaned thoroughly.
The most noteworthy fact is that it will free up a good amount of internal storage. That probably you could use for other things. Most importantly, it calibrates the overall performance of the device and makes it better.
As soon as your clear all the cached data on your Samsung Galaxy S7, you’ll see the many improvements. If you think that the performance of your phone has been declining so much, you must have this action performed on the phone.
The following directions will help you perform this action on your phone:
- Open the Settings menu on your phone.
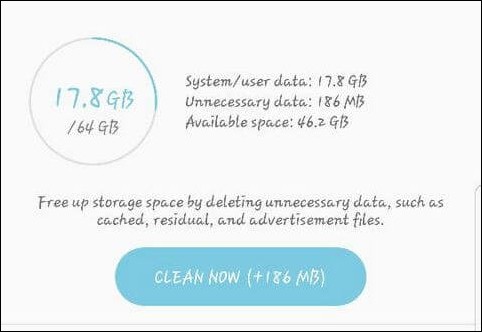
- Now, tap on the ‘Device maintenance’ option.
- Then tap on ‘Storage’
- Under this hood, tap on ‘CLEAN NOW’ button.
This will remove all the cached data present on your phone. This data is gathered by the applications installed on your phone. Therefore, you might lose app/game progress and login details.
If possible, try to save them before you clear the whole cached data on your phone. For advanced users, there is one way to clear the whole cache partition. That cleans the phone more thoroughly.
3. Wipe the Cache Partition
If you think that you want to go beyond the above methods, you can try to clear the whole cache partition. The Android OS has different partitions for different purposes.
It has a separate partition to store all cached data. Whether it is a third-party application or system ones, once we wipe the cache partition, everything is going to reset. It wipes all the cache files related to apps, games, and clutter stored on the phone.
In order to wipe the cache partition on Galaxy S7, we will use the Recovery Mode. Being an essential part of the Android OS, the recovery mode gives us several options to troubleshoot our phone.
Without ado, let us perform this action on this phone:
- Turn OFF your phone.
- Now, boot into the Recovery Mode:
- Press and hold Volume Up, Home and Power keys at the same time.
- Release these keys once the Samsung Logo appears.
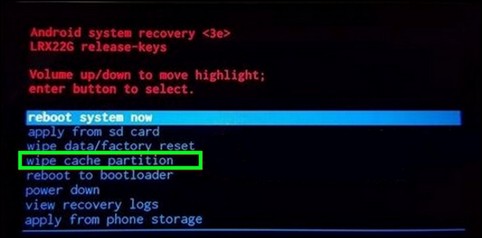
- You should enter into the recovery mode. Use Volume Up/Down to navigate and Power key to select.
- Under the Recovery mode, tap on ‘Wipe Cache Partition’ and provide your confirmation.
- After that, reboot your phone.
You’ve successfully wiped the cache partition on your phone. It should have cleaned your phone thoroughly. Problematic bugs and issues should have been removed. Once your phone turned ON, you’ll notice that performance and stability have been restored and it works fine. Since this phone has a amazing hardware, you could play PSP games like God of Ware, Naruto on it using the PPSSPP Emulator. Just follow the below links:
That ends our tutorial on how to clear cache on Samsung Galaxy S7 here. Use this guide to restore your phone for better performance and remove bugs and problematic issues. If you find this tutorial helpful in any way, do share your thoughts in the comment section below.


This website of yours is totally on the other level of quality. When I first visit your site I was stunned by its great content management. Moreover the design of your website is so user friendly. Regardless whatever device I used it works perfectly fine on all of them. The website itself is filled with amazing content that I was unable to find somewhere else. Wish you best of luck for the future. Keep up the great work!