How to Clear Cache on the Galaxy Note 9
The cache memory gets accumulated over the time so much that it starts disturbing the performance and stability of the phone. And thus, it becomes important to flash this memory once within a month or two. No matter if your smartphone features a bounteous amount of internal memory, the gathered clutter will impact the performance, and stability anyway. In this tutorial, we’ll help you to delete or clear app cache on Samsung Galaxy Note 9 to improve performance, stability, remove bugs, lags and freezing issues.
This will help you get rid of app crashes, or if your phone becomes unresponsive or behave strangely, clearing cache memory could alleviate these problems. People are often to observe some performance related problem over the time on their smartphone. The cache memory could do this. Each time we open an application, it creates some of amount cache memory. This memory keeps on increasing over the time and becomes enormous that it affects the phone. Mostly it creates strange behaviors in applications. You can observe app crashes, freezes, lag and similar problems. If you’re facing issues on your Samsung Galaxy Note 9, then you can clear the cache memory to the situation better. Must see our list of best apps for Galaxy Note 9.
There are two ways, either you can delete the cache memory selectively of individual applications or delete the entire cache partition at once. If you’re facing problems related to one or a few more applications, you can clear their associated cache memory. That should be enough to resolve the existing issues. Otherwise, if you’re facing some serious problems with your phone, or it is behaving strangely, clearing the entire cache partition would do the work for you. You can assume this as a basic troubleshooting, that people are often to apply. Certainly, it imparts a boost in the performance, or simply it calibrates your phone for better functioning and performance.
In order to delete the cache memory on your Samsung Galaxy Note 9, we don’t require a separate tool or utility. The Android Operating system has many tools for maintenance purpose. One of them is the Recovery mode. We will make use of this of mode to perform this action. The recovery mode has even more options like factory reset, apply the update and a few more. The most noteworthy thing is that deleting the cache memory doesn’t void the warranty or cause harm to your phone. This method is supported by all OEMs including Samsung as well.
When to clear cache?
If you’ve not performed this action before, you might be wondering this question. And that’s a pretty good thing you’re thinking. Basically, when your application/s behave strangely, or entire your phone, this is when you can clear the cache. That will improve the perform and bring stability to your phone. For that purpose, most of the users perform this action.
While you delete the cache memory, it merely wipes the files created by applications in an app cache folder (partition). Applications output some files in cache memory for reference purpose, so same they don’t need to download the same data. This database keeps on growing.
So, for the sake of some used space, you can clear the cache memory on your phone. That’s another reason for you could perform this action. Most importantly, it won’t hurt the login details, progress, and similar things.
We hope that things are clear enough so we can move further.
How to clear app cache on Samsung Galaxy Note 9
The very first method is about clearing the app cache memory of individual apps. If things are bad with a particular app/s, you should try to clean this cache memory. There are great chances to overcome those problems and issues.
You can clear the cache of an application when it behaves strangely, crashes or something similar happens to it. The following instructions will help you clear the app cache manually on your Galaxy Note 9 smartphone:
- Pull out the Settings menu on your phone.
- Then, tap on the ‘Apps’ menu to open the list of applications.
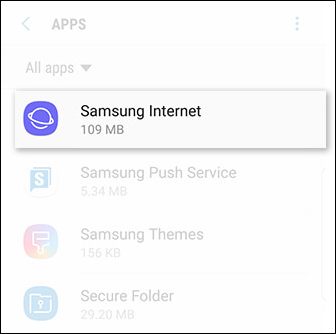
- Now, locate the application that you want to clear its cache memory:

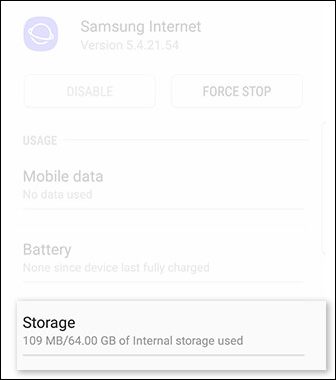
- Next, tap on the Storage:

- Then, tap on Clear Cache:

- Repeat the same steps for other applications.

That’s the way to clear the app cache on this smartphone. Manually, you can delete the cache memory of certain applications.
If you wish to clear cache data at once, you can do it easily as well. That will wipe out all the cache files created by applications. That should free some good space on your phone.
The following instructions shall guide you to clear all cache data at once on Samsung Galaxy Note 9:
- Open the Settings.
- Now, tap on the Device Maintenance.
- Then, open the Storage menu.
- After that, tap on ‘Clean Now’ button to remove all clutter data gathered on your phone:


That’s one way to clear all cache data at once. There is one more way to do same. The user can get into the recovery mode and perform the ‘Wipe cache partition’.
Most likely, advanced users perform this action. It ensures that cache memory is deleted completely, even for system applications.
How to clear cache partition on Galaxy Note 9
If you find that clearing the app cache doesn’t work or even you’ve cleared all the cache data, but things haven’t changed, then you should try wiping the cache partition.
It is a more specific way to remove the cache data. Basically, the Android operating system gathers all the cache stuff in different space or partition.

So, through this method, we can wipe that partition completely. That improves the performance, stability and remove bugs on the phone.
Just follow the below step to perform this action on your phone:
- Turn off your phone using the power button.
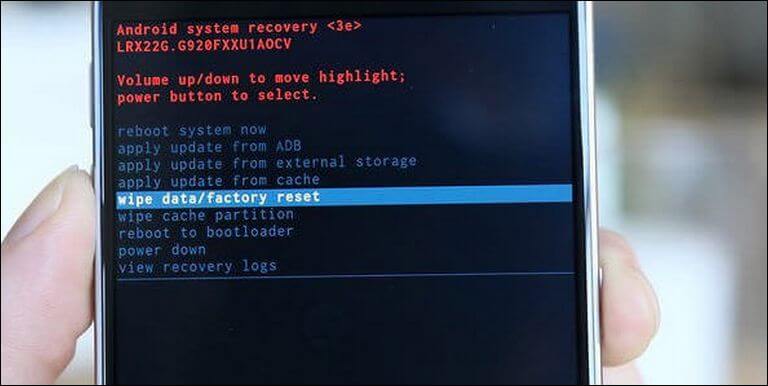
- Now, boot your phone into the recovery mode using tutorial: Enter into the Recovery mode on Samsung Galaxy Note 9.
- Under the recovery menu, tap on ‘Wipe Cache Partition’ and confirm your selection.
- Once this action is performed, exit this menu by tapping on the ‘Reboot system now’.
Then, your phone will reboot and bring the screen home forth soon.
That’s it, you’ve successfully deleted the cache partition on your Galaxy Note 9. Now, things should have been settled down. You would notice the stability and performance, both have been improved. And probably, you’ll see some good amount of free storage on your phone.
You must consider clearing the cache of some application frequently. Apps like Facebook, Reddit, and Instagram can generate cache data in GBs within in a week or two.
That ends our tutorial here. We hope that our readers would find this tutorial on how to delete cache on Samsung Galaxy Note 9 smartphone. If you have issues or question regarding this phone, do let us know. Leave your comments below. We’ll reach out to you as soon as possible.


Very well explained. Thanks for the efficient tutorial
Rajas, you’re most welcome.
Learn how to wipe the Samsung Galaxy Note9 using the hardware keys. If the device is not working correctly, you may need to master reset it and also clear the cache partition. These two resets clear different parts of the device storage. Unlike a master reset, wiping the cache partition does not delete your personal data. An ‘Installing system update’ message will show for 30 – 60 seconds before the Android system recovery menu options appear.