How to unbrick Samsung Galaxy Note 9 using stock firmware
Just like the other Android phones, the Samsung Galaxy Note 9 can brick too. There are multiple reasons that lend our smartphone to such circumstances where they become unresponsive. In simple words, we end up bricking our smartphone somehow. If something like that has happened with your phone, then this guide is for you. During this tutorial, we’ll help you to repair or unbrick your Samsung Galaxy Note 9 with different troubleshooting solutions. Until the problem is restricted to the operating system, it can be cured through these troubleshooting guides. This should get your device work again like it was before it got bricked.
Usually, we got our device bricked while we install custom firmware or it could happen post installing certain applications. Thus, it becomes important to understand the cause of the problem. Throughout this tutorial, we explore different problems and their solutions. So, you get to know more about your phone. If you know the correct action to be performed, you can easily cure your phone even from the worst conditions. While dealing with the bricked Galaxy Note 9, you might require to wipe out your phone completely. Anything that is stored in the phone will be deleted and we simply can’t go back.
Therefore, we strongly recommend that you create a backup of your phone. If you’ve any chance to back up your phone, then you must do it. No matter if we format your phone or install the stock firmware, it will erase the internal memory. There are tons of applications available to accomplish this task or just follow our guide; Backup Samsung Galaxy Note 9. That will help you backup important stuff like Contacts, Messages, Videos, Photos, and Documents. That will be a much safer way to start this process. If your phone has become unresponsive, then there is no chance to back things up. Just keep reading this tutorial to make it work again.
The noteworthy thing is that these troubleshooting solutions are officially supported by Samsung and they won’t hamper your phone in any manner. No matter if you’re using a custom firmware or recovery, these solutions are applicable. During this guide, we will discuss three methods to repair or unbrick the Samsung Galaxy Note 9. The problems may have raised because of some toxic applications, cache memory or custom firmware/mod. There is no need to flash stock firmware if problems can be cured through removing those applications or performing a hard reset. You must consider alternatives before flashing the stock firmware.
To troubleshoot most of the issues on Note 9, we have three solutions. The first is uninstalling the recent applications that might have caused the phone to malfunction. If that doesn’t work, you can perform a hard reset. And our last resort is flashing the stock firmware. It works most of the time. Until the problem related to the Android software, we can troubleshoot them. If that is your case and you’ve bricked its hardware, then you must take it to the nearest service center. Now, move forward and begin with these different troubleshooting solutions.
How to troubleshoot bricked Samsung Galaxy Note 9

1. Method: Use safe mode to uninstall toxic applications
Nowadays, there are many toxic applications intentionally created to diminish the user experience. Or might cause your phone to malfunction due to some support issues. Must see our list of best apps for Galaxy Note 9 for better productivity and usefulness.
You might have ended up messing things on your phone after installing an application (or more). So, it would be a good idea to try removing that application. It that has caused the problem, you could remove it and make your phone work normally.
In order to uninstall those applications, we will use the safe mode. While we get into this mode, the Android software loads only system application. All third-party applications stand turn OFF.
Therefore, you can easily get rid of these applications to see if the problem is resolved. Just follow the below steps:
- Press and hold the Power button to bring out the power menu.
- Now, tap and hold the Power OFF menu on your phone.
- Unhold the tap once Safe Mode option appears and tap on it. This will take you to the safe mode soon.
- Once the operating system is loaded, uninstall the application/s that you think as the troublemaker.
- After you done with this task, exit the menu.
This should fix the problems caused by the toxic applications. If you’re seeking better performance on your phone, then we recommend you disable the unnecessary apps on your phone.
That will improve the storage space and performance on your phone. Must follow our tutorial below:

2. Method: Perform a hard reset
It is essential for us to perform resets on our smartphone after some time. The Android applications keep gathering cache data that accumulate so much over the time that it starts impacting the performance of the phone.
Thus, it is important for us to get rid of such clutter. If you’re facing some serious dip in performance, app crashes, stability and unusual behavior problems, then performing a reset could help you a lot.
Performing a factory reset (hard reset) will wipe the internal memory of the phone. Therefore, you must backup important stuff before. For this purpose, we have already published a dedicated guide on our website.
Just follow the below guide to reset your phone:
For performance sake, we should reset our phone at once in two or three months. That will tune the performance and keep our phone running smoothly all the time.
This will remove all custom apps and settings. It makes your device like a factory fresh piece leaving no custom apps, files and configuration.
Remember, it won’t remove the custom firmware, recovery, and root access. It just wipes internal memory and cleans it thoroughly.
If you find that none of the above methods works, then putting the stock firmware should work. Try the next solution.

3. Method: Unbrick the Galaxy Note 9 using the stock firmware
Flashing the stock firmware works always. It removes all sorts of custom aspects like custom ROM, recovery, root access, applications, and configuration. These all things are replaced with the official stock aspects and default settings.
If you’re using a custom firmware/recovery, then it will be replaced with the stock firmware/recovery. That apparently restores the warranty and other terms. Most of the time, people usually end up bricking the phone while performing a custom operation. Like, while installing a custom ROM, third-party mods, and applications.
That makes the phone unresponsive and it usually stuck at the boot logo or screen. Or you might face some unusual/strange behavior. That’s when you need to downgrade your phone to its native operating system.
In order to flash stock firmware and unbrick Galaxy Note 9, we will use the Odin flashing tool. So, before we begin, you need some preparations:
- You need a Windows-based computer and a USB cable of your phone for connecting purpose.
- Enable USB Debugging on your phone. It is necessary to enable this option as we about connecting the phone to the computer. Follow this tutorial: Enable USB Debugging on Galaxy Note 9.
- You must install the USB Drivers of your phone to your computer. So, your computer would be able to detect it. Download and install the Samsung USB Drivers from →here.
- Charge your phone to a good extent.
That’s all you need to prepare to flash the official stock firmware on your phone. Now, the following steps will help you install the stock firmware on your phone:
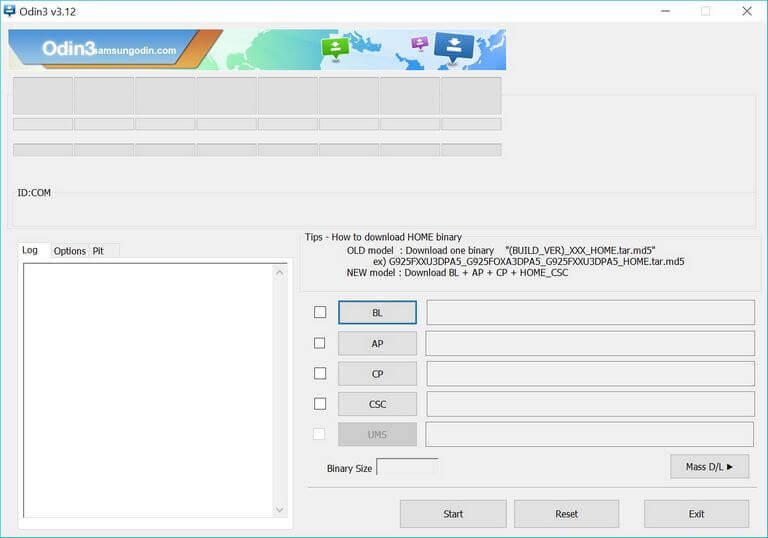
- Download the Odin flashing tool on your computer from →here. Extract the content of the package to obtain the executable program. Run the Odin program. It looks like this:

- Now, get the official stock firmware for your phone from →here.
- Find the appropriate firmware using the device model number of your phone. To find it, tap on Settings->Software Information->About Phone->Device Model number.
- After you download the firmware, extract it on your computer to obtain the firmware file, that has .md5 extension.
- Next, turn OFF your phone.
- Then, boot into the Download mode — press and hold the Volume Down and Power buttons together until the Samsung logo appears. Then, use the Volume Up button to get into Download Mode or follow on-screen instructions.
- The Odin program should locate your phone. If nothing happens, try to install the USB Drivers on your computer and try again.
- Then, tap on ‘AP’ button and load the firmware file (.md5 file).
- Now, tap on the Start button to begin the flashing process.
- Once it is complete, take OFF your phone.
Your phone should reboot then. It will take you to the setup screen soon. There, enter your Google account details and configure the set up the way you want.
We have successfully flashed the stock firmware on Samsung Galaxy Note 9. That should have wiped all problematic apps, settings, and clutter. There shouldn’t be any issue on your phone now.
That ends our tutorial here on how to unbrick the Samsung Galaxy Note 9 smartphone. If you face any problem, then, drop your comments below. Stay connected with us for more useful tutorials and lists.