How to Root Motorola Moto G6 and G6 Plus [Definitive Guide]
Rooting is no longer a process that was a tricky before. Although the Android OS has been drastically changed, still people tend to root to gain more control over the phone. For root users, it becomes seamlessly easier to customize their phone to the extreme extent. In this tutorial, we’ll help you to root your Moto G6 and G6 Plus smartphone with the easiest process. So, if you want to improve general performance and customization aspects, then you must read this tutorial. We explain all the steps required to perform a root operation on your phone.
The Moto G6 and G6 Plus are mid-range smartphones having a decent specification. Just like other brands, like Xiaomi and Nokia, dragging high-end smartphones into the low and mid-range segment, the Motorola no intention walkout. These smartphones have been powered by solid hard specifications, and thoughtfully the run on latest Android 8.0 Oreo operating system. And we suppose them to receive further Android updates. If you’re looking to root your Moto G6 and G6 Plus smartphone, then this guide shall help you achieve that. Once you get the root access on your phone, you’ll be able to access the core settings and edit them as per your needs.
If you’re serious about real customization, then you cannot skip rooting your phone. The root access will extend your privileges and lets you customize your phone. Basically, root serves the Superuser privileges to you. Then using the root-specific applications, you can edit/customize/access almost all aspects of the Android software on your Motorola Moto G6 and G6 Plus smartphone. There is no doubt that these custom operations give you more personalized Android experience, you can speed up your phone, make it more productive, and find countless ways to make exceptional changes.
Though rooting is a powerful custom operation, but it impacts the warranty on your phone directly. Performing the root action on your Moto G6 will void the warranty of your phone. Means, you’re manufacture can deny you helping in warranty terms. Though, there is a way to make things restore. If you wish to get the warranty terms restored, you have to flash the official stock firmware on your phone. In that way, you can replace all custom tweaks and aspects with the official resources. That will retain the lost warranty on your phone.
There is one more thing we should discuss before starting the root operation. Since we are performing a custom operation, there are possibilities that we end negatively. It might possible that your phone’s memory gets corrupted or deleted while we perform this action. Thus, it becomes important for you to safeguard your data. We highly recommend that you create a backup of your phone. You can start with photos, videos, contacts, call logs, and documents. Either you can sync your data to Google Drive, or use other backup applications available on the Google Play store or store them locally using the backup software.
In order to complete this root operation on your Motorola Moto G6 and G6 Plus, your phone must be unlocked. If your phone’s bootloader is locked, performing these actions won’t have any significance. Therefore, you must unlock the bootloader on your phone to perform this action. Otherwise, it wouldn’t possible to complete this operation. If you’ve not unlocked your phone, then follow the below guide:
We use the ADB commands to put root binary files on your phone. That will root your phone and grant you root access. You must adhere that you required an unlocked bootloader on your phone to successfully complete this operation. Now, you can proceed further to achieve the root access on your phone. If you’re a newbie or not sure about this process, then you should step out now. These actions are for advanced users who prefer to use custom aspects on their phone. Also see our list of best apps for Moto G6 and G6 Plus, exclusive apps for better productivity and usefulness.
How to root Motorola Moto G6 and G6 Plus
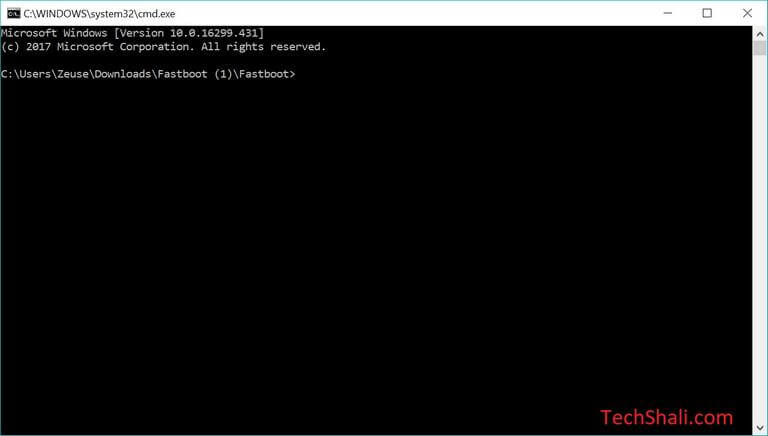
The procedure includes the use of the ADB tool. If you’ve own unlocked your phone, then you must’ve used this tool. To make things simple for you, we have managed to bring a minimal fastboot tool (a minimal version of ADB tools). We will use this tool to flash root files on your phone.
The following instructions will help you to root your Motorola Moto G6 and G6 Plus:
- First, download the minimal fastboot tool package from →here and extract it on your computer. Most preferably on the desktop. From the extracted files, double tap on Rum Me.bat file. It will open the following command prompt:

- Next, download the root file Magiks package from here. Save this package within the fastboot tool package. Means where you’ve found Run Me.bat file.
- Download the no-dm-verity package from →here and save this file within the fastboot tool package as well.
- Now, connect your phone to your computer using the USB cable. The fastboot tool will connect to your phone automatically.
- Next, type the following command to access bootloader mode on your phone:
- adb reboot bootloader
- Next, type this command:
- fastboot flash boot Force_Encryption_Disabler_For_ALI_Oreo_v2.zip
- Then, this command:
- fastboot flash recovery Magisk-v16.7.zip
- In the end, type following command to reboot your phone:
- adb reboot
- Take off your phone from the computer.
Your phone will reboot and take you to home screen very soon. Now, to verify the root access on your phone, just open the Google Play Store and download the Root Checker application. Verify the root access on your phone.
Bingo, you’ve rooted your Moto G6 and G6 Plus smartphone. Now you can enjoy the goodness of root applications and take complete control over the phone. For gamers, it is recommended to use the PPSSPP emulator. Follow the below guide ⇒How to setup PPSSPP Emulator to play PSP games.
There are chances that your phone gets stuck on the logo. If that happens to you, just go into the recovery mode, and perform followings:
- ‘wipe data factory reset’
- and ‘wipe cache partition’.
That will all the issues emerged after rooting your phone. So that ends our tutorial here. We hope that our readers would take complete advantage of root access on their phone. If you face any issue, make sure to leave your comments below.


buenas amigo descargue todo lo guarde donde dijiste y cuando escribo el segundo comando me dice error
Hi there,
If possible share the exact error you’re facing so we can help you.
when i type in adb reboot bootloader it says; error: device offline
What do you suggest that I do?
Hi there, it simply means that your phone is not recognized the by the computer. Just Install the Motorola USB Drivers on your computer, reboot your computer and try it again.
Now, it should work fine!
when trying to add oreo package, i get an error where it wants to not have cohabitation with the magik package, is there any way to get both these to be in the fastboot package, as when i get to the fastboot flash recovery Magisk-v16.7.zip stage it comes back saying it cant find that package.
I have tried figuring out what the problem is and it seems that the oreo and magic components both have META-INF in the consists, and that is causing one file to be integrated into the other, and erasing one copy of the Meta-inf that is required for the other program to run, need a way to overcome this so tha both programs can be put into the same folder, ..thank you.