How to clear cache on Samsung Galaxy A7 [2018]
This is a must-know thing about Android phones. Clearing cache memory could help you troubleshoot the most common problems that usually happen to our phones. Whether your phone is running out free space or its performing is degrading over time, that is might be caused by the cached data. In this tutorial, we’ll help you to clear/delete the cache on the Samsung Galaxy A7 [2018] smartphone for better performance, stability and remove bugs. There are different methods, either you can use the Storage Settings or get into the recovery mode to perform Wipe cache partition.
Basically, the cache files are generated by the applications installed on the phone. Each time we hit an application, it aggregates some temporary files. This helps applications to serve data/information to users as quickly as possible. These cache files are stored within the cache partition that keeps on growing up. And eventually, it becomes so huge that impacts the overall performance and stability of the phone. Therefore, to troubleshoot the performance and stability issues on the Samsung Galaxy A7, you should try to clear the cached data.
Mostly, all Android users encounter some problems related to performance and stability over time. This usually happens due to expire and junk files. Such data are generally linked with cached files. Thus, for troubleshooting purpose, clearing cache is one of the most preferred solutions. It will wipe the cache files associated with the installed applications. The major percentage is covered by social media applications. Facebook, Instagram, etc., the application gathers most of the cache data. These applications can summon heaps of cache files within a week or two. Therefore, it is recommended to clear the cache memory associated with such apps.
If you ever figure that certain applications is causing a problem or behaving abnormally, you should clear its cache files. That probably should troubleshooting that problem on the Samsung Galaxy A7 smartphone. Moreover, clearing cache memory can free up some good amount of internal memory. If you’ve been using your phone for a long time, you might have noticed the internal memory filling every day and the performance may decline as well. In such cases, you should the basic solutions to cure them. So, during this tutorial, you would learn how to clear cache through different methods.
Primarily, users prefer to clear cache files through the Storage menu presents within the Settings. Whereas using the recovery mode is pretty much snappier and it thoroughly cleans device. We would recommend you to use the second method that includes the use of the recovery mode. That ensures that each and every cache file is wiped off your phone. That cures most of Android problems and issues related to usual working and functioning of the phone. Most importantly, performing this action won’t hurt apps and files present on your phone.
Also see:
The Android OS uses different partitions for storage purpose. The cache files are stored within the cache partition. So, while we get rid of the cache files, that won’t hurt other files stored within your phone. If you’re still concerned, I would suggest you back up your phone. For that purpose, you should follow our guide; how to backup Samsung Galaxy phones. That would much safer for you to proceed. Now, we shall go further and learn how to clear the cache memory on the Samsung Galaxy A7 [2018] smartphone.
![Clear App cache on Samsung Galaxy A7 [2018]](https://techshali.com/wp-content/uploads/2018/11/Clear-app-cache-galaxy-a7.jpg "Clear App cache on Samsung Galaxy A7 [2018]")
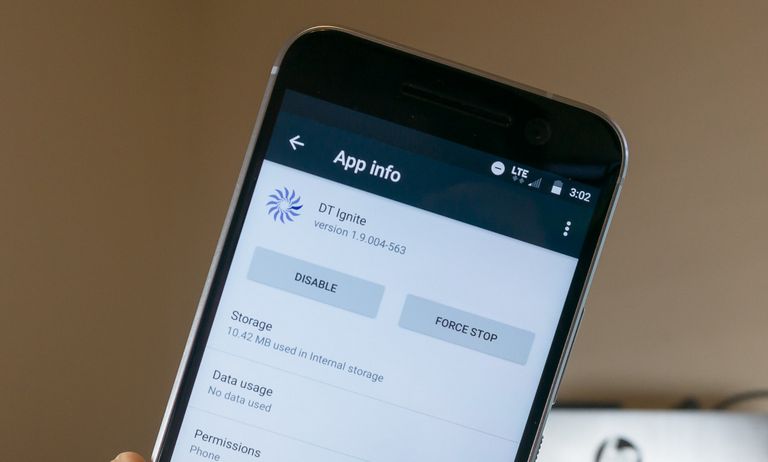
How to clear app cache on Samsung Galaxy A7 [2018]
- Open Settings menu.
- Now, scroll Down and tap on Apps-> Apps list.
- Under the list of apps, tap on the App, to clear its cache.
- Then, tap on Storage.
- Now, tap on CLEAR CACHE.
Repeat the steps for other applications. That’s how you can clear app cache on Samsung Galaxy A7 smartphone. That will help you troubleshoot problems and bugs related to certain applications. If you figure that one or more application is behaving abnormally, crashing, freezing or similar issues happen, you should clear its cache memory.
That will remove all the clutter that has been induced so far by that application. And probably, that should fix these common issues that we usually encounter on our Android phones. This is method stands well while we clear cached data related few applications.
If you find that the overall performance has declined and multiple issues are going around, you better wipe the entire cache partition. That will thoroughly clean your device. In the next part of this tutorial, we would learn this method. Just keep reading this tutorial.
How to Wipe cache partition on Samsung Galaxy A7
If you want to delete the whole cached data at once, then you should follow this method. We will use the recovery mode to wipe the entire cache partition on this smartphone. That removes cache files generated by both; system and third-party applications. It calibrates the overall performance of your phone.
It improves the overall performance and stability of the phone. If you’ve been using your phone for a long time, then you must have observed that the performance sinks down over time. Clearing the cache memory helps to cure such problems.
To delete the cache partition on Galaxy A7, we would use the recovery mode. We will enter this device into the recovery mode and perform ‘wipe cache partition’. That will wipe off the cache data on your phone. Just follow the below steps to clear cache partition on our phone:
- Turn off your phone using the power key.
- Now, boot into the recovery mode through this tutorial.
- Under the recovery mode, select ‘Wipe Cache Partition’.
- Perform this action and provide your confirmation.
- Once this action is performed, exit the recovery mode.
That’s it, you’ve deep cleaned your phone. This is the way to wipe the cache partition on the Samsung Galaxy A7 smartphone. Now, let your phone reboot. Thereafter, observe your phone thoroughly. You would find that your phone is working fast and smoothly. If that doesn’t help you to cure the problem, then you must visit our troubleshooting guide for this smartphone.
That ends our tutorial on how to delete cache on the Samsung Galaxy A7 here. That should help you manage and maintain this smartphone easily. If you have any other problem, do let us know through your comments. We would be glad to help you in that regards.


![Take Screenshot Samsung Galaxy J7 [All Variants]](https://techshali.com/wp-content/uploads/2019/01/screenshot-samsung-galaxy-j7-all-variants.jpg)
Followed process successfully.
But blurry photo problems persists
Try downloading some other camera app see if that works.