How To Enter Recovery Mode On Galaxy Note 10+
Although Android OS is extensively moving towards stability, still there are many conditions where we would need manual actions to get things sorted. Whether you’re looking to troubleshoot problems, bugs or want to put custom/stock firmware yourself, you need the recovery mode. Through this tutorial, we’ll help our readers to put Samsung Galaxy Note 10 /Note 10+ into the recovery mode easily. We explain different methods to get into this mode and utilize it for something good.
Ever since the Android has appeared, the recovery mode has been it’s important part. This mode doesn’t work along with the operating system, but it is there to make changes, update or re-install the operating system. So, even when your phone doesn’t boot up successfully, there would be greater chances that you could access the recovery mode and make things better. This mode has been blessed with many powerful functions that help Android users for maintenance purposes.
Basically, this environment offers a set of tools that help to modify, update and re-install the Android firmware. That makes it really important. With the help of recovery mode, Samsung Galaxy Note 10 users can easily wipe cache files, perform a factory reset, install firmware updates, flash custom firmware and a few more actions can be performed. These actions, especially, wipe cache files and factory reset, come helpful in fixing common Android problems that could happen to these flagship smartphones.
Through this tutorial, we describe different methods that put Samsung Galaxy Note 10/Note 10+ into the recovery mode. One of the most common method is to use the hardware keys and boot into this mode. However, sometimes things are pretty bad and users couldn’t get into this mode that easily. Therefore, we should know alternatives besides. There’s a tool to know as Google Android Debugging, we can use this utility to boot almost any Android device into recovery mode and a few more.
While we detail the necessary steps to boot into this mode, one should be careful using this environment. Apparently, recovery mode has privileges to wipe the phone’s memory instantly. And if that happens, there’s no way to go back. Hence, you should carefully use the recovery mode for a definite purpose, or else, using it unwisely could lose your data. In this respect, we highly suggest you backup your phone before getting into these things.
1. Enter Samsung Galaxy Note 10 Into Recovery Mode Using Hardware Keys
- Switch OFF your phone.
- Now, press and hold the Volume Up and Bixby buttons at the same time.
- Once the Samsung Logo appears, release these two buttons.
- Wait for 10-15 seconds, your phone should automatically boot into the recovery mode.
- Use the Volume Up button to give your confirmation (if any appears).
- Inside the recovery mode, use Volume Up and Down buttons to navigate and Power button to make your selection.
The recovery mode looks like this:
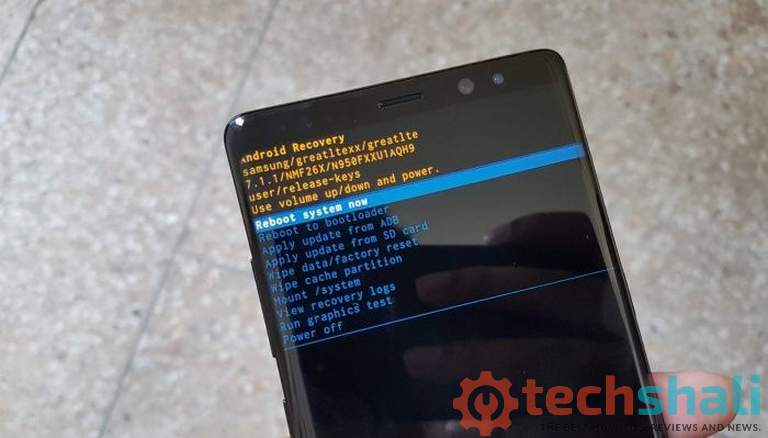
That is the simplest method to boot Samsung Galaxy Note and Note 10+ smartphones into the recovery mode. Inside this mode, you’ll get the list of operations that users can perform.
Must see:
If you’re completely new to this independent Android environment, here are some useful operations that should assist you to get familiar with this recovery mode.
- Reboot system now – This is the very first option on the list. Once you’re done with work, use this option to reboot your phone into the normal mode
- Reboot to bootloader – Bootloader is another mode available on Android phones. This basically is used to flash firmware and booting files. Most of the time, this mode remains unused, especially on Samsung devices.
- Apply update from ADB – This is a developer-friendly feature that sideloads firmware, programs, and flashable files through the Android Debugging tool.
- Apply update from SD card – If you’re looking to manually put stock, custom or firmware update, this option is for you. Use this option to update firmware and install third-party mods.
- Wipe data/factory reset – This option allows us to perform a factory reset. This is quite useful in case of the bricked condition, where the phone doesn’t boot normally.
- Wipe cache partition – This action wipes entire cache files present on the phone. You can perform this action to restore general performance and stability.
Apparently, recovery mode on Samsung Galaxy Note 10 looks identical to what we’ve seen on Galaxy Note 9, S10, and S9 devices. So, if you’ve already indulged any of these, there shouldn’t be any difficulties using this mode on this latest flagship.
That’s the most common method to enter recovery mode on Samsung devices. Most probably, it remains the same among devices with the Bixby button. Going further, we learn a few more methods to access this mode when the hardware keys method doesn’t work, due to any reasons. Perhaps, the most common reason is due to the failure of the hardware keys.
If any of these two; Bixby or Volume Up, stop working, users simply can’t access the recovery mode. Therefore, one should know the alternatives.
2. Reboot Samsung Galaxy Note 10 to Recovery Mode Using ADB Commands
Though it requires some preparations, it comes most helpful when a user couldn’t boot recovery mode through hardware keys. There can be different reasons like hardware failure, software problem, etc., that won’t let users access the recovery mode. Alternatively, we can boot any Android phone into different modes like Recovery mode, Fastboot mode, etc., using the Android Debugging tool, provided by Google, this tool is convenient for developers.
In order to make this method work, first of all, we need to install the Android Debugging tool on Windows or Mac desktop/laptop, whichever you have. To keep things simple, we have a minimal version of the ADB tool that works on the Windows platform. If you don’t have the Windows computer, you must install Google’s ADB tool, you can get installation files on their official website.
Here the prerequisites that you need to accomplish before we move further:
- Enable USB Debugging on your phone – For that purpose, you would need to enable Developer Options on your phone first. Here, in this tutorial, we have detailed guidelines for both. Just follow the instructions mentioned in the tutorial.
- Whether you’re using a Windows-based computer or MAC, you must install the USB drivers of the phone on your computer. You can download the USB drivers from Samsung’s official website here. Drivers are mandatory, otherwise, the computer might not detect your phone.
- You must have the original USB cable for connectivity purposes.
That’s all we need to get started.
Basically, the ADB tool looks similar to Windows’ CMD command prompt. Through giving commands, we can perform certain actions on an Android device. From booting recovery mode to sideloading firmware files, many operations can be executed through commands.
Must see:
Now, just follow the below instructions to boot your Samsung Galaxy Note 10/10+ into the recovery mode using ADB commands:
1. Download the minimal version of the ADB tool from here and extract the package to obtain “Run me.bat” file. This is an executable file, so just double-tap to run it. This should open the following command prompt window:
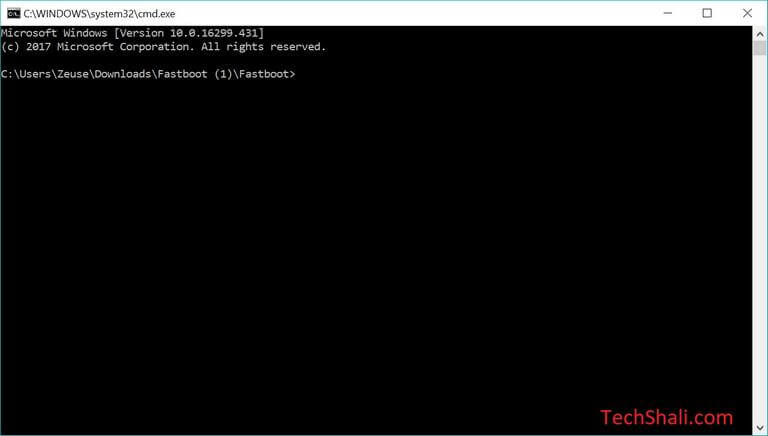
2. Now, connect your phone to your computer using the USB Cable.
3. Type the following command to confirm that your device has been detected:
adb devices
Right after this, it will display the connected devices. Hopefully, you should be able to locate your phone.
If you don’t find your phone listed there, make sure to install USB Drivers again, and reboot the system. After that, try again.
4. Now, type the following command:
adb reboot recovery
This command should reboot your phone into the recovery mode.
In a similar manner, we can easily boot into different modes using the ADB commands and perform other actions. There’s no doubt that the ADB tool is an extensively powerful tool, however, to get the most out of it, we must have proper knowledge and development skill.
So, that’s the second method to put Galaxy Note 10 to boot into the recovery mode. Right after, you can take-off the USB cable and use this mode purposefully.
The next method is for those users who’ve rooted their smartphones. Undoubtedly, root users have better privileges over non-root users. Though such actions void the device warranty, however, it worth totally, if you’re looking to complete access over your mobile phone.
3. Boot Recovery Mode on Samsung Galaxy Note 10 Using Quick Reboot Application
There plenty of useful applications available for rooted users that help them control almost every aspect on their smartphone. Whether it is CPU’s clock, hardware functionality or OS hacks, it can be achieved using root applications.
One of our favorite apps is Quick Reboot. This application facilitates the easy-to-use interface to access different modes like recovery mode, fastboot mode, safe mode, etc. That is not just limitations, there’s a lot more that users can do with this application.
This app is completely free to download and use from Google Play. You can download this application by searching its name over Google Play.
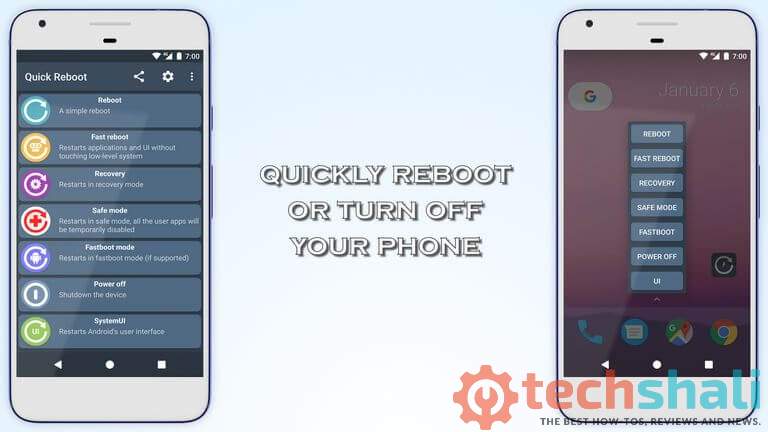
In order to boot into the recovery mode (or any other), users need to open this application and select the recovery mode from the list. Thereafter, this application will reboot your phone into that mode. That’s it!
Overall, we find this application very useful. If you’re using a rooted Galaxy Note 10, then we highly recommend you to use this application.
That’s the third method that we can use to access the recovery mode. If you’re about to root your phone, then you should consider warranty terms. You must know that these actions void the warranty and the manufacturer’s support.
Contact us
That completes our tutorial that describes different ways to boot Samsung Galaxy Note 10 into recovery mode. Hopefully, one of these should definitely assist you to get started modifying this Android phone. If for any reasons you get stuck anywhere following these procedures or looking to troubleshoot some bugs on this phone, you can contact us through the comment section below. We would be happy to assist you further regarding this mode and other problems. Don’t forget to spread your words about this tutorial with your friends.