How to unbrick Google Nexus 7 with stock firmware
Google Nexus 7 runs on an Android Lollipop version that means you’re not having the latest and most stable Android version released so far. So, there are chances that you might end up bricking this tablet while performing some operations. That could make this tablet phone unresponsive and useless unless you re-flash the firmware on it. In this tutorial, we’ll help you to repair/unbrick the Nexus 7 with the official stock firmware. That will restore its original state and make it just like a factory fresh piece. That will make it word like before it got bricked.
The Android smartphones are much easier to maintain and even users can switch to the different custom firmware. While they do so, users usually get into troubles and could end up messing up things. Other than that, there are several things that can brick your Google Nexus 7. We have different troubleshooting methods that could be used to revive and repair dead Android phones. As far as the issues are related to Android Software, we can cure them easily. However, things have become pretty bad, and the issues are related to the hardware part, you better take your phone to the nearest service center. That would the ideal step you could take.
Flashing the stock firmware is ideal when problems are related to Android OS. If your phone is turning ON, stuck at the boot logo, crashing repetitively, or similar issues are occurring, then flashing the stock firmware on Google Nexus 7 should resolve these issues. During the downgrading the process, the entire firmware is re-installed. So, it doesn’t leave any chance that any problem could persist afterward. It removes all sorts of custom firmware, mods, configuration, and other settings. So after this procedure, the phone becomes responsive and works normally. You can simply re-install the firmware to calibrate the performance and stability.
Low performance and stability issues generally raised as we use an Android phone for some time. This could be caused by the applications or something bad has happened to the OS, and it cannot function properly. In cases where you find that our regular troubleshooting doesn’t work, you can re-flash the native firmware. That restores that phone completely and leaves no footprints of bad apps/settings/viruses or any that could have bricked your phone. And most importantly, this process doesn’t void the warranty of the device. You can install the stock firmware on Google Nexus 7 if you’re using a custom ROM, that will restore its native operating system along with the warranty terms.
Following this method won’t hurt your phone in any manner. However, you should know that re-install the stock firmware on Nexus 7 wipes the internal memory completely. It ensures that this firmware is installed properly and bugs/issues have been wiped. Therefore, we highly suggest you back up stuff on your phone. Otherwise, it wouldn’t be possible to recover the deleted files once we have performed this method. You can start by creating a backup of files like documents, messages, contacts, photos, and videos. Before we could get started with the procedure, you must read all the prerequisites and make sure that you fulfill them.
Prerequisites
- This procedure is intended to be used on the Asus Google Nexus 7 tablet only. You shouldn’t implement this guide or any of the files we mention here on any other smartphone. That can make things worse.
- The flashing process goes through a complete Wipeout of the device’s internal memory. Therefore, it is suggested that you should back up all the important stuff before you move further. Now, there are tons of applications and services that help to create backup online and offline, both.
- Since we are flashing the stock firmware, it restores the Nexus 7 to 100% pure stock Android operating system. All sorts of custom firmware, images, recovery, mods, and configuration will be removed and replaced with the stock aspects.
- You need a Windows-based or Linux-powered laptop or desktop to perform this operation. Also, you need an official USB cable of your phone.
- You must download the Google USB Drivers on your computer. That will ensure that your phone is recognized by the computer. You can download the latest Google USB Drivers from →here.
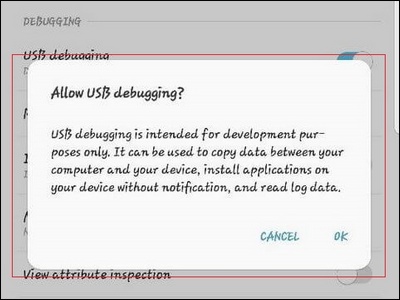
- Make sure that you enable the USB Debugging on your phone. Just follow this tutorial to enable this option on your phone.
Now, you’re ready to step ahead and unbrick your Google Nexus 7 using the official stock firmware.
How to flash stock firmware on Nexus 7 and unbrick it
The installation process is very simple. Google provides a complete OS package for this tablet phone that includes the flashing process. Just follow the below instructions to unbrick this smartphone:
- First, download the official stock firmware for Nexus 7 using the below links:
- Extract this package on your computer to obtain flash-all.bat (for Windows) and flash-all.sh (for Mac and Linux) file.
- Now, turn OFF phone using the power button.
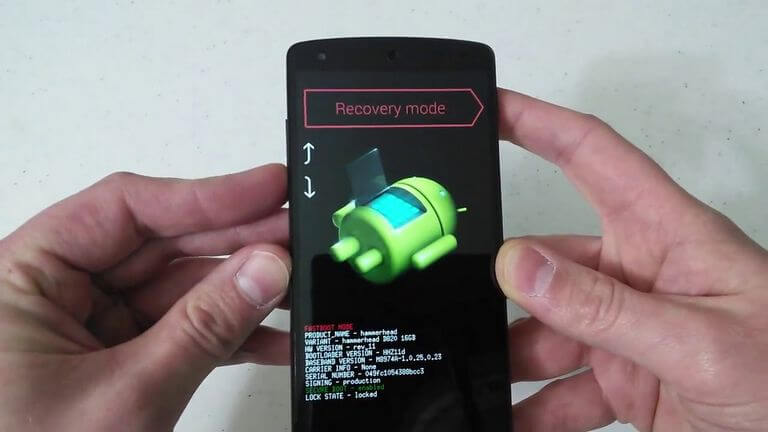
- And boot into the Fastboot mode –
- Pres and hold the Volume Down and Power buttons at the same time.
- Release the buttons once Fastboot screen appears.
- Using a USB cable, connect your phone to the computer.
- Now, from the extracted package, run flash-all.bat and flash-all.sh.
- This will start the flashing process. Do not press any button while it does the work.
- As soon as the flashing process is complete, just take off your phone from the computer and again boot into the Fastboot menu.
- Now, select the Recovery mode from the Fastboot menu.
- Under the recovery mode, perform:
- Wipe data/factory reset.
- Exit the Recovery mode.
That’s all you need to do. You’ve successfully unbricked your Nexus 7 using the official stock firmware. That completes our tutorial here. We hope that Nexus 7 users would find this guide helpful. If you have any question or stuck anywhere, just drop your comments below. We’ll help you with our best efforts.