How to Unbrick Samsung Galaxy A7 [All Variants]
Recently, Samsung has announced the all new Samsung Galaxy A7. In comparison to older models, this launch brings major improvements in camera, processor and the operating system. There are numerous enhancements that make this phone worth purchasing. Out of the box, it runs on the Android Oreo operating system and like any other phone, it is can be bricked. In this tutorial, we’ll help you unbrick or repair the Samsung Galaxy A7 using the official stock firmware. We will flash the stock firmware to revive this smartphone back, it will restore the phone completely and remove all bugs and problems.
Most importantly, this method is officially supported by Samsung. That means, it won’t cause any problem to the warranty terms. In current days, we usually spent so much time with our phone using third-party applications and developments. Of course, these applications and developments make the Android phones so much useful, however sometimes they cause the OS to malfunction and prevent it from running normally. Mostly, users are more likely to face such problems while dealing with custom aspects like custom firmware, recovery and specific mods. If you’ve bricked your Samsung Galaxy A7 somehow, then flashing the stock firmware could help you.
The flashing process formats the phone completely and doesn’t not leave any chance for issues and bugs to persist. It replaces the entire operating system with that native one. So, all affected aspects are replaced with untouched ones. That restores the Samsung Galaxy A7 to its native operating system, that usually known as downgrading process. That will wipe your phone completely. Thus, if you have any chance to backup stuff present on your phone, then you must do it. Once we perform this action, there is no way to go back and restore the wiped files and documents. You can use the Smart Switch app to sync and backup your phone, follow this guide; how to backup Samsung Galaxy phones.
That’s the safest way to deal with such problems. Remember, if you’re using a custom firmware or recovery, both the aspects will be removed and replaced with stock aspects. Many people downgrade their devices to just get to the stock operating system. Since we flashing the stock firmware, it restores the native state along with warranty terms. Also, it removes the root access. You’ll no longer have this privilege on your phone. You gotta re-root your phone after we install the stock firmware on your Galaxy A7 and unbrick it. You shouldn’t perform this action carelessly. Just follow the steps that we mention in this guide to revive your handset.
To restore the official firmware, we will use the Odin flashing utility. A commonly used flashing tool among Samsung devices. It allows users to to flash stock firmware, images and perform a few more actions. In order to work with this tool, you need a Windows-based computer, laptop or desktop. Before we begin, there are some prerequisites that you must read and follow.
Prerequisites
- We dedicate this guide to Samsung Galaxy A7 variants (2016, 2017, and 2018). One shouldn’t not implement it on any other smartphone. Probably, that could make thing even bad.
- You must aware yourself that this process wipe the internal memory completely. All the stuff resides in the internal memory will be deleted and there’s no way to recover them. In conclusion, we recommend you to backup all the important stuff before you go any further.
- If your phone runs on custom firmware or rooted already, both will be removed. If you wish, you can re-root your phone after you restore the official firmware.
- In order to perform this action, you need a Windows-based computer at your disposal along with USB cable of your phone. We will use the USB cable to connect your phone to the computer and Odin tool.
- You must install the USB Drivers of your Galaxy A7 on your computer. Conversely, the Odin tool won’t be able to detect your phone. Therefore, you better install the Samsung USB Drivers that you can download from →here.
That’s all about the requirements you need to prepare. Proceed further will wipe your phone’s internal memory and there’s no way to recover it. Thus, you perform this task carefully.
How to flash stock firmware on Samsung Galaxy A7
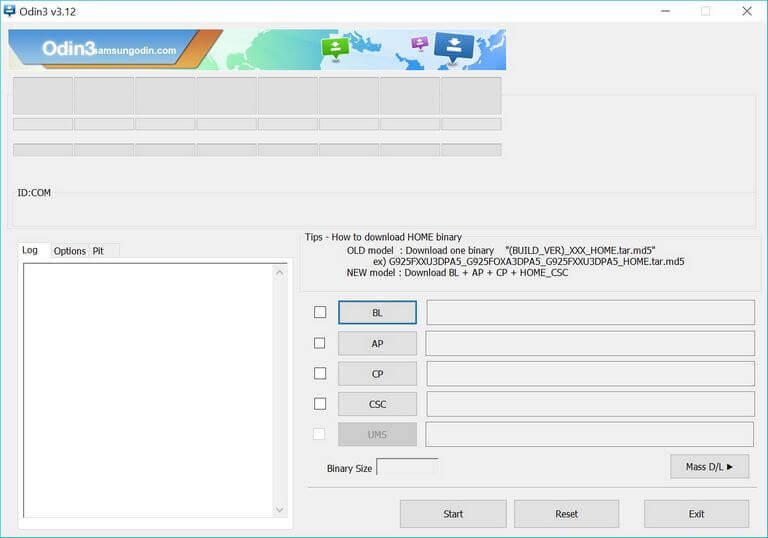
- Begin with downloading the Odin flashing tool from →here. Extract the content of the package to obtain the Odin program and run it. That Odin program looks like this:

- Now, head onto this →firmware website and download the firmware of your phone.
- Use the Model number to find the exact firmware. Tap on Settings->About Phone->Model number to locate the firmware of your phone.
- Extract the package to obtain .md5 files (firmware file).
- Next, turn OFF your phone using the Power OFF menu.
- Now, boot into the Download mode:
- Model 2016 and 2017 — Press and hold Volume Down, Home and Power buttons until the Samsung logo appears. You should then enter into the recovery mode.
- Model 2018 — Press and hold Volume Down and Power buttons at the same time until the logo appears. That will take you into the Download mode.
- Using the USB Cable, connect your phone to the computer. That Odin will detect your phone, the ID : COM section turns to blue. If nothing happens, install the USB Drivers again and try again.
- Then, tap on ‘AP’ button and load the firmware file (.md5 files).
- To begin the process, tap on ‘Start’ and wait till it finishes the flashing process.
- Take off your phone once the process is completed.
That ends all the necessary steps to complete this process. Now, your phone will reboot and bring out the setting screen soon. There enroll your Google account details to customize your phone.
So, that ends our tutorial here on how to unbrick the Samsung Galaxy A7 smartphone using the stock firmware. That will restore the original performance, stability and user experience. Users can perform this action to calibrate performance and deal with stability related issues.
If you need any help on this topic, just drop your comments below. We would get back you as early as possible with an appropriate solution.