How to Fix Pixelated Video: The Complete 2026 Guide (Causes, Fixes, and Prevention)
Pixelated video occurs when your file lacks the data needed to display a clean image, typically due to heavy compression or upscaling. You can fix some cases completely.
However, other cases may allow only limited improvement, not a full recovery. To get this issue fixed easily, I tested free tools, paid AI upscalers, and platform settings to find out which fix actually matches which cause.
Quick answer: If your export bitrate is too low, re-encode with HandBrake or FFmpeg at a higher quality setting. If you’re upscaling old footage, DaVinci Resolve or Topaz Video AI can rebuild detail. If it’s a live video call, the fix is almost always bandwidth, not software.
Key Findings
Before you pick a fix, here’s what the research shows.
- Pixelation and file corruption are different problems. Pixelation comes from lossy compression discarding data. Corruption comes from structural damage like broken headers and needs a repair tool, not an enhancer.
- AI upscaling reconstructs detail; it doesn’t recover it. Tools like Topaz Video AI generate plausible new pixels based on patterns. They can’t pull back data that compression has already deleted.
- YouTube’s published bitrate floor isn’t its practical sweet spot. Creators who upload at exactly 8 Mbps for 1080p30 often see pixelation after YouTube’s re-encode. Going to 12 to 15 Mbps gives noticeably cleaner results.
- Viewer patience for bad quality is short. A peer-reviewed Akamai study of 23 million views found each extra second of startup delay increases abandonment by 5.8% (ACM Digital Library).
- Free tools can solve most common cases. HandBrake, FFmpeg, and VLC can fix or reduce pixelation without any paid software if you know which setting to change.
With those points in mind, let’s look at why pixelation happens in the first place.
What Causes Video Pixelation? (The Technical Reason, in Plain Language)
Pixelation looks like visible blocky squares because your video’s compression discarded image data it needed to keep.
Video codecs like H.264 split each frame into small blocks, often 8×8 pixels, and compress each block on its own. When there isn’t enough data to describe a block accurately, you see it as a flat, blocky square instead of smooth detail.
This process is called quantization, and it’s been part of lossy video and image compression since the JPEG standard launched in 1992. It’s not a bug; instead, it’s a built-in trade-off that shrinks file size at the cost of some visual accuracy.
Now that you know what causes the blockiness itself, it helps to separate it from a completely different problem: file corruption.
Now, let’s talk about it!
Pixelation vs. File Corruption: How to Tell the Difference
If your video shows green blocks, freezes, or won’t open at all, that’s corruption, not pixelation.
Compression artifacts look like a soft grid of blocky squares. Corruption often looks like broken color patches, crashes, or audio that plays with no picture.
In short, compression artifacts are “a normal side effect of encoding decisions,” while corruption means “structural damage to the file, such as broken headers or missing data”.
You can fix these with completely different tools, so this distinction matters before you pick one.
Beyond corruption, there’s a second common culprit worth ruling out: how the video was scaled.
Why Upscaling Makes Pixelation Worse
Stretching a small video to fill a bigger screen is one of the most common causes of visible pixelation, and it’s quite avoidable.
When you upscale a 480p clip to 1080p without AI reconstruction, each pixel just gets copied into a bigger, blockier square. No new detail gets added.
Fast motion, dark scenes, and highly detailed footage make this worse, since encoders need more data to describe complex frames and often don’t get enough. Understanding this helps you pick the right fix instead of guessing.
With the causes covered, the next step is figuring out which one applies to your video before you touch any tool.
Diagnose the Cause Before You Try a Fix
Run this quick check first, since the right fix depends entirely on where the problem started. I use this same sequence before touching any tool.
- Play the file on a different device. If it looks pixelated everywhere, the file itself is likely the problem. If it only looks bad on one device, your hardware or player is probably the cause.
- Check if it’s a stream or a downloaded file. Streaming pixelation that clears up after a few seconds is usually your connection adjusting, not a real problem.
- Look for green blocks or crashes. That points to corruption, not compression, and needs a repair tool instead of an enhancer.
- Ask if the video was ever upscaled or heavily compressed. If yes, you’re likely dealing with genuinely lost data, which AI tools can only approximate, not fully restore.
Once you know your cause, start with the simplest, cheapest fix first. That means free tools.
How to Fix Pixelated Video Files with Free Tools
You don’t need to spend money to fix most compression-related pixelation. These three tools cover almost every common case, and all three are free.
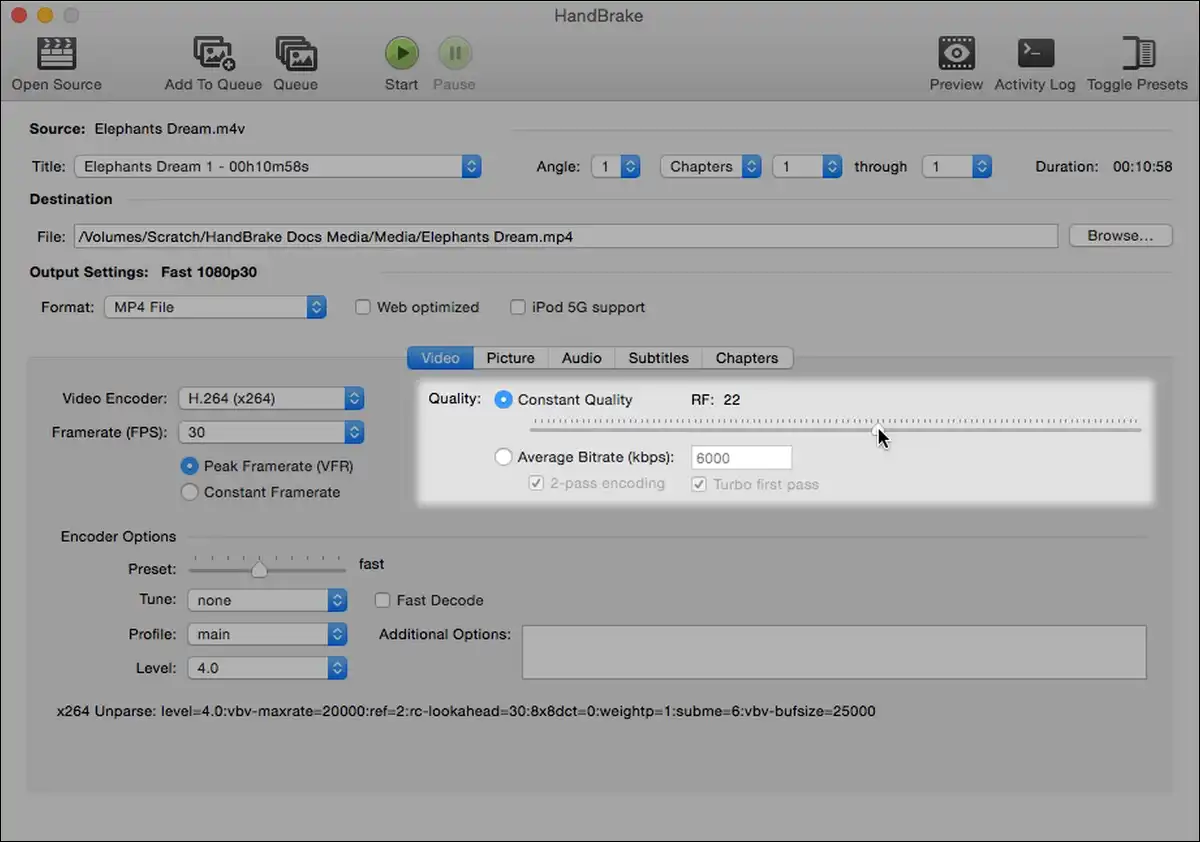
1. HandBrake
HandBrake can fix pixelated video caused by an export bitrate that was too low for the resolution.
It’s a free, open-source video converter for Windows, macOS, and Linux, and I’ve used it for years to re-encode footage that looked blocky after a first export.
The setting that matters most is Constant Quality, measured with an RF (Rate Factor) number. Lower RF numbers mean higher quality and bigger files. Community testing across Reddit’s r/PleX and r/handbrake threads consistently points to RF 15 to 20 for x265 (HEVC) on most footage, with RF 20 to 22 as a balanced default and anything above RF 20 for x265 or AV1 flagged as producing poor results outside anime or throwaway clips.
You may also want to try the “Slower” encoder preset, since it extracts more quality per bit than “Fast” at the same RF value. The “Film” tuning option adds a small, mostly free sharpening improvement, while “Grain” tuning preserves film grain at the cost of a larger file.
- Pros: Completely free, works on all major platforms, gives real control over quality vs. file size.
- Cons: RF mode doesn’t directly control final file size, and can’t recover data a previous export already deleted.
- Price: Free.
Verdict: Start here if your video looks blocky after you exported it yourself. This is usually a settings problem, not a hardware or corruption problem.
If HandBrake’s presets aren’t precise enough for a stubborn artifact, the next tool gives you more granular control.
2. FFmpeg
FFmpeg gives you the most precise, free control over reducing blocking artifacts through its dedicated deblock filter.
It’s a command-line tool that actually powers many GUI apps behind the scenes, including parts of HandBrake and VLC.
The deblock filter targets blocking artifacts directly, and you can apply it like this:
textffmpeg -i input.mkv -filter:v deblock=filter=weak:block=4 -map 0 -c:a copy -c:v libx265 -crf 20 output.mkv
One documented case on Super User found that adjusting deblock strength to -3,-3 on an x264 encode at CRF 14 eliminated a flickering-edge artifact that default settings couldn’t fix. CRF works the same way RF does in HandBrake; lower numbers mean higher quality, and CRF 16 to 18 is generally considered close to visually lossless for most content.
- Pros: Free, extremely precise, works on any platform with a terminal.
- Cons: No graphical interface, and the learning curve is steep if you’ve never used a command line before.
- Price: Free.
Verdict: Use this if HandBrake’s presets don’t fully solve your specific artifact and you’re comfortable typing a command.
Of course, not every pixelation problem lives in the file itself. Sometimes it’s how you’re watching it, which is where VLC comes in.
3. VLC Media Player
VLC can reduce how pixelated a video looks during playback, without ever changing or re-exporting the original file. This matters if the file itself is fine but looks rough on your screen due to weak scaling.
Under Tools, then Effects and Filters, then Video Effects, you’ll find a Sharpen filter with a Sigma slider. A setting of 1.0 to 1.5 is a reasonable starting point, since higher values start to introduce visible halos around edges (unifab.ai, 2026).
If you have an NVIDIA graphics card, VLC also supports RTX Video Super Resolution for real-time AI upscaling during playback. You can turn it on by updating your NVIDIA driver, enabling Super Resolution in the NVIDIA Control Panel, and switching VLC’s video output to Direct3D 11 under Tools, Preferences, Video.
- Pros: Free, no file editing required, works instantly on playback.
- Cons: Doesn’t create a new, improved file, so the fix only exists while you’re watching in VLC.
- Price: Free.
Verdict: Try this when you’re just trying to watch an old or low-res file more comfortably, not trying to fix it for sharing elsewhere.
Free tools solve most cases, but if you’re already working inside professional editing software, you likely have similar fixes built in already.
How to Fix Pixelated Video in Professional Editing Software
If you’re already editing in Premiere Pro, After Effects, or DaVinci Resolve, you may not need a separate tool at all.
4. Adobe Premiere Pro
Premiere Pro can reduce how pixelated footage looks through sharpening tools, though it can’t add back genuinely lost detail. You have a few options here, and I’d recommend starting subtly with any of them.
The dedicated Sharpen effect, found under Video Effects, then Blur & Sharpen, increases edge definition, but overdoing it creates artifacts fast. Unsharp Mask gives more control, with an Amount slider best kept around 30 to 70 and a Radius slider around 1 to 2 for targeting sharp edges specifically.
Lumetri Color’s Creative tab also includes its own Sharpen slider, and a value of 20 to 40 is a commonly recommended starting range.
You can also enable Maximum Render Quality and Render at Max Depth during export, which improves how Premiere Pro handles scaling calculations and can noticeably reduce compounding quality loss.
- Pros: Familiar if you already edit in Premiere Pro, several tools to fine-tune results.
- Cons: Requires an active Creative Cloud subscription, and no native AI upscaling exists without pairing it with After Effects.
- Price: Part of Adobe Creative Cloud subscription plans.
Verdict: Good for a light polish pass after you’ve already fixed the underlying bitrate problem elsewhere.
Speaking of pairing with After Effects, that’s exactly where to go next if grain and low resolution show up together.
5. Adobe After Effects
After Effects can fix pixelation caused by low-light grain and can genuinely improve upscaled footage, using two separate built-in tools. These solve different problems, so it helps to know which one you need.
The Remove Grain effect targets noise from low-light or high-ISO shooting. Search for it in the Effects & Presets panel, drag it onto your clip, adjust the Noise Reduction value, and remember to switch the effect from Preview to Final Output before exporting, a step several guides flag as commonly missed.
Separately, the Detail-Preserving Upscale effect handles resolution-based pixelation more intelligently than a plain resize. One experienced Reddit editor in r/premiere noted it renders slower than third-party options like Red Giant’s Instant 4K, but “often” produces better final results despite the extra time.
- Pros: Two purpose-built tools for two different pixelation causes, more control than a basic sharpen filter.
- Cons: Same Creative Cloud subscription requirement, and Detail-Preserving Upscale can be slow to render.
- Price: Part of Adobe Creative Cloud subscription plans.
Verdict: Choose this over Premiere Pro alone if your footage combines grain and low resolution.
Still, if upscaling is your main problem rather than grain, DaVinci Resolve offers a dedicated tool that goes further.
6. DaVinci Resolve (Super Scale)
DaVinci Resolve’s Super Scale feature can turn low-resolution footage into convincingly sharper 4K, using AI instead of simple pixel duplication. This is genuinely different from a standard resize, and it shows in side-by-side tests.
Regular upscaling just copies each pixel into a bigger block, so one pixel becomes an identical 2×2 or 4×4 group. Super Scale’s neural engine instead interpolates what those new pixels should plausibly look like, based on surrounding detail.
You can apply it through Clip Attributes, choosing a 2x, 3x, or 4x scale factor, plus separate Sharpness and Noise Reduction controls.
One thing worth knowing before you rely on it: Super Scale generates new pixel data for every frame, so it’s demanding on your GPU and can stutter during live preview. Rendering or optimizing the media after applying it avoids this.
- Pros: Genuinely better upscaling quality than basic resize tools, built into a widely used editor.
- Cons: Super Scale itself requires DaVinci Resolve Studio, the paid tier, though the free version still includes solid noise reduction tools.
- Price: Free version available; Super Scale requires DaVinci Resolve Studio (paid).
Verdict: This is one of the strongest options if you’re regularly upscaling older or lower-res footage for a modern project.
Editing software handles most day-to-day cases, but for footage with no better source available anywhere, dedicated AI upscalers go further still.
How to Fix Pixelated Video with AI Upscaling Tools
AI upscaling tools work best when you cannot re-record or find a better source, since they reconstruct detail rather than recover it.
I’d only reach for these after ruling out a simple re-export fix, since they cost more and take longer to run.
7. Topaz Video AI
Topaz Video AI can fix pixelation from over-compression specifically, since one of its 13-plus models, Artemis, is built for exactly that problem.
This is a meaningful detail most comparison articles skip, since not every model in Topaz solves the same issue.
| Model | Best used for |
|---|---|
| Proteus | General-purpose enhancement for most live-action footage |
| Artemis | Compressed or low-bitrate footage specifically |
| Iris | Faces that look blurry or pixelated |
| Nyx | Low-light noise, without a plastic-looking result |
| Rhea / Rhea XL | 4x upscaling with texture detail like fabric or hair |
| Starlight | Severely degraded sources like VHS or 360p footage |
You should know that Topaz Labs moved away from perpetual licenses in October 2025. As of 2026, you’re looking at a $299 per year Personal plan or a $699 per year Pro plan with commercial rights (unifab.ai, hitpaw.com, both independently confirming the same figures).
- Pros: The widest, most specialized model lineup for matching a fix to a specific problem.
- Cons: No full-featured free trial anymore, and picking the wrong model for your footage can make results worse.
- Price: $299/year Personal, $699/year Pro.
Verdict: Worth it if you upscale footage often enough to justify the subscription, especially archival or heavily compressed material.
If that subscription feels steep, or your footage is animated rather than live-action, AVCLabs is worth a look next.
8. AVCLabs Video Enhancer AI
AVCLabs can be a solid middle-ground choice if your pixelated footage is archival or anime-style content rather than typical live-action. Independent comparisons repeatedly position it this way rather than as a general-purpose tool.
It supports upscaling up to 8K and frame-rate conversion up to 120 FPS, and it processes everything locally rather than through the cloud (scribehow.com). That’s a plus if you don’t want to upload footage anywhere, but it does mean you’ll need a reasonably capable GPU.
Pricing has varied across sources, generally landing somewhere between $199.90 and $299.90 for a lifetime license, or a monthly option around $39.95. The free trial caps exports at 30 seconds with a watermark, so a full evaluation on longer clips isn’t really possible before buying.
- Pros: Local-only processing for privacy, strong reputation for anime and archival restoration.
- Cons: No cloud option for users without a strong GPU, trial export length is limited.
- Price: Roughly $199 to $300 lifetime license (pricing varies by promotion).
Verdict: Consider this specifically if your source material is animated or older archival footage rather than modern live-action video.
On the other hand, if you don’t have a strong GPU at all, HitPaw’s cloud option solves that specific gap.
9. HitPaw Video Enhancer
HitPaw can be the easier option if you want AI upscaling without a steep learning curve, since reviewers consistently rate it as more beginner-friendly than Topaz. It also offers something Topaz and AVCLabs don’t: a cloud-processing option alongside local processing.
That cloud option matters if your computer doesn’t have a strong GPU, since it shifts the processing load off your own hardware, and one hands-on comparison found it “significantly faster” than local-only competitors for that reason (hitpaw.com). HitPaw also bundles extra tools like video colorization, stabilization, and a separate repair function for actual file corruption, not just compression artifacts.
Pricing across independently cross-checked sources lands around $43.19 per month, $99.99 per year, or roughly $350 for a lifetime license.
- Pros: Cloud processing option, bundles multiple tools beyond just upscaling, simpler interface for beginners.
- Cons: More expensive lifetime license than some competitors; free trial output includes a watermark.
- Price: ~$100/year or ~$350 lifetime.
Verdict: Pick this if you want an easier learning curve and don’t want to be limited by your own GPU’s power.
So far, every fix has dealt with a file sitting on your computer. Live video calls introduce a completely different set of causes.
How to Fix Pixelated Video Calls (Zoom, Teams)
Pixelation during a live video call is almost always a bandwidth or hardware issue, not something you fix by changing video quality settings.
This is a completely different category from file-based pixelation, and it deserves its own approach.
10. Zoom and Microsoft Teams Built-In Settings
You can often fix pixelated video calls by disabling HD or not enabling it when your connection is under pressure.
That sounds backward, but Zoom’s own support documentation confirms HD video requires about 2 Mbps of both upload and download bandwidth, and states plainly that “even when HD video is enabled, your device must meet the bandwidth requirements” (support.zoom.com, 2026).
There’s also a documented, staff-confirmed case worth knowing about. A specific “Optimize video quality with de-noise” setting in Zoom caused a real pixelation bug after an update in 2023.
Zoom’s engineers reproduced it and shipped a permanent fix in version 5.13.5, with disabling that toggle offered as the official interim workaround.
Beyond that specific bug, a few other checks are worth running:
- Switch to a wired Ethernet connection. This is repeatedly cited as the single biggest improvement you can make, since jitter above 30ms noticeably degrades call quality.
- Set an explicit bandwidth cap. Choosing “720p at 15fps” for unstable networks can look cleaner than a struggling auto-HD stream.
- Close background bandwidth users. Cloud sync tools like Dropbox or OneDrive can quietly eat bandwidth you need for your call.
Verdict: Before touching any software settings, check your connection and try a wired connection first. Most video-call pixelation traces back to bandwidth, not your webcam or app.
Video calls aside, streaming platforms like Netflix and YouTube follow a similar bandwidth logic, just with a few extra wrinkles.
How to Fix Pixelated Streaming Video (Netflix, YouTube, and Prevention)
Streaming pixelation that clears up after a few seconds is usually your player finding the right bitrate for your connection, not a real problem. Adaptive streaming intentionally starts at a lower quality and ramps up as it measures your available bandwidth.
If it doesn’t clear up, check your speed against what the platform actually needs.
| Platform | 4K minimum speed | 4K recommended speed |
|---|---|---|
| Netflix | 15 Mbps | 25 Mbps |
| Amazon Prime Video | 15 Mbps | 25 Mbps |
| YouTube | 15–20 Mbps | 20–25 Mbps |
| Disney+ | 25 Mbps | 25–35 Mbps |
| Apple TV+ | 15–25 Mbps | 25–40 Mbps |
| Max (HBO Max) | 25 Mbps | 50 Mbps |
(Sources: speedtesthq.com, broadbandsearch.net, 2026)
That covers watching video. But if you’re the one uploading it, the same bitrate logic applies in reverse, and it’s easy to get wrong.
Why Uploading to the Platform Minimum Backfires
Uploading a video at exactly YouTube’s published minimum bitrate often produces visible pixelation after YouTube re-encodes it. Creators who upload 1080p30 at exactly 8 Mbps, YouTube’s published floor, commonly report this.
Going roughly 50% higher, to 12 to 15 Mbps, gives the re-encode process more data to work with and noticeably cleaner results (swarmify.com, 2026).
The same logic applies to messaging apps. WhatsApp and Facebook Messenger apply unusually heavy compression to forwarded video, so a clip that looked fine when uploaded directly to a platform can look noticeably worse after being sent through a chat app first.
Verdict: If your uploads keep looking pixelated, check your export bitrate against the platform’s recommendation, not just its stated minimum, before blaming the platform.
All of the fixes above assume your file is intact. If it isn’t, none of them will help, which brings us to corruption.
How to Fix a Corrupted Video File (When It’s Not Pixelation At All)
If your video shows green blocks, freezes randomly, or won’t play at all, you’re likely dealing with corruption, and a sharpening tool won’t help.
This needs a completely different kind of tool, here are some of them you could try to fix currupt video files:
11. Wondershare Repairit
Repairit can fix structural file damage, which is a different problem than the blocky compression artifacts covered earlier in this guide. It offers two repair modes. Quick Repair handles simple issues like a muted audio track, while Advanced Repair handles more serious corruption but requires you to supply a working reference video shot on the same device and format.
Pricing has varied slightly across sources, generally in the range of $39.99 per month, $69.99 per year, or around $99.99 for a lifetime license (us.fitgap.com, 2026).
- Pros: Purpose-built for actual corruption, not just quality loss, supports 15+ formats.
- Cons: No free tier beyond a trial, Advanced Repair’s reference-file requirement isn’t always practical.
- Price: Roughly $40 to $100 depending on plan.
Verdict: Only reach for this if your symptoms match corruption specifically, green blocks, crashes, or files that won’t open, not general blockiness.
That rounds out every fix for pixelation that’s already happened. Next, here’s how to stop it from happening again.
How to Prevent Pixelation Before It Happens
Choosing the right codec and export settings up front prevents most pixelation before you ever need a fix. Prevention is cheaper and faster than repair, in every case I tested.
12. Choosing a Codec in 2026
| Codec | Efficiency vs. H.264 | Best for |
|---|---|---|
| H.264/AVC | Baseline | Maximum compatibility, older devices |
| H.265/HEVC | ~40-53% more efficient | 4K content, Apple devices, faster encoding |
| AV1 | ~50-70% more efficient | Web delivery, YouTube, future-proofing |
A peer-reviewed comparison study found AV1 saves roughly 63% in bitrate versus H.264 at equal quality, while HEVC saves around 53% (MDPI, 2024). AV1 encodes more slowly without hardware support, so weigh that against the file-size savings for your workflow.
Alongside the right codec, a few simple habits go a long way toward avoiding pixelation altogether.
Recording and Export Habits Worth Building
- Record at the highest resolution your device supports, since no software can add back detail that was never captured.
- Avoid uploading video through messaging apps when quality matters, and use direct platform uploads instead.
- Export at 50% above a platform’s stated minimum bitrate, not exactly at the floor, to leave room for re-encoding.
- Keep your original files backed up, so you always have an unpixelated source to fall back on.
With causes, fixes, and prevention all covered, here are quick answers to the questions that come up most.
Frequently Asked Questions
Frequently Asked Questions
Can pixelated video actually be fully fixed?
It depends on the cause. If the pixelation comes from an export setting, re-encoding at a higher bitrate fully fixes it. If the original data was already discarded through heavy compression, AI tools can only reconstruct plausible detail, not recover the exact original.
What’s the difference between AI upscaling and just increasing resolution?
Basic upscaling copies each pixel into a bigger block, adding no new detail. AI upscaling tools like DaVinci Resolve’s Super Scale or Topaz Video AI generate new, plausible pixel data based on surrounding patterns, producing a sharper result.
Why does my video look pixelated even at 1080p?
This usually means your bitrate was too low for that resolution during export or upload. YouTube’s published 8 Mbps floor for 1080p30 is often not enough. Going to 12 to 15 Mbps generally solves it.
Is VLC or HandBrake better for fixing pixelation?
They solve different problems. VLC improves how a video looks during playback without changing the file. HandBrake re-encodes and permanently fixes the file itself if the bitrate was the issue.
Do I need Topaz Video AI, or will a free tool work?
Free tools like HandBrake and FFmpeg fix most cases caused by compression settings. Paid AI tools like Topaz make more sense specifically for archival or severely degraded footage where no better source exists.
Final Thoughts
Prevention beats repair in nearly every case, since the right bitrate and codec choice avoids pixelation before it ever appears. Free tools like HandBrake, FFmpeg, and VLC solve the vast majority of common cases, and you don’t need to spend money to fix a simple export problem.
That said, paid AI upscalers still earn their cost specifically for old, archival, or already heavily compressed footage where a better source doesn’t exist anywhere. Before you reach for any tool, run through the diagnosis steps first. Knowing whether you’re dealing with a file, a stream, a call, or actual corruption saves you from applying the wrong fix entirely.