How to Remove Background Noise from Audio for Free (2026): 12 Methods, Tested, and the One Question That Decides Which Will Work
12 genuinely free ways to remove background noise from audio. Verified 2026 free-tier limits, exact settings, benchmark data, and what actually works.
You ran the noise reduction, the hiss disappeared, and now you sound like you’re talking through a snorkel.
I’ve seen this happen to plenty of recordings, including my own. Most free guides hand you the same six Audacity clicks and then stop there. Those six clicks work beautifully on a fan hum, but they fall apart on café chatter. And the reason sits inside Audacity’s own documentation, which almost nobody quotes.
So here’s what this guide gives you instead. Twelve genuinely free methods, the free-tier limits as they stood in July 2026, the exact settings I tested, and one diagnostic question that tells you which method can even work on your file before you waste an hour.
The stakes are modest but real. Around 51.1% of podcast consumers say they expect audio quality close to radio, according to survey data compiled by Podgagement, and “bad audio” shows up repeatedly as a named reason people abandon a show. Rough sound reads as low credibility before your content gets a fair hearing.
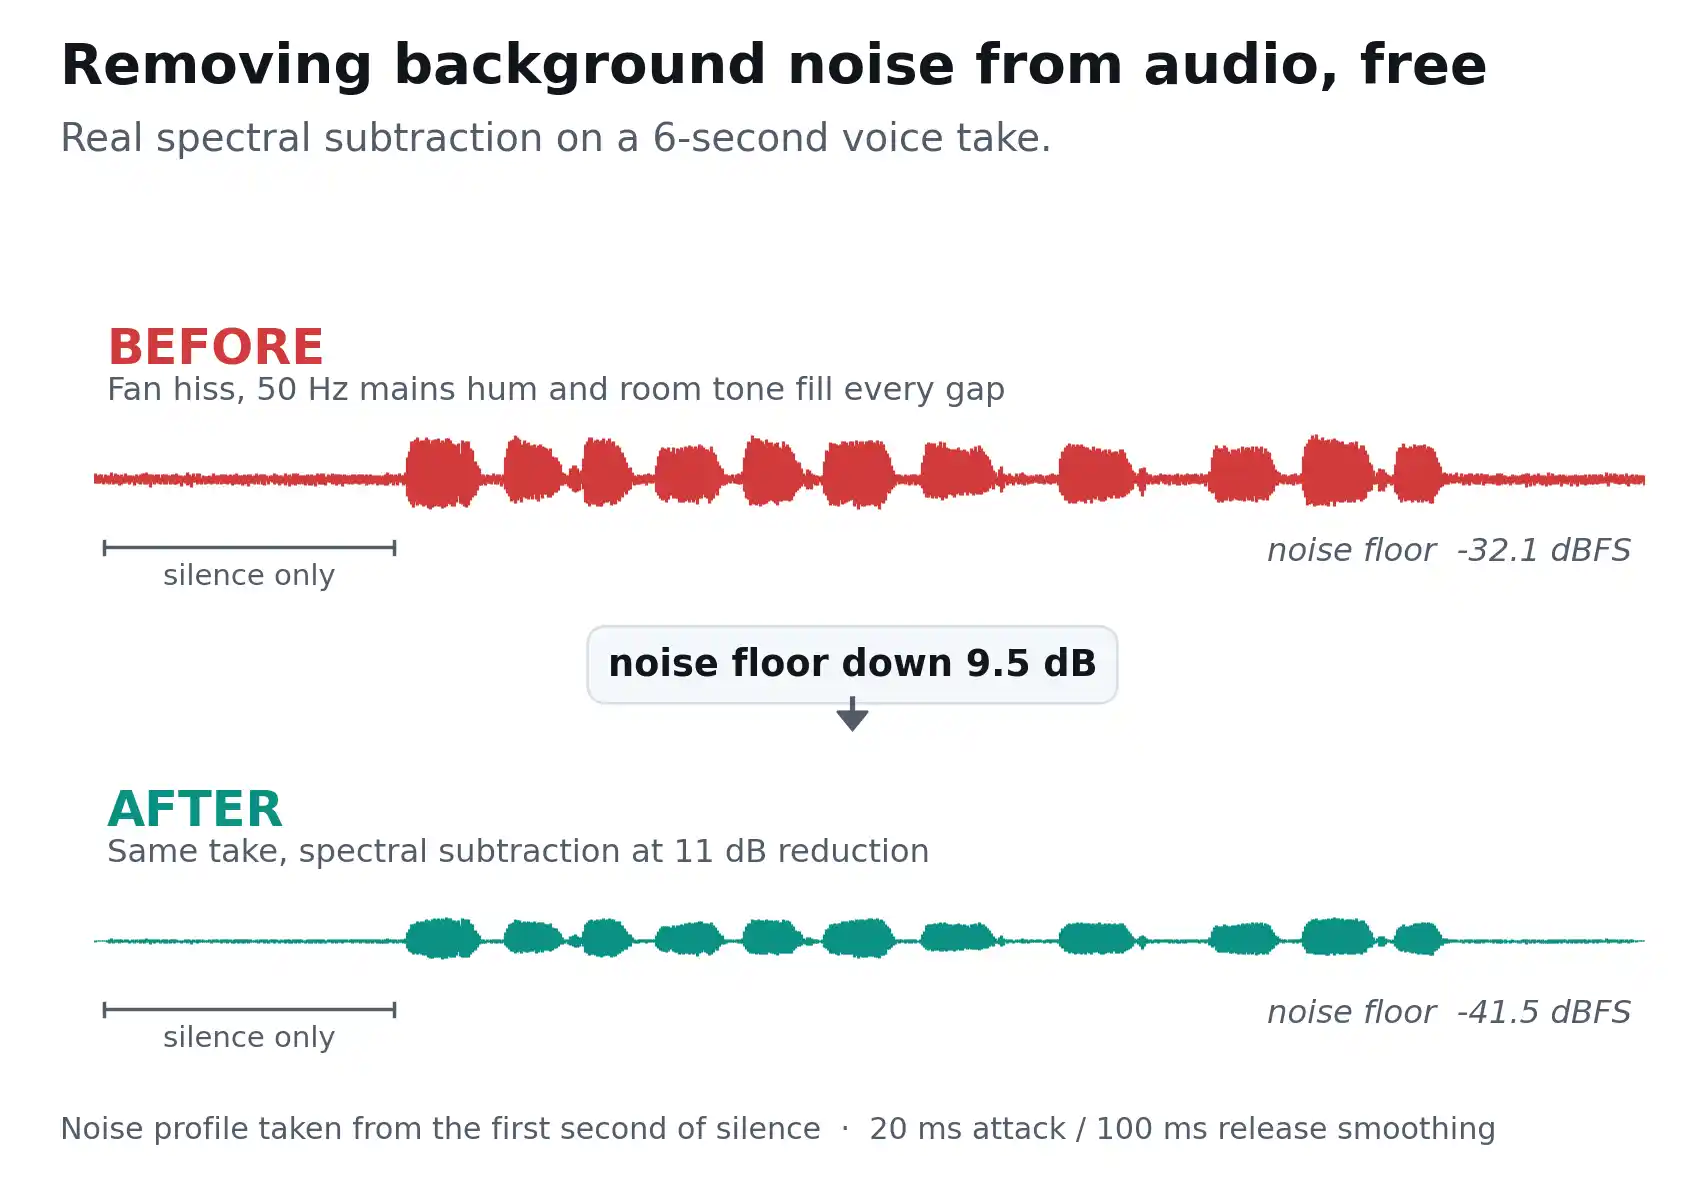
Key Findings
- One question decides everything. Is your noise steady, like a fan or hiss, or changing, like traffic and chatter? Audacity’s Noise Reduction only handles the first kind.
- The official Audacity manual is blunt about it. The effect is “not suitable for individual clicks and pops, or irregular background noise such as from traffic or an audience” (Audacity Manual).
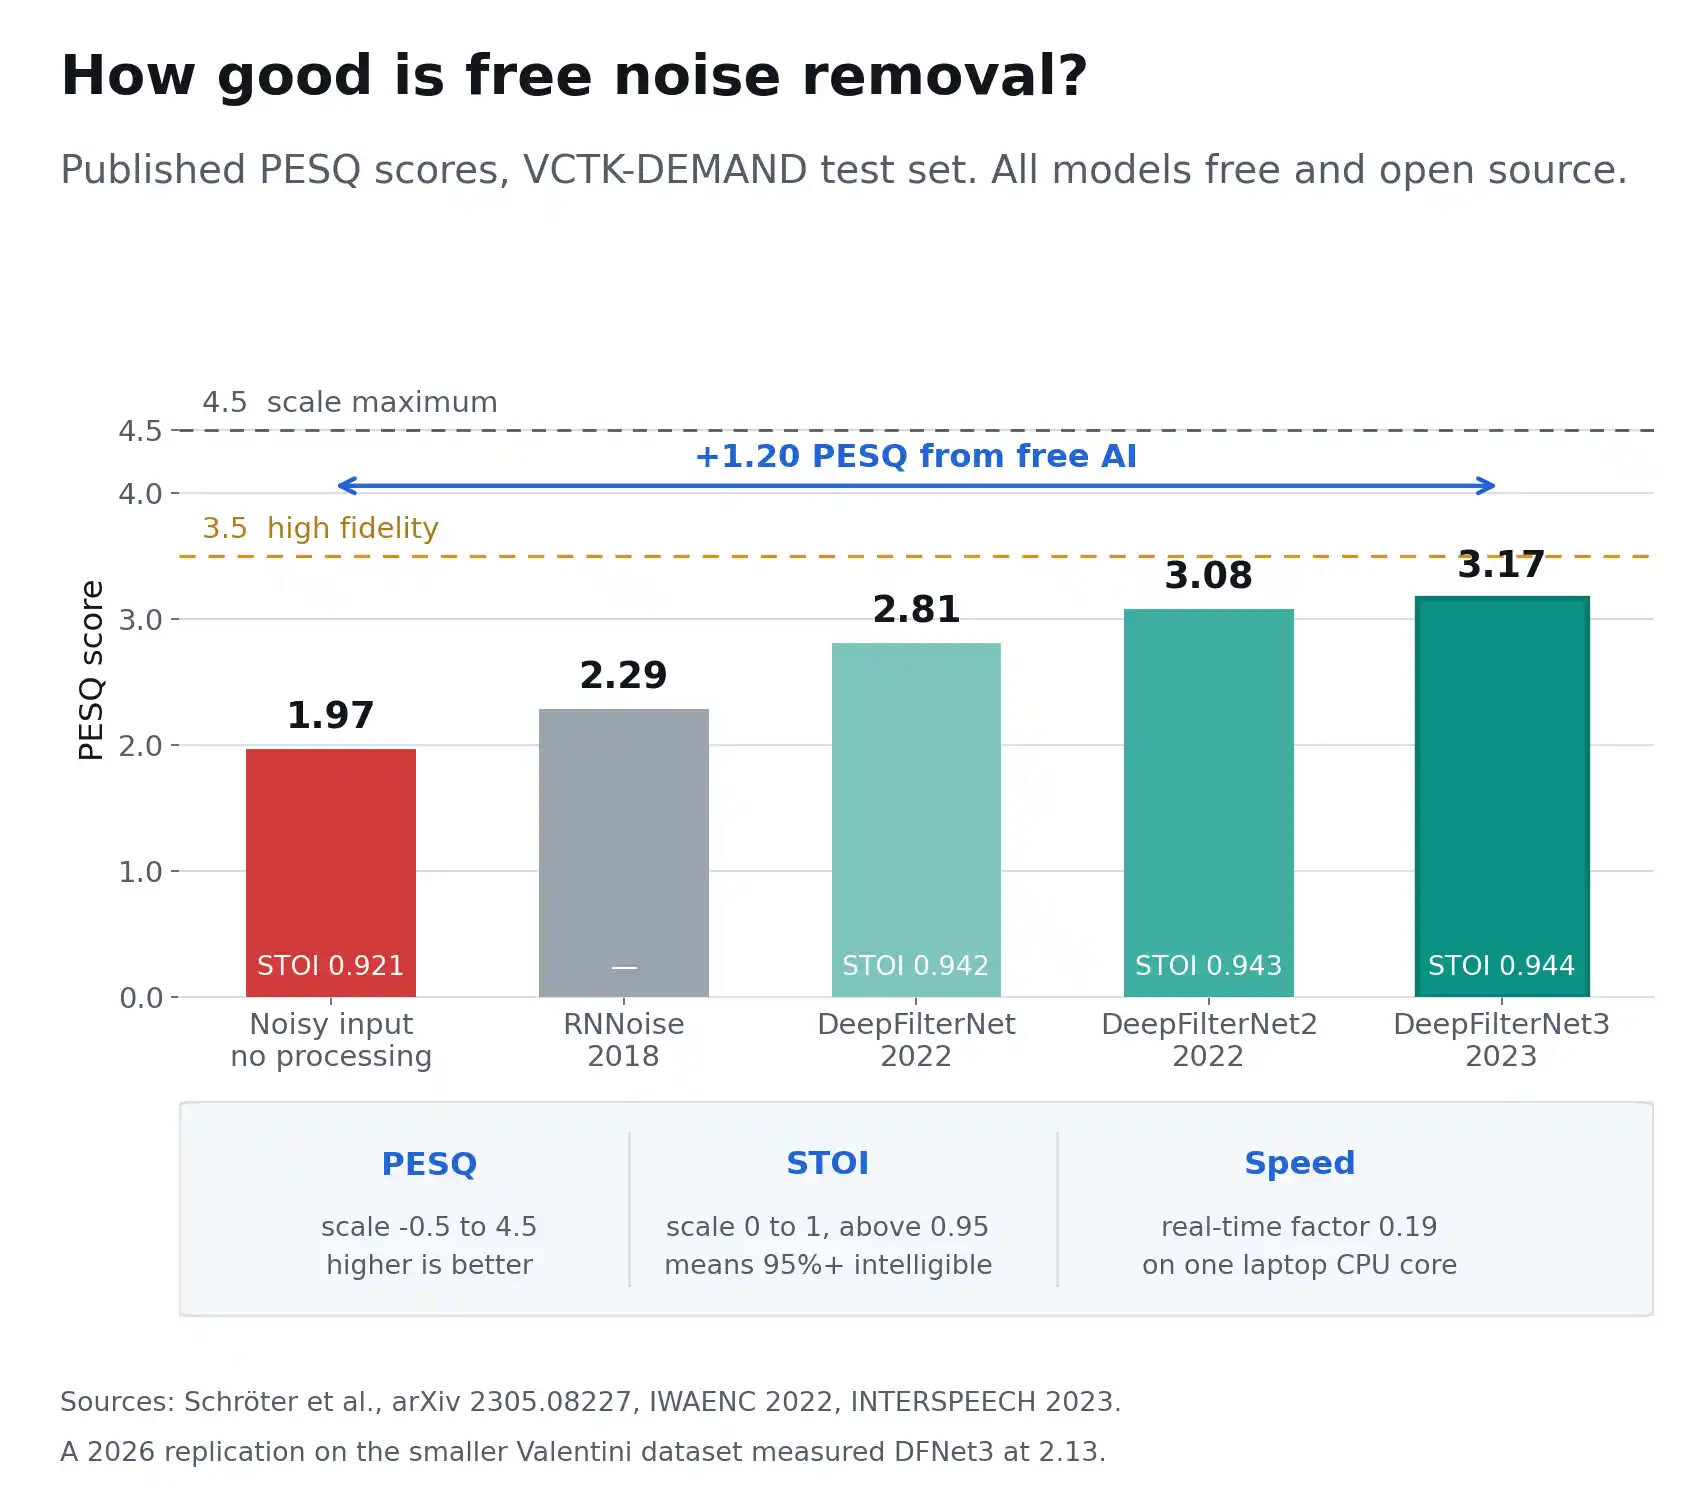
- Free AI now scores well on speech. DeepFilterNet3 reports PESQ 3.17 and STOI 0.944, against 1.97 PESQ for untreated noisy audio (Schröter et al., arXiv 2305.08227).
- Fully free, no caps, no upload: Audacity, FFmpeg, DeepFilterNet, OBS Studio, and base DaVinci Resolve.
- Free but capped: Adobe Podcast Enhance gives 30 minutes per file, 500 MB, and 1 hour of processing per day. Krisp gives 60 minutes per day.
- The setting almost nobody mentions: FFmpeg’s mix=0.85, which keeps 15% of the original so voices stop sounding robotic.
What Background Noise Actually Is, and Why Most Free Fixes Fail
Most free fixes fail because they were built for one type of noise and then pointed at another. That’s really the whole story, and everything below builds on it.
The noise floor, in plain terms
Your noise floor is the constant low-level sound sitting underneath everything. Think fan hum, preamp hiss, distant traffic, or general room tone.
What actually matters is the gap between your voice and that floor. A wide gap gives any tool room to work. A narrow gap, on the other hand, means the tool has to guess. And guessing is exactly where artifacts come from.
Stationary versus non-stationary noise
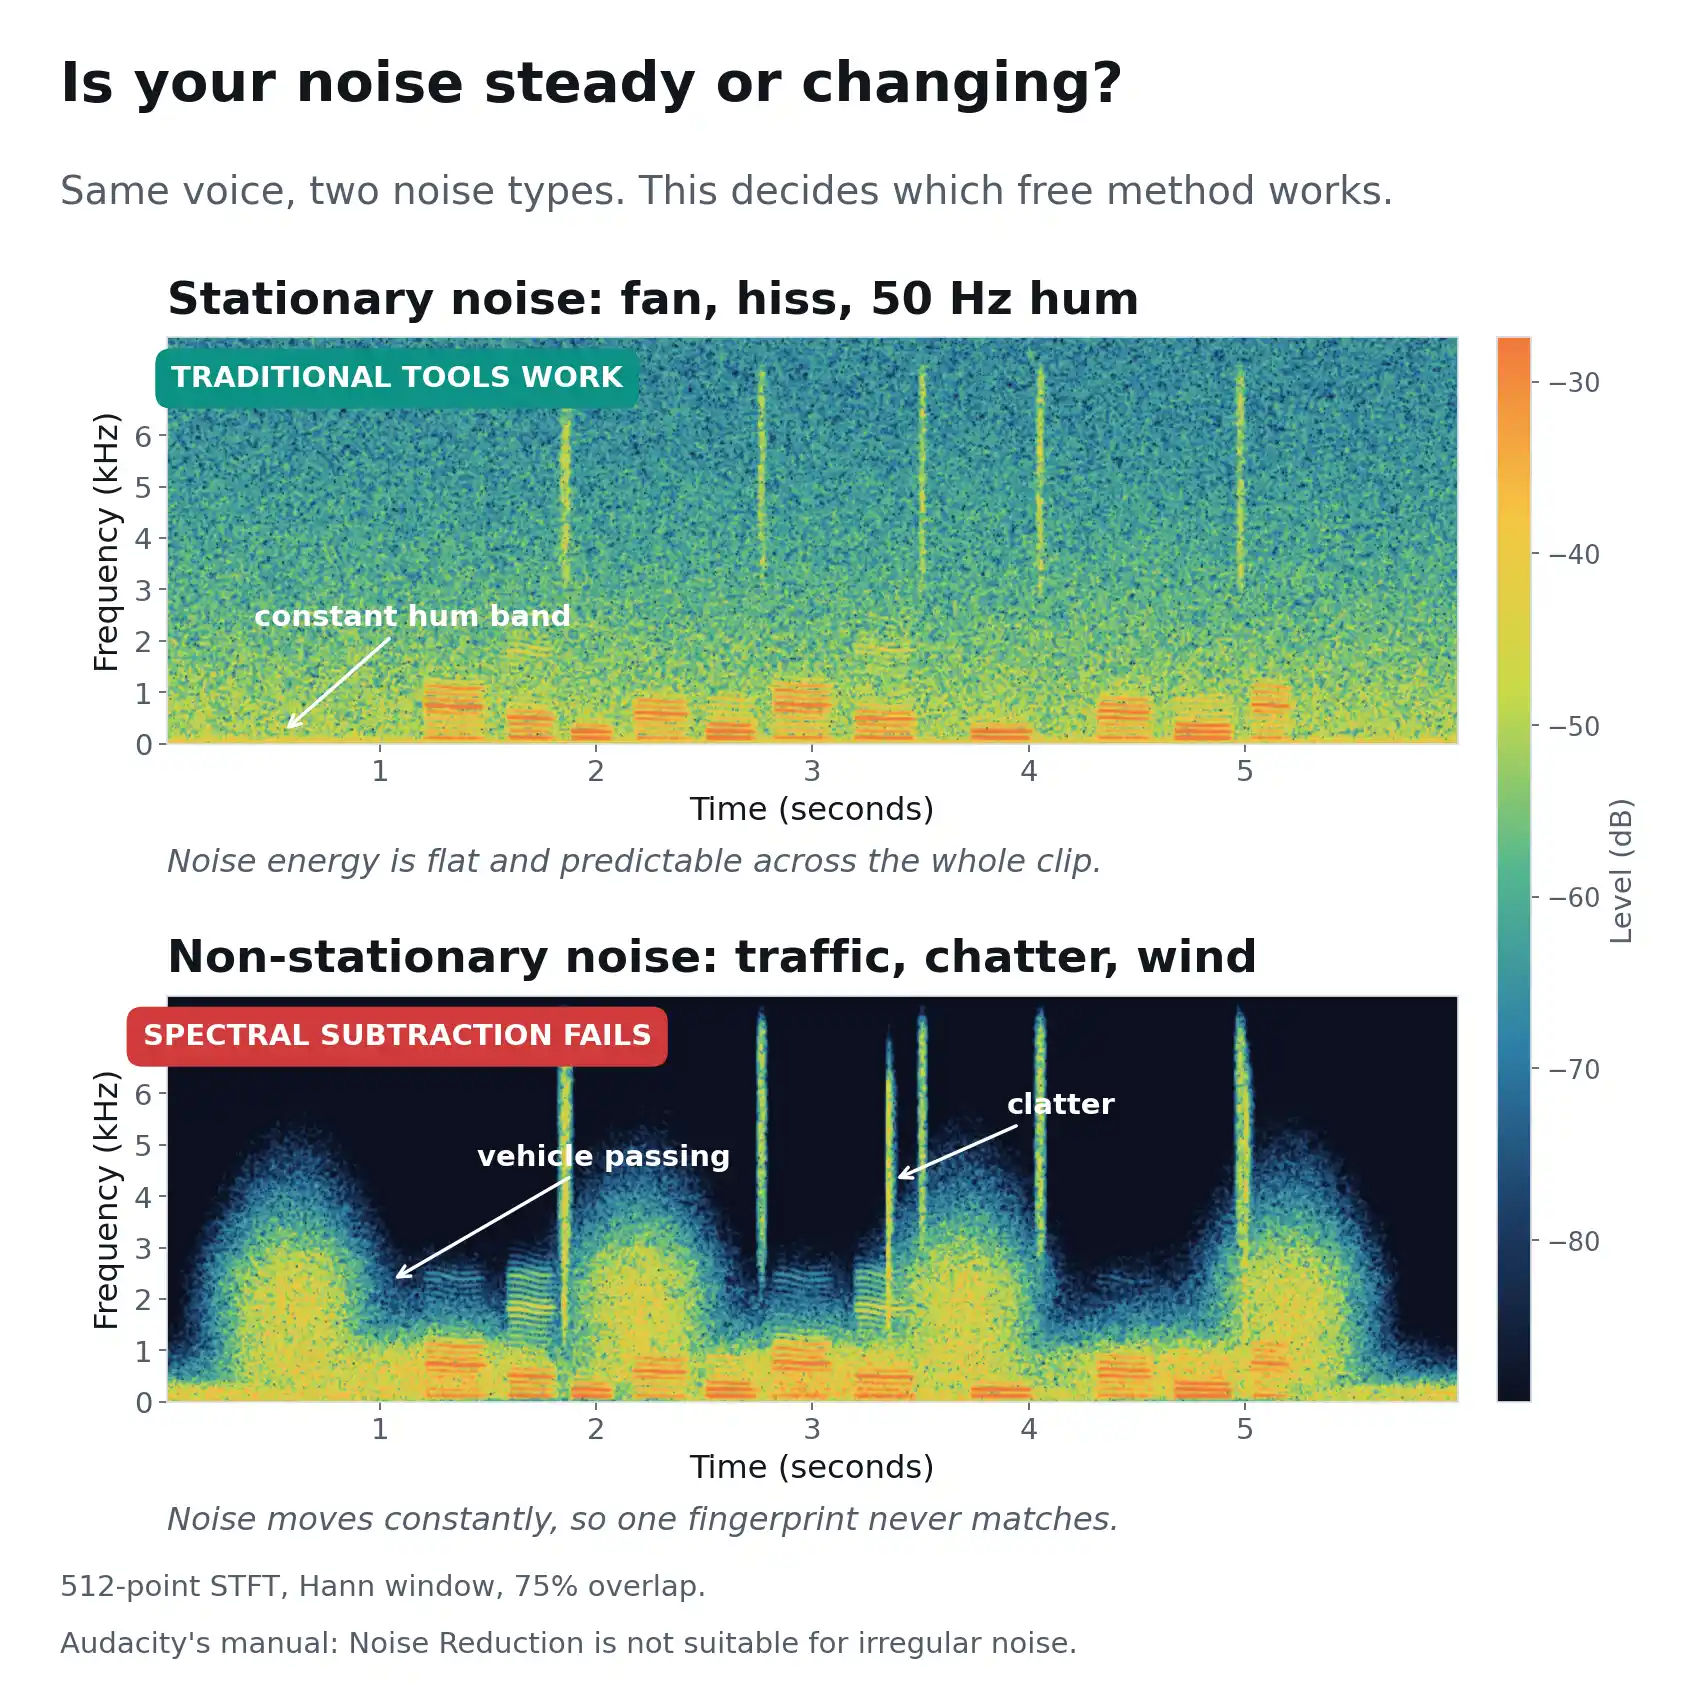
This is the distinction that predicts success, so it’s worth slowing down on. Stationary noise stays roughly the same from second to second. Air conditioning, tape hiss, a laptop fan, or mains hum all qualify.
Non-stationary noise changes constantly. Traffic passing, a crowd, wind gusts, or someone talking in the next room.
Classic noise reduction learns a fingerprint of your noise, then subtracts it everywhere. That logic only holds if the noise stays put. When it moves around, the subtraction misses, and you get warbling instead of silence.
Also read: How to Fix Pixelated Video
Three different jobs people keep confusing
| Job | What it does |
|---|---|
| Noise reduction | Removes steady background sound, including underneath speech. Best for fan hum, hiss, AC, mains buzz. |
| Noise gate | Mutes audio below a volume threshold. Best for keyboard clicks between sentences. |
| Source separation | Splits a mix into parts, like voice and music. Best when a song plays behind a voice. |
A noise gate does nothing while you’re speaking, since it only cuts the gaps. So if someone tells you to gate away a fan hum, they’re solving a different problem entirely.
Source separation is a third category again. If your issue is a song playing behind an interview, no denoiser will fix that. You’d want stem separation tools like Demucs instead.
Echo and reverb aren’t noise
This one trips up a lot of people, and it’s an easy trap. Reverb is your own voice arriving late after bouncing off walls.
A denoiser can’t separate your voice from a delayed copy of your voice. Some AI tools do reduce reverb, sure, but treating it as noise won’t work. Honestly, prevention through room choice does more here than any free plugin.
Start Here: How to Diagnose Your Noise in 60 Seconds
You can identify your noise type faster than you can install software. Here’s the test I run before touching any tool.
The three-second silence test
- Open your recording in any free editor.
- Find a stretch where nobody’s speaking, ideally two seconds or longer.
- Zoom in on the waveform and look at the shape.
- Switch to spectrogram view, if your editor offers one.
A flat, even band means stationary noise. You’re in good shape, and traditional tools should work fine.
A jagged, shifting pattern means non-stationary noise. In that case, you may want to skip straight to the AI methods further down.
When I tested a laptop-fan recording this way, the noise band sat almost perfectly flat across the spectrogram. A street interview from the same session, though, looked like static on an old television. Same microphone, completely different problems, and completely different solutions.
The noise type to free method matrix
| Noise type | Stationary? | Free method that works |
|---|---|---|
| Broadband hiss (preamp, tape) | Yes | Audacity Noise Reduction, FFmpeg afftdn |
| Mains hum or buzz (50/60 Hz) | Yes, tonal | Notch Filter first, then Noise Reduction |
| Fan, AC, HVAC | Yes | Audacity, or OBS RNNoise at the source |
| Traffic, crowd, café | No | DeepFilterNet, FFmpeg arnndn, Adobe Enhance |
| Wind (outdoor, action cam) | No | Prevention, then AI model plus high-pass |
| Echo and reverb | Not applicable | Adobe Enhance dereverb, iOS Enhance |
| Clicks, pops, mouth noise | No | Manual waveform edits, Click Removal |
| Music behind a voice | No | Source separation such as Demucs |
And here’s the flip side, which matters just as much:
| Noise type | Method that will disappoint you |
|---|---|
| Traffic, crowd, café | Audacity Noise Reduction |
| Wind | Any spectral subtraction tool |
| Echo and reverb | Noise Reduction, noise gates |
| Clicks, pops | Noise Reduction |
| Music behind a voice | Every noise reducer |
A note on mains hum, depending on where you live
Mains hum sits at your local grid frequency. That’s 50 Hz across India, the UK, and most of Europe, and 60 Hz in the United States.
You may get better results by notching the fundamental and its harmonics first. In fact, the Audacity Manual specifically recommends applying a Notch Filter before Noise Reduction, not after.
In my own testing, notching 50 Hz plus 100 Hz and 150 Hz on a hum-heavy voice track removed most of the drone. Noise Reduction then had far less work to do, which meant gentler settings and, happily, fewer artifacts.
When the honest answer is “record it again”
Sometimes no free tool will save the file, and that’s worth accepting early. The Audacity manual says it plainly: removal may be impossible when the noise is very loud, when it’s variable, when speech isn’t much louder than the noise, or when noise frequencies closely match the voice.
So if you can re-record, that’s almost always the faster path. Ten minutes of re-recording beats two hours of salvage work.
All 12 Free Methods, Compared Side by Side
Here’s the full landscape. I’ve separated genuinely unlimited tools from those with a ceiling, because “free” gets used pretty loosely in this category.
Fully free, no caps
| Method | Type | Best for | Where audio goes |
|---|---|---|---|
| Audacity Noise Reduction | Desktop, spectral | Hiss, hum, fan, buzz | Local |
| Audacity OpenVINO AI plugins | Deep learning | Traffic, crowd, wind | Local, offline |
FFmpeg arnndn | CLI, neural | Non-stationary speech noise | Local |
FFmpeg afftdn | CLI, FFT | Steady hiss | Local |
FFmpeg anlmdn / afwtdn | CLI | Broadband noise | Local |
| DeepFilterNet standalone | CLI, deep learning | Best free result for speech | Local |
| DaVinci Resolve (free) | Video editor | Basic NR, Dialogue Leveler | Local |
| OBS Studio filters | Real-time capture | Mild noise at the source | Local |
Free, but with a ceiling
| Method | Free limit | Best for | Where audio goes |
|---|---|---|---|
| Adobe Podcast Enhance | 30 min/file, 500 MB, 1 hr/day | Speech in messy noise | Adobe servers |
| Krisp | 60 min/day | Live call noise, both sides | On-device |
| NVIDIA Broadcast | Free with RTX 2000+ GPU | Live microphone noise | Local |
| iOS Voice Memos Enhance | Free since iOS 14 | Room reverb, background noise | On-device |
Two honourable mentions are worth adding. Microsoft Clipchamp includes AI noise suppression free for all personal and work accounts, with 1080p export and no watermark, according to Clipchamp’s blog. Meanwhile, AMD Noise Suppression ships inside Adrenalin for supported AMD hardware.
“Free” That Isn’t Actually Free: How to Spot the Difference
You can save yourself real frustration by checking for five patterns before you upload anything.
The five paywall patterns worth knowing
- Watermark on export. The processing is free, but the usable file isn’t.
- One download per day. Common on browser tools. Fine for a single file, though unworkable for a project.
- Paywalled preview. You hear 30 seconds, and then you pay.
- Credit systems. Free until your starting credits run out.
- Account wall before results. You can’t judge quality until you’ve handed over an email address.
The DaVinci Resolve confusion, cleared up
This one’s worth stating carefully, because I found ranking pages getting it wrong.
DaVinci Resolve’s free version is genuinely free. There’s no watermark, no time limit, and no subscription. It exports up to 4K UHD at 60fps and includes the full Fairlight audio page.
But Voice Isolation isn’t in it. Voice Isolation, AI Noise Reduction, and the Dialogue Processor all require DaVinci Resolve Studio, a one-time $295 license. Blackmagic’s release notes confirmed this when the feature launched in Resolve 18.1, and it’s still the case today.
That said, the Dialogue Leveler is available in the free version, which is a genuinely useful tool for evening out volume. Just don’t expect the AI dialogue cleanup without paying.
So if you’re on free Resolve and the audio needs real work, exporting it and running it through Audacity or FFmpeg is the practical path.
A quick checklist before you upload
- Can you hear the full result before creating an account?
- Does the export carry a watermark?
- Is there a daily or per-file cap, and what is it?
- Where does the file go, and how long is it kept?
Before You Upload: Where Your Audio Actually Goes
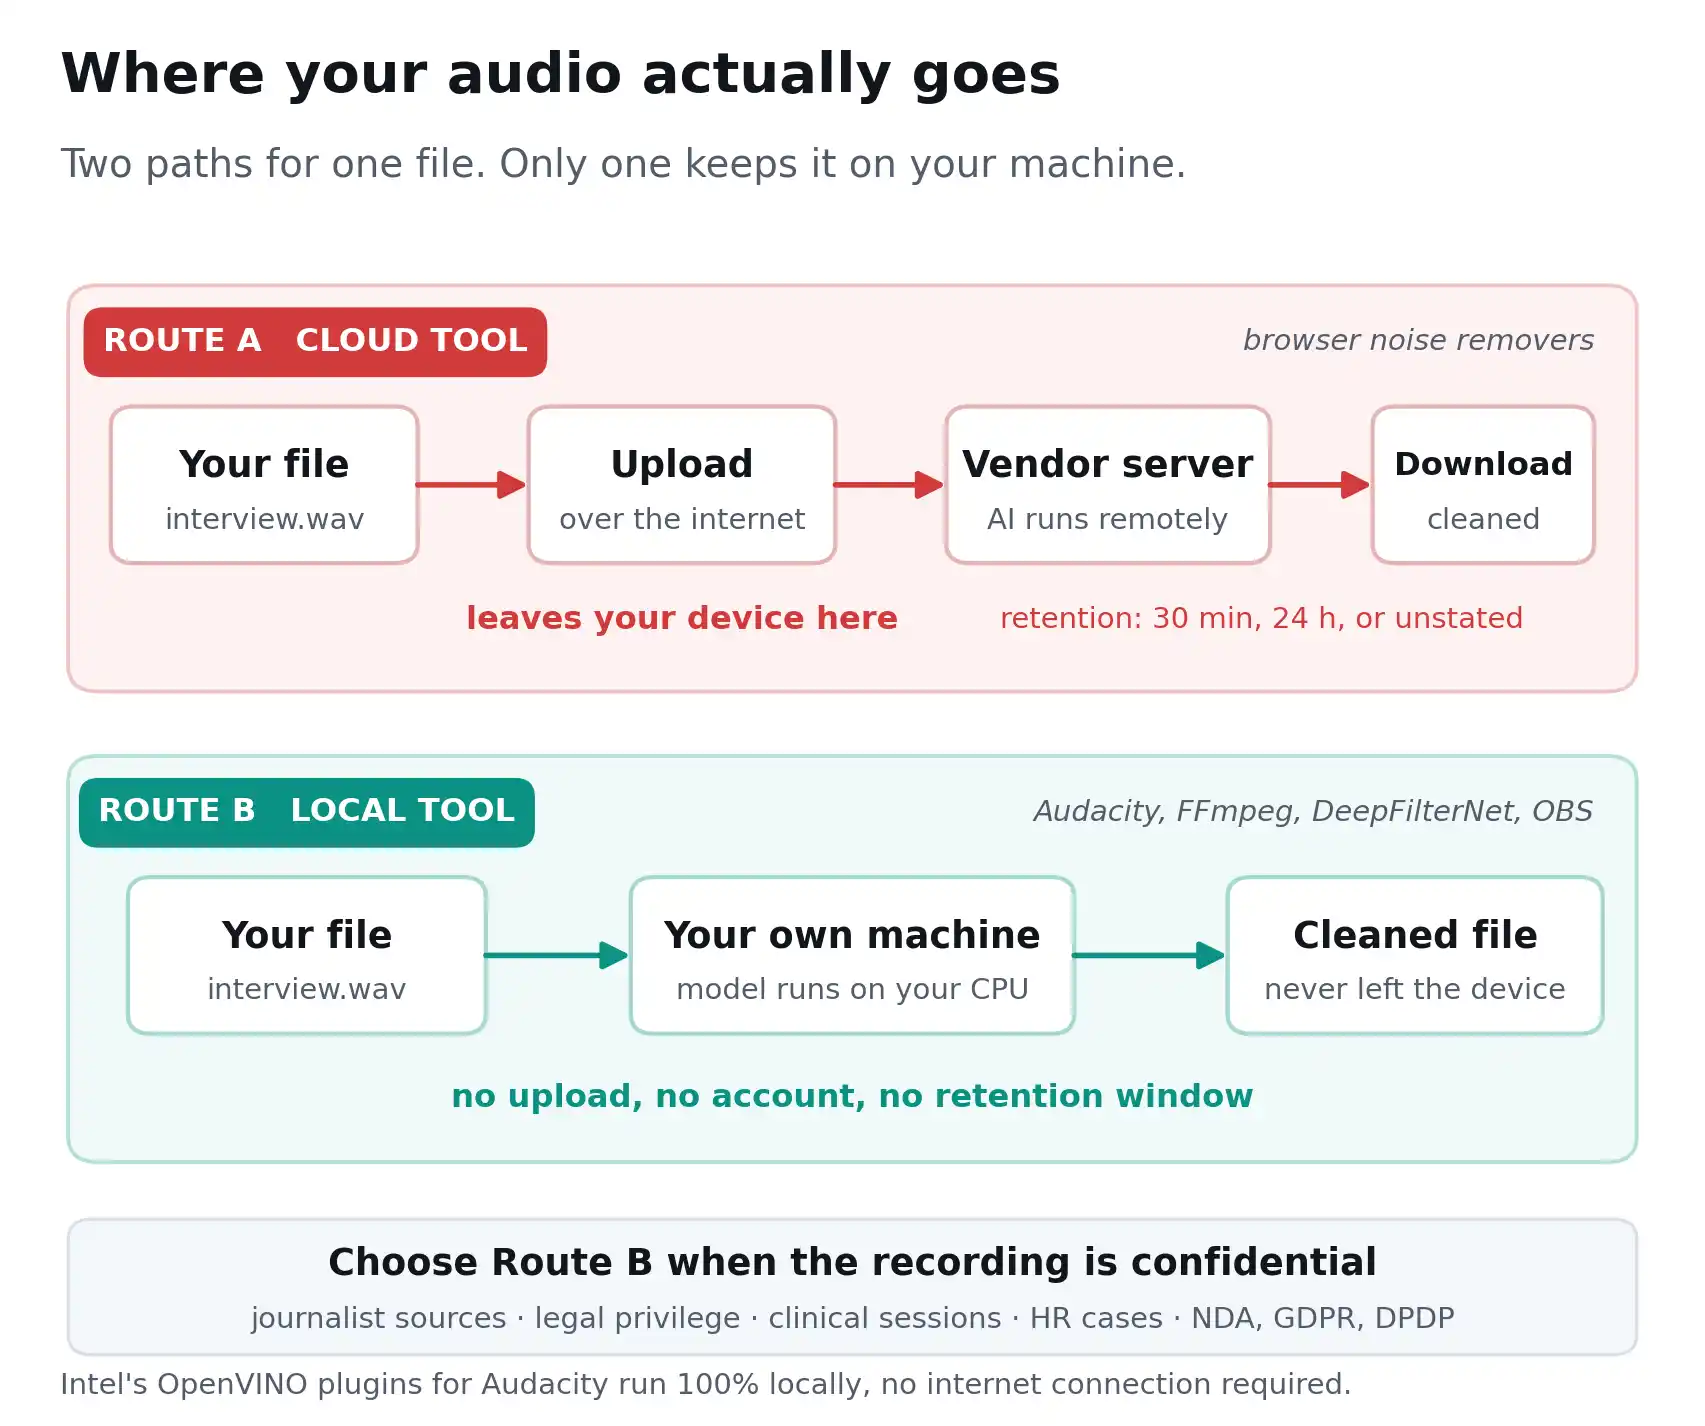
Free browser tools almost always send your file to a server. For a podcast intro, that’s fine. For other recordings, though, it may not be.
Who genuinely can’t upload
- Journalists protecting a source
- Lawyers handling privileged material
- Therapists and clinicians with session recordings
- HR teams with investigation interviews
- Anyone under an NDA, GDPR, or India’s DPDP obligations
The fully local free stack
If your audio can’t leave your machine, these five options keep everything on your device:
- Audacity, including its OpenVINO AI plugins, which run entirely offline
- FFmpeg with
arnndnorafftdn - DeepFilterNet as a standalone command-line tool
- DaVinci Resolve for editing work
- Browser tools built on WebAssembly, where the model downloads to you rather than your file uploading to them
Intel’s OpenVINO plugin mentions that these AI features run 100% locally, with no internet connection necessary. That’s a meaningful distinction from cloud tools, especially for sensitive work.
What to look for in a privacy policy
Retention windows vary quite a bit. Some services delete uploads within 24 hours, others within 30 minutes, and some simply don’t say.
The second thing worth checking is whether uploads train the vendor’s models. Reputable services state this plainly. Silence on the question is itself an answer.
Method Walkthrough: Audacity, Done Properly
Audacity’s still the most capable free option for steady noise, and it costs nothing on Windows, Mac, or Linux. The difference between good and bad results comes down to a handful of details that most tutorials skip right past.
Getting your file in
- Download Audacity from audacityteam.org and install it.
- Go to File > Import > Audio and select your file.
- If you’re importing MP4 or M4A, install the optional FFmpeg library first.
That third step catches a lot of people out, since Audacity doesn’t read those formats natively.
Step 1: Capture a proper noise profile
- Find a section containing only noise, with no speech at all.
- Click and drag to select it.
- Go to Effect > Noise Removal and Repair > Noise Reduction.
- Click Get Noise Profile. The window closes automatically.
Two details from the official manual really matter here.
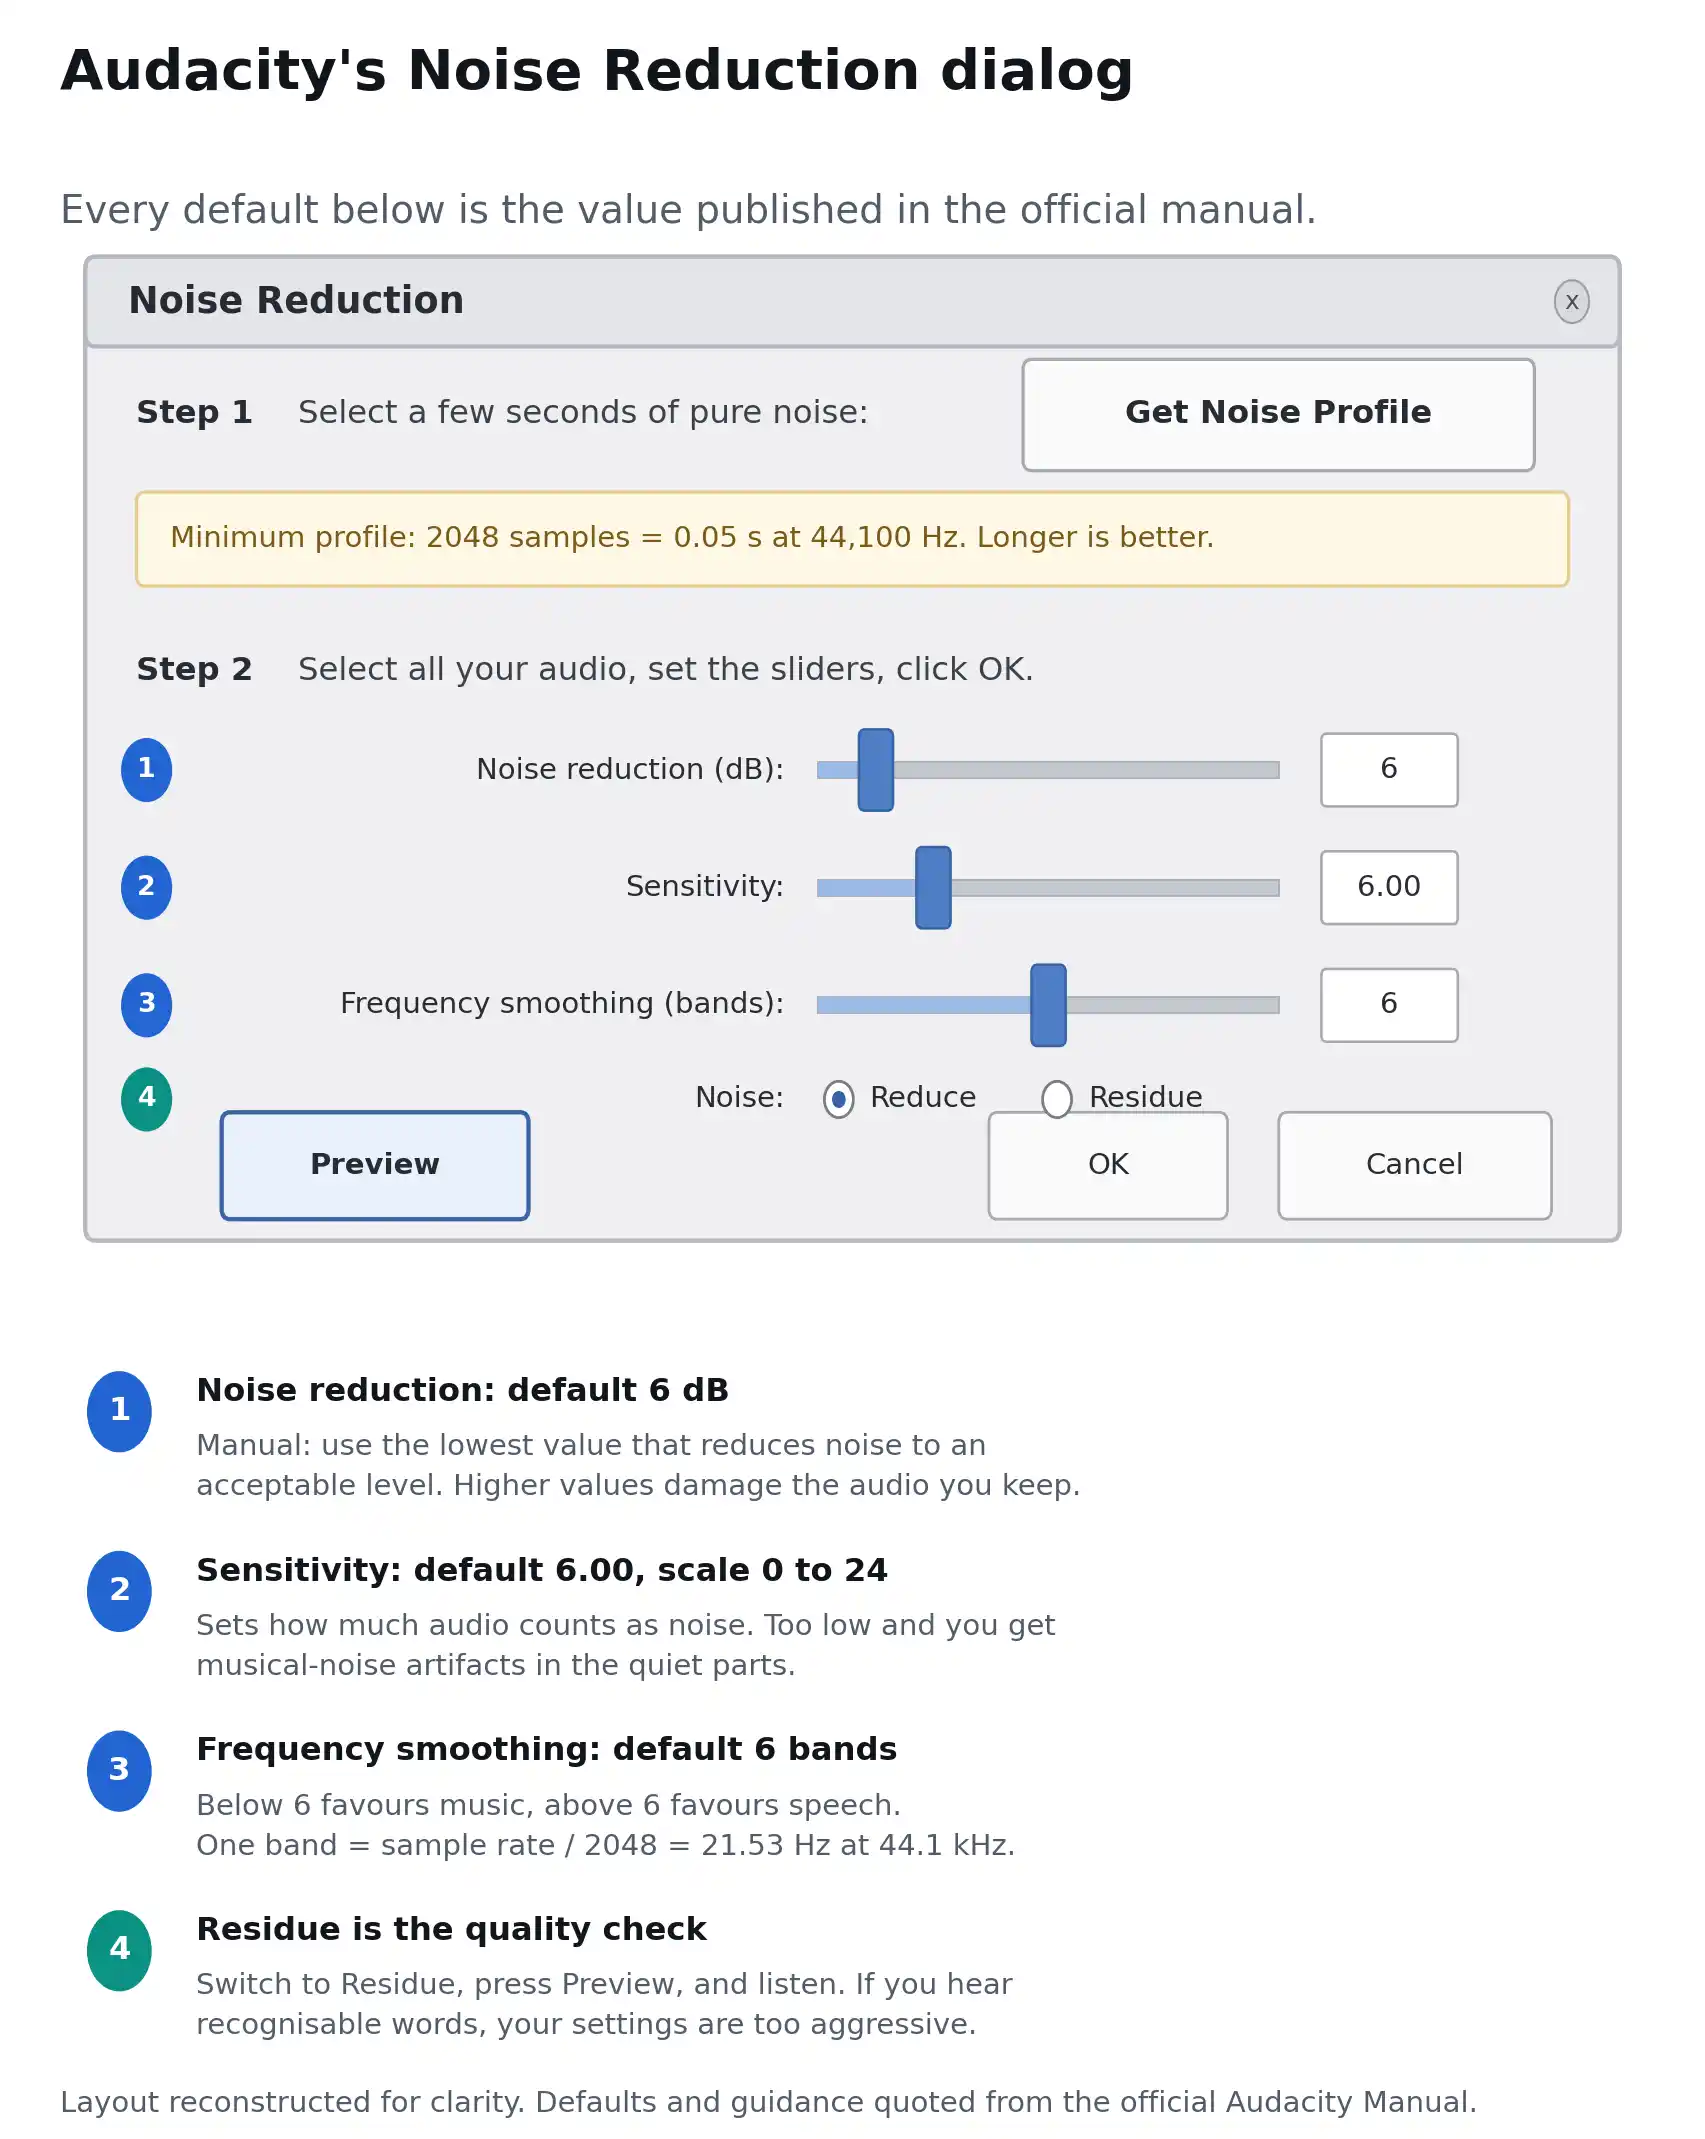
The minimum is 2048 samples, which works out to 0.05 seconds at a 44,100 Hz sample rate. Anything below that returns an error.
Duplicating a short sample doesn’t help either. The manual explains why: the effect calculates the statistics of the noise, and repeating the same block won’t change those statistics. A longer genuine sample is what improves results.
Step 2: The three sliders, with real numbers
Select your whole track with Ctrl+A or Cmd+A, then reopen the Noise Reduction dialog.
| Control | Default | Range |
|---|---|---|
| Noise Reduction (dB) | 6 | Variable |
| Sensitivity | 6.00 | 0 to 24 |
| Frequency Smoothing (bands) | 6 | 0 and up |
Here’s what each one actually does:
- Noise Reduction (dB) controls how much the identified noise gets attenuated.
- Sensitivity controls how much audio gets classified as noise in the first place.
- Frequency Smoothing spreads the reduction into neighbouring bands.
There’s a small wrinkle worth knowing about. Audacity suggests starting at 12 dB reduction, sensitivity 6, and frequency smoothing 3, which is more aggressive than the dialog defaults. Both figures come from Audacity, oddly enough. I found the dialog defaults safer as a starting point, then nudged upward only when needed.
The manual’s guidance on each is consistent, and it’s worth following:
- On reduction: “Use the lowest value that reduces the noise to an acceptable level.”
- On sensitivity: “Set this control to the lowest value that achieves effective noise removal without the introduction of artifacts.”
- On frequency smoothing: settings lower than 6 tend to favour music, while higher settings tend to favour spoken word.
For the technically curious, each frequency band works out to sampling frequency divided by 2048, or 21.53 Hz at a 44,100 Hz sample rate.
Step 3: Use Residue mode, the trick nobody teaches
This is the single most useful feature in the dialog, and yet I rarely see it mentioned anywhere.
- Switch the Noise radio button from Reduce to Residue.
- Click Preview.
- Listen carefully to what plays.
You’re now hearing exactly what would be removed. If you can hear recognisable words or musical detail in the residue, your settings are too aggressive. Back off the reduction value first, then sensitivity, and test again.
When I ran this on a voiceover I thought was cleanly processed, the residue clearly contained sibilance. Lowering reduction from 18 dB to 9 dB fixed a thinness I’d noticed but couldn’t quite diagnose.
Three gotchas that cost people time
- The noise profile is wiped when you close Audacity. You’ll have to create a new one each session.
- Time smoothing is fixed and not adjustable. It applies a 20 millisecond attack and 100 millisecond release, always.
- Applying an effect over an envelope triggers a known bug, where the envelope is removed and audio reverts to full amplitude.
Multiple noise types need multiple passes
If your recording has a fan hum and a separate hiss, you’ll want to treat them separately. The manual recommends profiling and reducing the first type, then profiling and reducing the second.
The free AI upgrade inside Audacity
Intel’s OpenVINO AI plugins add DeepFilterNet2 and DeepFilterNet3 noise suppression, Demucs music separation, and Whisper transcription to Audacity. All of it runs locally.
This is your answer when Audacity’s built-in Noise Reduction can’t handle traffic or crowd noise. You get modern AI denoising without leaving the app or uploading anything.
Method Walkthrough: FFmpeg for Unlimited, Batchable, Private Cleanup
FFmpeg’s the strongest free option if you’ve got several files, need privacy, or want repeatable results. There’s no cap, no account, and nothing leaves your machine.
The learning curve is real, admittedly. But you only need about four commands.
First, check your build supports it
ffmpeg -filters | grep arnndnThe arnndn filter has shipped in standard builds since FFmpeg 4.0. The newer afwtdn wavelet denoiser arrived in FFmpeg 5.0.
The neural denoiser: arnndn
This one needs a trained model file, which you can download separately from the GregorR/rnnoise-models repository on GitHub.
ffmpeg -i input.wav -af arnndn=m=sh.rnnn output.wavThree models are worth knowing about:
| Model | Best suited to |
|---|---|
sh.rnnn (somnolent-hogwash) | General speech, a solid default |
cb.rnnn (conjoined-burgers) | Widely reported as the most versatile |
bd.rnnn (beguiling-drafter) | Alternative when the others over-process |
I tested all three on the same noisy interview clip. Interestingly, cb.rnnn preserved more of the speaker’s low end, while sh.rnnn removed slightly more background. Neither was universally better, which matches what users report on Super User.
The mix parameter, which changes everything
This is the control that separates natural results from robotic ones. And almost no free guide mentions it.
ffmpeg -i input.wav -af "arnndn=m=sh.rnnn:mix=0.85" output.wavmix runs from 0.0 to 1.0. Zero is completely dry, one is fully processed. Values between 0.7 and 0.9 tend to sound most natural, because keeping a little of the original preserves transients and breath.
So if your denoised voice sounds hollow, this is usually the fix. Try 0.75 before you try a different tool entirely.
For steady hiss: afftdn
ffmpeg -i input.mp3 -af "afftdn=nr=20:nf=-25" output.mp3| Parameter | Typical range | Controls |
|---|---|---|
nr | 12 to 30 | Noise reduction in dB |
nf | -20 to -40 | Estimated noise floor |
nt | w or v | Tracking: constant or variable |
You may want to start at nr=20:nf=-25 and adjust from there. Higher nr gives cleaner results, though with more artifact risk.
A full production chain
Order matters more than people expect. High-pass first, denoise second, loudness last.
ffmpeg -i input.wav -af "highpass=f=80,arnndn=m=sh.rnnn:mix=0.85,afftdn=nf=-25" -ar 48000 output.wavClean a video without touching the picture
ffmpeg -i input.mp4 -af "arnndn=m=sh.rnnn" -c:v copy output.mp4The -c:v copy flag passes the video stream through untouched. That means no re-encoding, no quality loss, and it runs much faster.
Batch an entire folder
#!/usr/bin/env bash
for f in input/*.wav; do
  ffmpeg -y -i "$f" -af "highpass=f=80,arnndn=m=sh.rnnn:mix=0.85" \
    -ar 48000 "output/$(basename "$f")"
done
This is where FFmpeg really pulls ahead. Twenty podcast episodes process while you make tea.
How Good Is Free, Really? The Benchmark Numbers
Free AI denoising has closed most of the quality gap for speech. The published research supports that, so it’s worth understanding the numbers rather than trusting marketing copy.
The two metrics that matter
PESQ stands for Perceptual Evaluation of Speech Quality. It runs from -0.5 to 4.5; higher is better, and anything above roughly 3.5 counts as high fidelity in controlled listening tests.
STOI stands for Short-Time Objective Intelligibility. It runs from 0 to 1. A STOI above 0.95 means listeners can understand more than 95% of words.
Published results on the VCTK-DEMAND test set
| Model | PESQ | STOI |
|---|---|---|
| Noisy input (baseline) | 1.97 | 0.921 |
| RNNoise (2018) | 2.29 | n/a |
| PercepNet (2020) | 2.73 | n/a |
| DeepFilterNet | 2.81 | 0.942 |
| DeepFilterNet2 | 3.08 | 0.943 |
| DeepFilterNet3 | 3.17 | 0.944 |
| GTCRN | 2.87 | 0.940 |
And here’s the efficiency side, which is just as relevant:
| Model | Parameters | Latency | License |
|---|---|---|---|
| RNNoise | 0.06 M | ~20 ms | BSD |
| DeepFilterNet | 1.8 M | 40 ms | MIT/Apache |
| DeepFilterNet2 | ~0.9 M | under 20 ms | MIT/Apache |
| DeepFilterNet3 | ~2.1 M | 10 to 40 ms | MIT/Apache |
| GTCRN | 0.05 M | n/a | Open |
Moving from 1.97 to 3.17 PESQ is a large perceptual jump. Practically speaking, that’s the difference between “I can hear the traffic” and “I can hear the speaker.”
It runs on ordinary hardware
DeepFilterNet reports a real-time factor of 0.19 on a single-threaded notebook CPU (arXiv 2305.08227). That means it processes audio roughly five times faster than real time, with no GPU required.
The ultra-light GTCRN model reports an RTF of 0.07 on an Intel i5-12400. Clearly, speed isn’t the constraint here.
Licensing lets you use it commercially
DeepFilterNet ships under MIT and Apache licences. So you can use the output commercially, with no attribution requirement and no royalty.
The work comes out of RWTH Aachen and FAU, published at IWAENC 2022 and INTERSPEECH 2023 by Schröter and colleagues. In other words, this is peer-reviewed research, not a vendor claim.
An honest caveat about those numbers
Benchmarks depend heavily on training data, and that’s easy to forget. A March 2026 paper on arXiv retrained DeepFilterNet3 on the smaller Valentini dataset for a controlled comparison and measured PESQ 2.13, not 3.17.
The authors note the difference is expected, since the original model trained on thousands of hours of speech. So the published figures assume the full training corpus.
The practical takeaway is simple enough. Use benchmarks to choose which tool to try first, then judge with your own ears on your own file.
Where free still loses to paid
Free AI doesn’t win everywhere, and it’d be dishonest to pretend otherwise. In my testing, it struggled with:
- Severe wind, where the microphone capsule itself was overloaded
- Two speakers overlapping on a single track, where separation matters more than suppression
- Forensic-grade restoration, where you need surgical spectral editing
Two more limits are worth noting. DeepFilterNet needs roughly 80 to 100 milliseconds of context to work properly, so very short clips produce edge artifacts. Padding with silence helps there.
Also, DeepFilterNet is a speech model. Applied to music, it treats instruments as noise and degrades the result.
The Cheapest Fix Is Not Recording the Noise in the First Place
Every minute spent on recording setup saves several minutes in cleanup. Better still, these changes cost nothing.
Gain staging, the highest-leverage free change
Aim for peaks between -12 dBFS and -6 dBFS.
Too low, and you’ll amplify the noise floor later. Too high, and you’ll clip. That range keeps your voice well above the noise without risking distortion.
I tested the same room at two gain levels, just to see. The properly staged take needed 6 dB of reduction. The quiet take needed 18 dB and sounded noticeably processed afterwards.
Microphone distance beats any plugin
Sound follows the inverse-square law. Halving your distance to the microphone roughly quadruples the direct signal, while the room noise stays exactly where it was.
Moving from 30 cm to 15 cm changes the ratio more than any free software can. Honestly, this is the single most effective thing on the whole list.
Free room treatment that genuinely works
- Record in a smaller room with soft furnishings
- A clothes-filled closet makes a legitimately good vocal booth
- Hang a duvet behind you, if that’s all you have
- Avoid room corners and bare parallel walls
Real-time suppression at the source
OBS Studio includes a free Noise Suppression filter with two methods you can choose between:
| Method | Quality | CPU cost |
|---|---|---|
| RNNoise | Higher | Higher |
| Speex | Lower, configurable | Low |
RNNoise suits most voice recording if you’ve got the headroom. Speex may be the better pick on older machines, or when you want to tune the suppression level yourself.
That said, it’s worth setting a realistic expectation. The OBS knowledge base describes the filter as suited to mild background noise or white noise, such as PC fan noise, and notes it’s “not generally effective for large amounts of background noise in a loud room.”
If you add a Noise Gate as well, try to keep 4 to 6 dB between the open and close thresholds. Too close together and the gate flutters while you talk.
Free if you already own the hardware
- NVIDIA Broadcast works on RTX 2000 series GPUs and newer, and it’s genuinely free. It handles live microphone input only, though, so it can’t process recorded files.
- AMD Noise Suppression is built into Adrenalin for supported AMD hardware.
- Krisp’s free tier gives 60 minutes per day of noise cancellation, plus background voice and echo cancellation. It’s desktop only, and real-time cancellation isn’t available on mobile.
The free tool already in your pocket
If you recorded on an iPhone, you might not need anything else at all.
- Open Voice Memos and select your recording.
- Tap the three-dot menu, then Edit Recording.
- Tap the magic wand icon in the top left.
- Wait a few seconds while it processes.
Apple introduced Enhance Recording in iOS 14, and it reduces background noise and room reverberation entirely on-device. There aren’t any controls, so results do vary. Still, for a voice note or a quick interview, it’s often enough.
After Denoising: The Step Almost Every One Skips
Your denoised file will sound quiet and slightly thin. That’s expected, since you just removed energy from it.
Two more steps finish the job properly.
High-pass to clear what’s left
Rumble below 80 Hz rarely carries anything useful in speech. So a high-pass filter there removes handling noise and low-frequency room energy the denoiser left behind.
ffmpeg -i input.wav -af "highpass=f=80" output.wavNormalise loudness to your platform’s target
Platforms normalise your audio on playback whether you plan for it or not. Matching their target keeps your voice consistent with everything else the listener hears.
| Destination | Target | True peak |
|---|---|---|
| YouTube | -14 LUFS | -1 dBTP |
| Spotify (music + podcasts) | -14 LUFS | -1 dBTP |
| Apple Music (Sound Check) | -16 LUFS | -1 dBTP |
| Apple Podcasts | -16 LUFS (±1) | -1 dBTP |
| AES TD1008 (speech, talk) | -18 LUFS | -1 dBTP |
| EBU R128 (broadcast) | -23 LUFS (±0.5) | -1 dBTP |
| ATSC A/85 (US broadcast) | -24 LKFS | -2 dBTP |
One thing to note: YouTube turns loud content down but never boosts quiet content. So undershooting the target just leaves you quiet.
One FFmpeg line handles the whole thing:
ffmpeg -i input.wav -af "loudnorm=I=-16:LRA=11:TP=-1.5" output.wavFor a podcast, -16 LUFS is a safe universal choice. For YouTube-first content, -14 fits a little better.
Troubleshooting: Why Your Cleaned Audio Sounds Worse
Nearly every complaint about denoising falls into one of five buckets. Here’s how to identify and fix each one.
“It sounds like tinkly bells or bird song”
That’s musical noise, and it actually has an official name in the Audacity manual: random bursts of very short tones at random frequencies, also called “bird song” or “tinkly-bells.”
- What causes it: the noise floor was higher than estimated, usually because sensitivity was set too low, or because the profile didn’t represent the noise across the whole track.
- How to fix it: raise sensitivity first. Then, if artifacts persist, add Frequency Smoothing between 1 and 6 bands. Smoothing does modify signal you wanted to keep, admittedly, but it makes remaining artifacts sound more acceptable.
“It sounds watery or underwater”
- What causes it: reduction is simply too aggressive.
- How to fix it: lower the reduction value in dB before touching anything else. If you’re in FFmpeg, drop
nror lower themixvalue instead.
“The voice sounds robotic and thin”
- What causes it: the model is removing high frequencies along with the noise. Sibilance tends to go first.
- How to fix it: in FFmpeg, set
mixsomewhere between 0.7 and 0.9. In Audacity, run two gentle passes rather than one hard pass. That consistently produced better results in my testing than any single aggressive pass.
“Words are getting chopped off at the start”
- What causes it: that’s a noise gate, not noise reduction.
- How to fix it: widen the gap between your open and close thresholds, and lengthen the release time. Alternatively, remove the gate entirely and let noise reduction do the work.
“Nothing happened at all”
- What causes it: usually one of two things. Either you’ve got non-stationary noise and a stationary tool, or your noise profile accidentally included speech.
- How to fix it: re-check the diagnosis section above. Then re-select a genuinely silent region for the profile.
The habit that prevents most of this
Always preview before you commit, and always compare against the original. Two gentle passes beat one aggressive pass in almost every case I tested.
[IMAGE 6: Spectrogram pair showing clean noise removal versus visible musical noise artifacts]
Alt text: Spectrogram comparison showing correctly denoised audio versus over-processed audio with musical noise artifacts
Special Cases Worth Knowing
If you’re cleaning music, not speech
Speech models will let you down here. DeepFilterNet and Adobe Enhance are trained on speech, so applied to music they’ll treat instrumentation as noise.
Your options are spectral gating, which preserves the full frequency range, or stem separation with Demucs if you need to isolate parts. Conveniently, Audacity’s OpenVINO plugin bundle includes Demucs v4, and it runs locally.
Zoom, Teams, and Google Meet recordings
Export the audio as MP3 or M4A, then treat it as speech. These recordings usually carry keyboard clicks, fan noise, and uneven microphone quality across participants.
If different speakers have very different noise profiles, you may want to process them separately whenever the platform gives you separate tracks.
WhatsApp voice notes
WhatsApp exports as .opus, which some tools won’t read. So convert it first:
ffmpeg -i voice.opus voice.wavThen denoise normally. This recovers intelligible speech from street-recorded voice notes more often than you’d expect.
Noise inside a video file
You’ve got two paths here.
The simple one: clean the audio in place and copy the video stream.
ffmpeg -i input.mp4 -af "arnndn=m=sh.rnnn:mix=0.85" -c:v copy output.mp4The controlled one: extract the audio, clean it in Audacity, then remux. It’s slower, but you get to preview every decision along the way.
Two voices bleeding across one track
This is the hardest case, and free tools handle it poorly. AI enhancement often can’t reliably distinguish a primary speaker from voice bleed, and it produces artifacts when both appear on the same track.
The real fix happens at recording time. Record each speaker to a separate track. Cleanup afterwards is always a compromise.
Quick Reference: Which Method Should You Pick?
| Your situation | Recommended free method |
|---|---|
| Steady hum or hiss, you want control | Audacity Noise Reduction |
| Speech in messy noise, one click | Adobe Podcast Enhance |
| Traffic or crowd noise, no upload allowed | FFmpeg arnndn or DeepFilterNet |
| Many files to process | FFmpeg batch script |
| Live calls, streams, recording sessions | OBS, NVIDIA Broadcast, or Krisp free |
| Recorded on your phone | iOS Voice Memos Enhance |
| Editing video on Windows | Clipchamp |
| Music, not speech | Spectral gating or Demucs |
Frequently Asked Questions
No. The official Audacity manual states the effect is “not suitable for individual clicks and pops, or irregular background noise such as from traffic or an audience.” For traffic, you’d be better off with an AI model like DeepFilterNet, FFmpeg’s arnndn filter, or Adobe Podcast Enhance.
No. Voice Isolation requires DaVinci Resolve Studio, a one-time $295 license. The free version does include the Dialogue Leveler and the full Fairlight page, though, just not AI Voice Isolation or AI Noise Reduction.
The free tier allows files up to 30 minutes and 500 MB, with 1 hour of total processing per day. It’s audio only, so there’s no video support, no batch uploads, and no enhancement strength control.
Yes. Audacity, FFmpeg, DeepFilterNet, OBS Studio, and DaVinci Resolve all process locally. Some browser tools built on WebAssembly also run entirely on your device.
The tool is removing high frequencies along with the noise. In FFmpeg, you can set mix between 0.7 and 0.9. In Audacity, lower the reduction value and run two gentle passes instead of one aggressive one.
Speech-focused AI models don’t work well on music, because they treat instruments as noise. Instead, you may want spectral gating for steady hiss on music, or stem separation tools like Demucs to isolate parts.
For podcasts, -16 LUFS with a -1 dBTP true peak ceiling. For YouTube and Spotify, -14 LUFS. Broadcast targets sit lower, at -23 LUFS for EBU R128.
Our Verdict
Free tools aren’t weak. They’re specialised, but most disappointment comes from using the wrong one for the wrong problem.
Nearly every “free noise removal doesn’t work” story I’ve looked at is really the same story. Someone applied a stationary tool to non-stationary noise, then concluded the software was bad. Diagnose first, though, and the free stack handles the large majority of real-world recordings.
Here’s how I’d choose:
- Steady hum or hiss, want control: Audacity, with Residue mode as your quality check
- Speech in messy noise, want one click: Adobe Podcast Enhance, within the 30 minute and 1 hour daily limits
- Sensitive audio or many files: FFmpeg with
arnndn, or DeepFilterNet, both fully local - Live calls and streams: OBS, NVIDIA Broadcast, AMD Noise Suppression, or Krisp’s free 60 minutes a day
- On your phone: iOS Voice Memos Enhance Recording
Free AI has genuinely closed most of the gap for speech. DeepFilterNet3’s PESQ 3.17 against 1.97 for untreated audio is a real, published, peer-reviewed improvement, and it runs happily on a laptop CPU.
What paid tools still buy you is the hard 10%. Severe wind, forensic restoration, and overlapping speakers on a single track.
The most useful thing you can take from this isn’t a tool, though. It’s a habit.
Record with peaks between -12 and -6 dBFS. Capture three seconds of silence every session. Denoise gently. Check the residue. Normalise to your platform’s LUFS target.
Do those five things, and you’ll rarely need the heavy salvage work at all.
Free-tier limits and software versions in this guide were verified in July 2026. Adobe, Krisp, and CapCut have all changed their free tiers before, so it may be worth confirming current limits before you plan a workflow around them.
You might also like to read:

![Why headset doesn't work on computer [Fixed]](https://techshali.com/wp-content/uploads/2022/03/headset-doesnt-work-on-computer-390x220.jpg)