How to Unbrick Samsung Galaxy J2 Core with stock firmware
You were trying to do something good for your phone, but end up messing things. No worries, it usually happens with many folks who try to install custom firmware, mods, recovery, and third-party applications. The Android OS has been improved very well during the past years, still, it can malfunction if it gets affected. Through this guide, we’ll help you to unbrick or repair Samsung Galaxy J2 Core using the stock firmware.
We will install the official stock firmware to restore the original firmware on this phone and revive it from the dead/unresponsive condition. Like any other smartphone, the Galaxy J2 Core can be bricked. Mostly it happens when we try to flash custom firmware and a third-party application. Sometimes we accidentally get engaged with some toxic applications that eventually brick our phone. Or you might face some serious issues related to performance and stability.
If you find that nothing seems to work, you can re-install its firmware. This action removes all sorts of custom aspects, firmware, settings, apps and everything stored in the internal memory. It cleans the phone thoroughly and installs a fresh copy of the Android OS. Therefore, you won’t see any kind of problems or issues after that. For Android phones, troubleshooting solutions are easier to understand and implement. You can downgrade your Samsung Galaxy J2 Core anytime you want.
That will restore an official copy of the Android firmware of this phone. If you’re using a custom firmware or recovery, they are replaced with the stock aspects. During this procedure, we learn how to flash stock firmware on Galaxy J2 Core using the Odin flashing utility. The Odin program is the most popular tool for Samsung devices. It allows users to flash the firmware, OTAs, and other images on Samsung devices.
Most importantly, this method is completely official and it won’t void the warranty of your phone. You can use this tutorial to flash the native OS on your phone and restore its warranty. In no way, this will hurt your phone. But you must be aware of the fact that it will wipe your phone completely. In order to install a fresh copy of Android software, your phone must be wiped out first. So, it is recommended that you backup all the important stuff before you move further. You could follow our dedicated guide; how to backup Samsung Galaxy smartphone on PC. After we perform this process, there’s is no way to recover the deleted files. Therefore, you should create a backup first.
While we perform this action, we need to connect the phone to the computer. So, you must enable the USB Debugging on your phone. Otherwise, the Odin program will not recognize this smartphone. Just follow the below tutorial to enable USB Debugging on your phone;
Before we get started with the required steps to flash this official firmware on your Galaxy J2 Core and revive it, we should discuss some important prerequisites. Make sure to read below prerequisites thoroughly and fulfill them.
Prerequisites
- This guide and firmware mentioned are only for Samsung Galaxy J2 Core smartphone, and one shouldn’t implement on any other smartphone. If that happens, it can hard brick the phone or make thing worse.
- This process includes a complete Wipeout of the phone. Thus, if possible, try to backup all the important stuff present on your phone. You can use the Smart Switch application to sync your data to other devices.
- This process will remove the current firmware present on your phone. If you’re using a custom ROM and recovery or any kind of mod, that will be removed. The custom recovery image will be replaced with a stock one.
- If you’ve rooted your phone, then you’ll lose it. While we flash the stock firmware, the root access will vanish and you’ll need re-root your phone if you wish so.
- To use the Odin tool, you need a Windows-based computer, a laptop or desktop and a USB cable of your phone
- Make sure to install the USB Drivers of your phone on your computer. You can download the Samsung USB Drivers from →here and install them on your computer.
Now, you are all set up to continue further and unbrick your Samsung smartphone.
How to flash stock firmware on Samsung Galaxy J2 Core
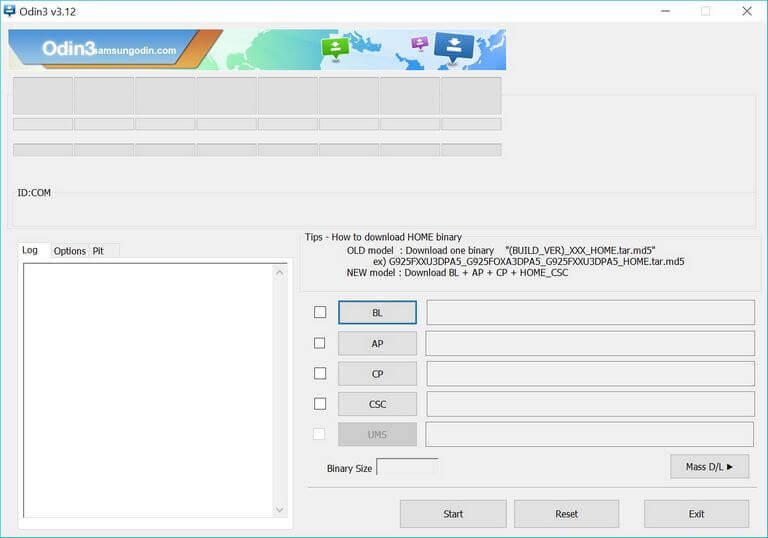
- Download the Odin flashing tool on your computer from →here. Extract the content of the package to obtain the executable program and run this program.

- Now, download the official stock firmware of Samsung Galaxy J2 Core from →here.
- Get the latest firmware based on your model number.
- You can find the model number of your phone in Settings->About phone->Software Information->Device model number.
- Extract the content of the stock firmware package to obtain .md5 file. This is the firmware file that we will flash using the Odin program.
- Now, turn OFF your phone.
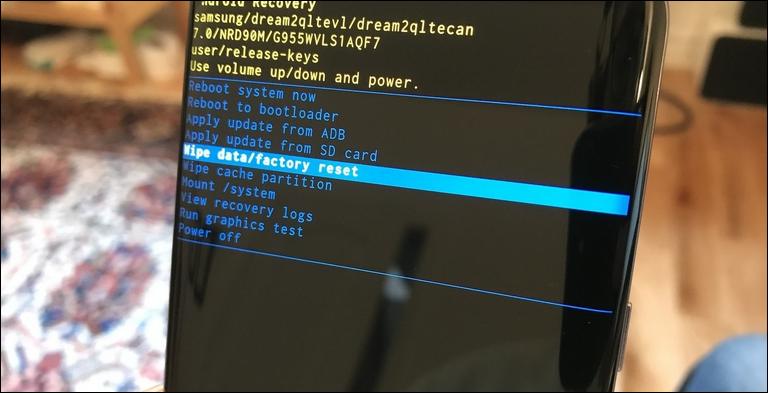
- Boot into the Download Mode – Press and hold Volume Down and Power button for a few seconds. Then, use the Volume Up button to enter into the Download Mode.
- Connect your phone to the computer using the USB cable. The Odin program will detect your phone automatically.
- Now, tap on ‘AP’ button and load the firmware file (.md5) extracted from the package.
- Tap on the ‘Start’ button to initiate the flashing process.
- As soon as the process is completed, take off your phone from the computer.
Then, your phone will reboot and take you to the setup screen soon. There, enter your Google account details and configure other aspects to customize your phone.
You’ve successfully unbricked your Samsung Galaxy J2 core smartphone. Now, it should look like a factory fresh piece. All problems and issues must have been removed.
That ends our this tutorial here. We hope that Galaxy J2 Core users would find it helpful. If you stuck anywhere while performing this guide or have any other issue related to this smartphone, drop your comments below. We’ll surely help you with our best efforts. Stay connected with us for more such tutorials and lists.


![Smart Wrist Watch Smartwatch: Best accessories for Samsung Galaxy A7 [2018]](https://techshali.com/wp-content/uploads/2018/10/Smart-Wrist-Watch-Smartwatch-Samsung-Galaxy-A7.jpg)