How to root Samsung Galaxy Note 3
This is the definitive guide to root Samsung Galaxy Note 3 using the Odin tool. The device was launched in September 2013, came with huge 5.7-inch display of 1080 * 1920 pixels resolution, hence making its ancestors proud and back then it came with class 3 protection of gorilla protector glass. The chip heart for our Note 3 here was actually with two different types as per the variant, It was based on Qualcomm Snapdragon 800 or the Exynos 5 Octa 5420 along with the quad-core of Krait 400 or the Cortex A15 and Cortex A7 clocked at 2.3GHz or 1.9 and 1.3 GHz respectively which additionally had Adreno 330 or Mali T628 MP6.
The note 3 being a higher premium device came with 3GB of RAM with an internal option to be chosen from three different versions 16 – 32 – 64 GB. But the camera stayed the same, though front 2MP was quite low given the back 13MP. So obviously it is a note device, it has the best functionality, powerful engine and also a lollipop promise from the company which did come recently! Then why root? This type of devices is rooted because people want something more than extraordinary for their devices! Like installing custom ROM’s or Kernel’s or using apps which are root restricted.
Thus, if you achieve root on Samsung Galaxy Note 3, you’ll able to improve its performance, productivity, and of course your overall experience. This guide shall help you to root your phone. Before we do that, we should consider discussing the prerequisites and risks involved in this procedure. In that way, you can process this task easily without worrying about the dark sides. Below we mention the prerequisites. You must read them carefully and prepare your phone according.
Prerequisites
- To start with rooting Note 3 you have to install its drivers on your computer so that the rooting software can identify your device, so visit this →link to download and then install them.
- After installing them you have to enable the debugging option of USB on your device and also allow the installation of unknown sources both of which you will get in the settings menu. (Follow this tutorial)
- Now that you have done it you have to make sure the device sustains the process so give some food to your battery hence charge it up with at least 80 – 85%.
- Once done with all of them you have to take the most necessary step in this process which is backing up the data and so take proper back before you begin the root.
Also see:
- How to speed up Samsung Galaxy Smartphones — this guide shall help you achieve better performance on your Galaxy Note 3 even without rooting.
- List of best applications for Samsung Galaxy smartphones — a collection of useful application to get the most out of our Android smartphones.
We hope that you’ve managed to fulfill the above prerequisites list. If yes, then proceed further to root your Samsung Galaxy Note 3 to unleash the hidden performance.

How to root Samsung Galaxy Note 3
Step 1: Now to start with the process you have to download and extract →Odin software which is the rooting tool for your note 3, so extract it under a folder named Note 3 on your desktop.
Step 2: After getting this Odin tool now you have to select the root package from the below link which will be used by Odin to root your Note 3 but make sure you download only that package which is made for your device model number and store it in the same Note 3 folder on your desktop.
Below given are device model number based packages (please choose carefully).
To check the device model number, tap on Settings->About phone->Model number.
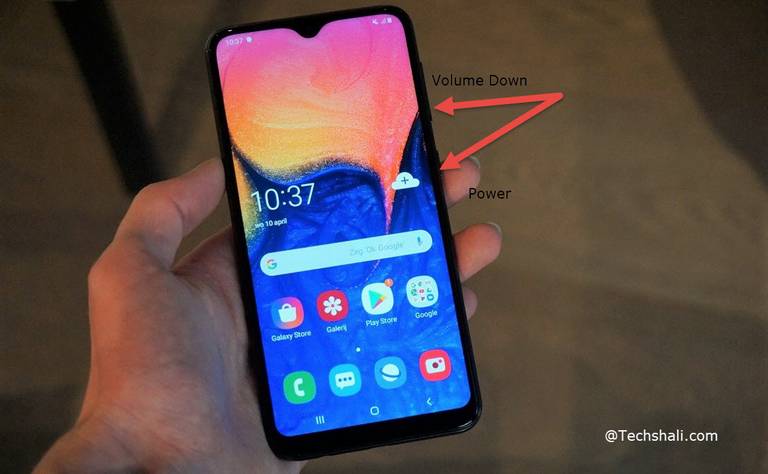
Step 3: Now to begin the process we need the Galaxy Note 3 in download mode so to do that turn off your phone and once done click on volume down button plus the power button and also the home button all of the three together until warning pop up appears and when it does hit volume up to bring the download mode.
Step 4: Once done that, you have to connect your Note 3 to the computer using USB cord given by Samsung and then open the Odin screen where if you have installed the drivers properly then an added message will appear at the left bottom of the screen. (Note that after you open the screen it may take few seconds or around a minute to show the added message).
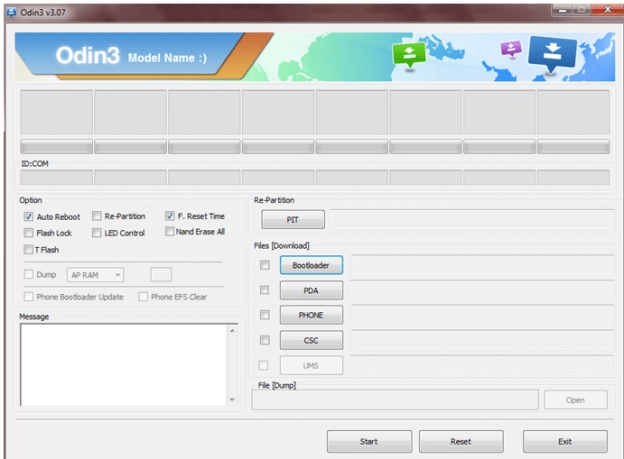
This step 4 is actually the proof that Odin has recognized your Note 3 and if you don’t get that message then we recommend you try again installing the drivers and starting all steps again.
Step 5: Now that you have the added message you have to click on the PDA option which will be present in the lower center of the screen in the form of a button and after you click it you have to hence select. tar.md5 file which is present in the package you downloaded and extracted to your desktop.
Before heading over to step 6 make sure you did this above step properly if you have any doubt here then contact us for sure!
Step 6: After you selected that file you have to ensure about two things, the Auto reboot, and the F. Reset. Time buttons which you can see on the left-center part of Odin screen have to be enabled before hitting the start button.
Step 7: Now that both are enabled, you can go and select start button which will start using the package files and root your device and that may take around max 2 minutes.
Step 8: After it has completed rooting your Note 3, you will see that the device will shut off and start again and then the computer screen will show a Pass message which means you can now unplug the cord.
That’s all gotta do.
You’ve successfully managed to root your Samsung Galaxy Note 3 using this guide. To verify the root access, try downloading the SuperSU application from Google Play store or any root specific application. That should work now.
That ends our tutorial here on how to achieve root on Samsung Galaxy Note 3. We hope that our readers would find it useful. Don’t forget to share your thoughts and comment below.