How to Use Swyshare Recordit to Ensure MacBook Screen Recording Quality?
Screen recording on a MacBook has become an essential task for professionals, educators, students, content creators, and developers alike. Whether you’re crafting software tutorials, capturing video calls, documenting bugs, or sharing gameplay, high-quality screen recordings are crucial for clarity and impact. But not all tools offer the flexibility, quality, or ease of use that modern users demand.
This is where Swyshare Recordit comes in — a lightweight yet powerful screen recording solution designed to deliver top-tier performance without complicating the workflow. In this article, we’ll explore why Swyshare Recordit is an excellent choice for Mac users and guide you step by step on how to use it to ensure professional-level screen recording quality on your MacBook.

1. Why Choose Recordit for Mac Screen Recording?
While macOS offers a built-in screen recording feature via QuickTime Player or Screenshot Utility, these tools have their limitations. They lack advanced options such as recording specific windows with custom frame rates, selecting formats, or exporting in high resolution without additional editing.
Swyshare Recordit is an easy-to-use screen recording app for Windows and Mac, optimized for MacBook users. It lets you quickly capture any part of your screen in high quality, with options for system audio, microphone input, and webcam overlay—perfect for meetings, tutorials, and more.
Recordit can address the macOS built-in recording tool shortcomings by offering:
- High-definition recording (up to 4K): Record your Mac screen in stunning detail.
- Custom Region Selection: Select to record the whole screen, a single window, or any custom region you prefer.
- Audio Input Options: Choose between system sound, microphone input, or both.
- Multiple Output Formats: Save your recordings in MP4, MP3, or GIF formats depending on the purpose
- Built-in Editing Tools: Add mouse effect and draw when recording
- Instant Screenshots: Easily take high quality screenshots with shortcuts
- Quick Export: Preview your recordings, and quickly export on your device.
- Lightweight and Efficient: Recordit is optimized for macOS and Windows, using minimal CPU and memory.
2. Swyshare Recordit vs. Mac Built-In Screen Recorder
| Feature | QuickTime/Screenshot toolbar | Swyshare Recordit |
| Ease of Use | Simple interface, minimal options | User-friendly with advanced controls |
| Recording Area | Full screen/Window | Full screen/Window/Custom region |
| Video Quality | Up to screen native resolution | Supports up to 4K recording |
| Audio Recording | Microphone only | System audio, microphone, or both |
| Webcam Overlay | Not supported | Supports webcam overlay |
| Screenshot | Separate tool | Built-in screenshot shortcuts |
| File Formats | MOV only | MP4, MP3, MOV, GIF, etc. |
| Performance | Lightweight but may cause lag with long recordings | Optimized for minimal CPU usage |
For Mac users who want professional-quality screen recordings with minimal effort, Recordit offers the perfect balance of power and simplicity.
3. How to Use Swyshare Recordit to Ensure MacBook Screen Recording Quality?
Here is a step-by-step guide to using Recordit on your Mac to produce clear, high-quality screen recordings every time.
Step 1: Download and Install Recordit
- Navigate to Swyshare Recordit’s official page to download the macOS version.
- Locate the downloaded installer, drag Recordit into your Applications folder, and launch the app.
- Navigate to System Preferences > Security & Privacy, then allow screen recording for Recordit.

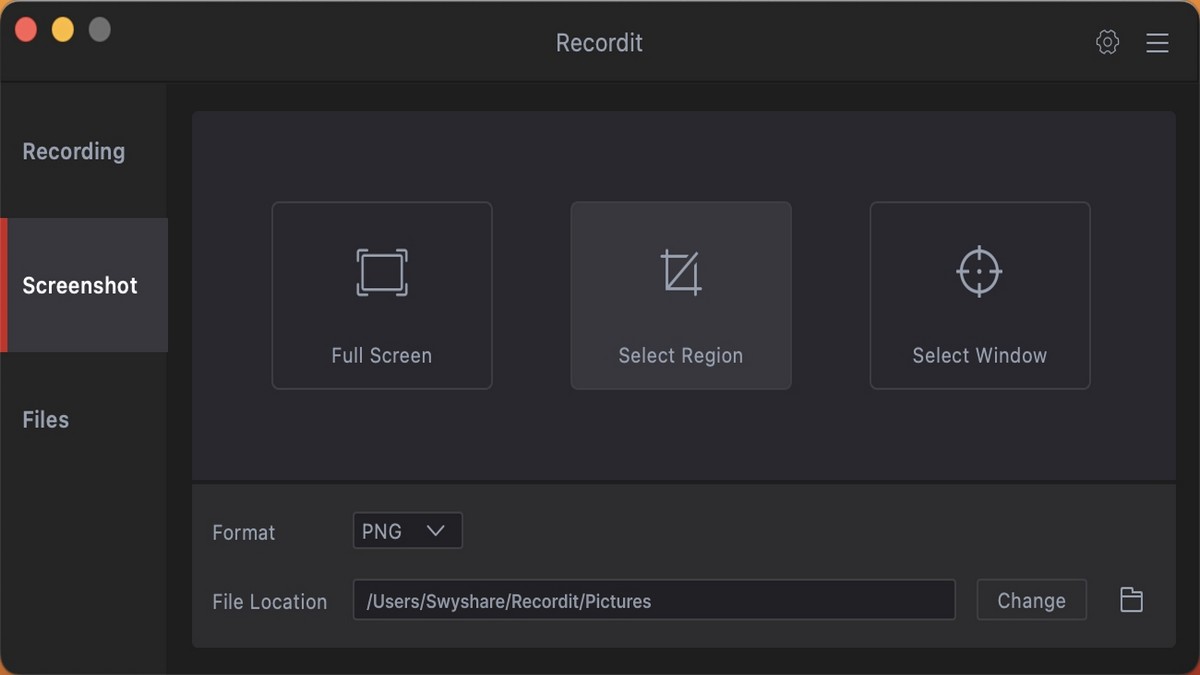
Step 2: Configure Your Capture Options
- Select what to capture—entire screen, a particular window, or a manually defined area.
- Choose Audio Source: Record system sound, microphone, or both.
- Enable Webcam Overlay: Add your webcam feed for tutorials or presentations.
- Set Resolution: Use your Mac’s native display resolution or upscale to 1080p/4K for sharper videos.

Step 3: Start/Stop Recording Your Screen
Start your session by clicking the “Start Recording” button—Recordit will begin recording right away. When done, click “Stop Recording”.

Step 4: Find Recordings
Recordit will automatically open the “Files” tab to display all you recorded videos.

Step 5: Take Screenshots (optional)
You can capture high-quality screenshots of key moments using Recordit’s built-in Screenshots feature or keyboard shortcuts.
4. FAQs
1. Is Swyshare Recordit free?
Recordit provides a free trial with a 10-minute recording time limit. To unlock unlimited access and advanced features, users can purchase a Recordit license.
2. Which macOS versions does Swyshare Recordit support?
Recordit supports macOS 11 and later versions.
3. Can I record internal audio on macOS?
Yes, but you may need to install an audio driver plugin (such as BlackHole). Recordit guides you through the setup if internal audio is required.
4. Does Recordit support webcam overlay?
Yes, you can enable webcam overlay to appear alongside your screen recording.
5. Does Recordit allow assigning hotkeys for recording control?
Yes, you can set your own hotkeys in Recordit to easily start, pause, and stop recordings for smoother operation.
6. Is there a watermark on recordings?
Yes, if you’re using the free trial. Upgrading to Recordit Pro removes the watermark from all your recordings.
7. Where are recordings saved?
By default, recordings are saved to your local disk, but you can change the output folder in settings.
5. Conclusion
High-quality screen recording is essential for MacBook users in many fields. While macOS offers basic tools, Swyshare Recordit provides a powerful yet easy-to-use solution with features like high-resolution capture, audio options, webcam overlay, and built-in editing.
By following simple steps to set up and record with Recordit, you can create clear, professional recordings without hassle. Lightweight and efficient, Recordit is ideal for tutorials, meetings, and content creation.
For Mac users seeking reliable, high-quality screen recording, Swyshare Recordit is highly recommended.

![Why headset doesn't work on computer [Fixed]](https://techshali.com/wp-content/uploads/2022/03/headset-doesnt-work-on-computer-390x220.jpg)