Figma online tool: everything a developer needs to know
Figma online application: an overview of the key functions of the service, knowledge of which is essential for any developer. Structure of the service, exporting elements, getting CSS information, working together on a project
Even if you have not worked with Figma yet, you probably already heard the name of this service. Figma is a relatively new online application. That means you don’t need to install it on your computer and don’t have to pay an expensive license to share project files.
Since most developers don’t have any serious experience with design applications, we’ll cover all the aspects of Figma that a programmer needs to know to confidently use this service and get all the necessary data about the user interface elements a designer is working on. I’ll also touch on those Figma options that provide the developer with the right information about the CSS styles used in the interface design.
A note about hotkey combinations
In most cases, keyboard shortcuts will be specified simultaneously for both Windows and macOS operating systems. That said, the Ctrl key for Windows corresponds to the Cmd key in macOS, and the Alt key in Windows is the same as the Option/Alt key combination in macOS. For example: Ctrl/Cmd + Alt + C corresponds to Ctrl + Alt + C for Windows and Cmd + Alt/Option + C for macOS.
Design collaboration
To understand why the emergence of the Figma service.
In those days, it was common for designers to communicate with the development team via email. Programmers received dozens of e-mails with lots of attachments, among which were design elements, exported resources, or even Word documents with screenshots of pages for the future site.
The developers, as a rule, did not have access to the full source code, as design licences were very expensive and direct involvement of the programmers in the process of creating the interface was not considered necessary. Discussion of the design happened in bits and pieces – via email, in the project management system, in the notes for the meetings. It was difficult for everyone involved to keep track of design progress. If any changes were made, all participants had to be informed, and it went on and on.
As design applications improved, this workflow began to become easier. Designers began to use Zeplin Invision.
Getting started in Figma
When you are added to a project using Figma.
The functionality of the browser and desktop versions of the Figma application is about the same. The desktop application, for example, has built-in support for installed fonts, while the browser version requires the Figma Font Helper plugin to use such fonts.
Figma interface
A file can consist of several pages; each page includes a single canvas. Designers often use pages to group project elements by type, e.g. allocating separate pages for system notifications, icons and so on.
When you first open a new project in Figma, carefully examine all the pages in the file. If the designer grouped colours, fonts and icons on separate pages, it will save you a lot of time during development.
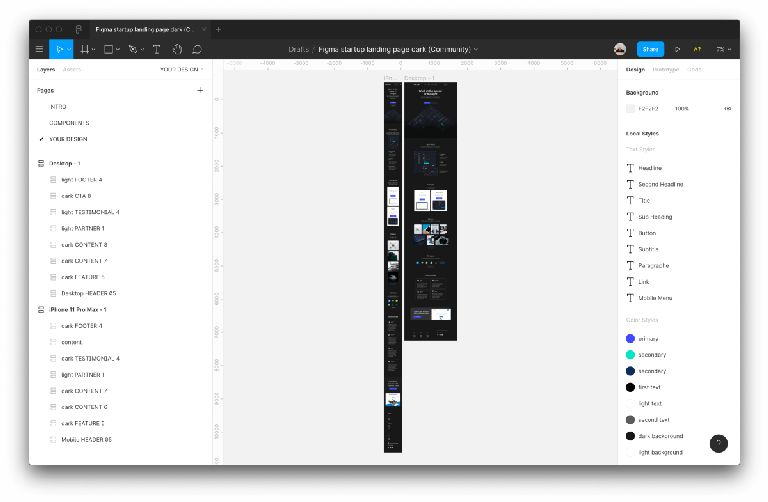
Sections of Figma service
Before we go on to explore the functionality of the Figma platform
- When you open a file, maximum magnification mode ensures that all sections are displayed in the visible area of the screen.
- You can zoom in or out of the working area by holding Cmd ⌘ and scrolling up / down simultaneously, or by pressing the + and – keys.
- To scroll the canvas horizontally, press the spacebar and “drag” the canvas with the mouse at the same time.
- Quickly zoom in on a particular section or item by selecting the desired object and pressing the Shift-2 key combination.
- You can instantly return to a scale where all items are visible on the canvas by pressing Shift + 1.
- Don’t worry about memorizing these keyboard shortcuts – you can always view these and other combinations by pressing Cmd – Shift – ?
- After using a hotkey combination, the corresponding combination is highlighted in blue – so you can immediately see what other commands are worth remembering.
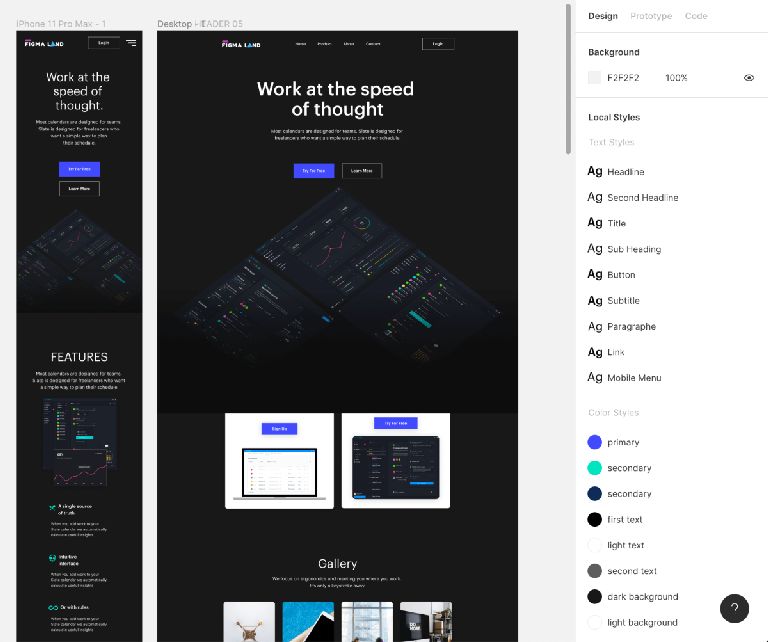
Styles in projects
When opening a new project in Figma, it is useful first of all to define the basic styles. Figma shows all project styles in the right pane. Here you can immediately find all fonts, colours, dimensional grids and other styles used in the design.
Note that the full list of project styles is displayed if no specific element is selected. If you want to deselect an element and return to viewing all of the project’s styles, simply click anywhere on the canvas area or press Esc on your keyboard.
Styles information can be used in the layout process to create CSS code. To view detailed style information for the desired element, click on the edit icon next to it.
Choice of elements
Once the basic style of the project has been determined, it’s time to move on to a more in-depth look at the design. The most important thing when parsing a design is to select the right elements to get information about their size and style.
Selecting the right layer is not so straightforward, as in most cases a design consists of many nested layers. By simply clicking on an element, only the topmost layer is selected.
To select the layer you want, either click on the layer while holding down the Command ⌘ key or right-click on an item and select the desired layer from the context menu.

By successive double-clicking on an element, each time the layer below the visible one will be opened. You can get to the layer you want this way too. There are other ways of viewing and selecting levels and objects – they are discussed in the official Figma documentation
When you get to the element you want, click on the Code tab available in the right-hand panel to view detailed information about CSS styles.
Note that CSS styles are automatically generated and may contain some inaccuracies – especially in the positioning of elements. These styles should not be copied thoughtlessly but used as a draft, a source of guidance.
Element sizes and spacing
If you need to measure element spacing, adjust element locations, set borders or indents, simply select the required element, hold down Alt and drag the mouse to where you want to measure the distance.
Figma marks the distance between objects with a red line and shows the value in pixels. If you need to measure the distance to a nested item, or to another group or section, press Cmd ⌘ as you would when selecting an object.
Exporting design elements
In the past, designers were responsible for exporting elements – since most developers didn’t have access to graphics editors. With Figma, developers have full access to all aspects of design, including exporting.
Preparing to export
The first thing to do before exporting objects is to mark the item as exportable. To do this, select the desired item and click the “plus” located in the right pane, next to the Export heading.
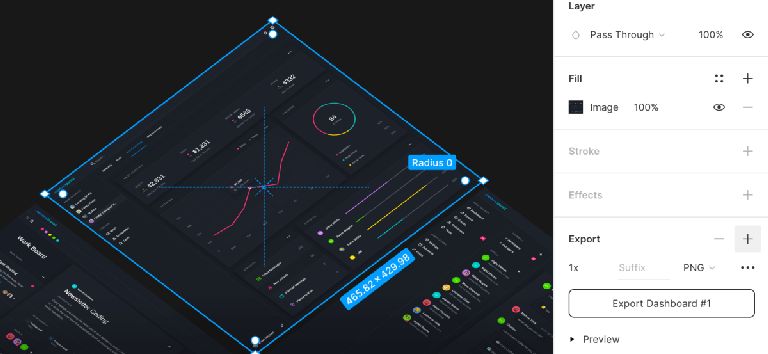
Depending on the type of file you wish to export, the settings will vary. For images, for example, there is only a choice of scale and format – PNG, JPG, SVG or PDF. Figma uses the name of the layer as the file name and you can add an extension if you wish. The item can then be saved by clicking the export button.
Tip: The item can be quickly exported by right-clicking on it and selecting the “Copy/Paste” option from the menu that appears. You can copy an image or SVG code in this way. This approach allows you to quickly save elements without going into export settings.
Exporting all elements
Elements can be exported not only one by one but all at once. In the latter case, you need to go to the main menu and click “Export” in the “File” menu. You can also use the key combinations Shift + Cmd + E in MacOS and Shift + Ctrl + E in Windows.
This will give you a list of all items to be exported. You will be able to check sizes, formats and uncheck files you do not need. If you hover your mouse over the thumbnail of the item to be exported, you will see the name that will be assigned to the file at the time of saving.
If you need to make changes, click on the thumbnail – this will highlight the item on the canvas, where you can easily adjust the export settings.
If the number of items to be exported is too large for a single file, you can use the “/” in the layer name to select objects in a separate group. Figma will automatically create a folder for that group and export the items in the folder as a subdirectory.
Transitions and animations
Figma provides a range of animation effects for transitions between states or pages, for opening sections or menus, for gestures on mobile devices and so on. You can view the available effects in Presentation mode by clicking on the play button located in the upper left corner.
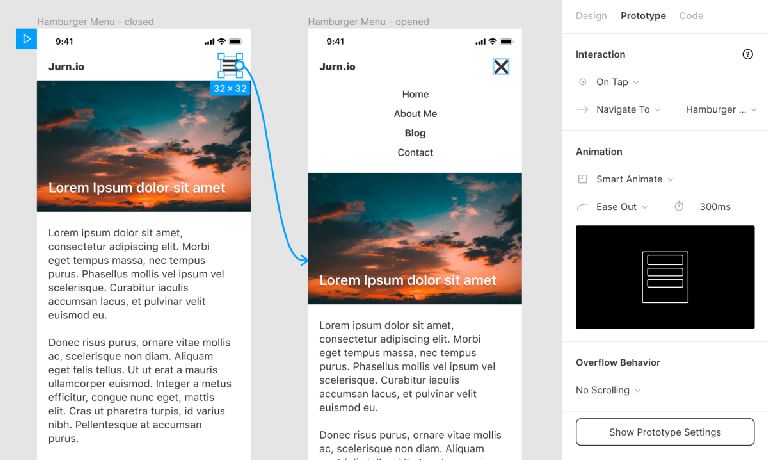
To view information about a particular effect, select the “Prototype” tab in the right-hand panel and you will see the workflow highlighted with blue arrows. Clicking the arrow displays detailed information about each effect, consisting of trigger, action and transition.
This simple animation accompanies the opening of the hamburger menu. As you can see, the hamburger menu icon has an On Tap trigger, the event is triggered after a ‘tap’ and leads to the Navigate To screen where the menu is in the expanded state. The transition type is Smart Animate – in Smart Animation mode, Figma automatically calculates the transition between the two states. The calculation uses a smooth Ease Out unfolding with a duration of 300 ms.
This information is needed to accurately reproduce the animation in CSS, but unlike the data for other design elements, the “Code” tab does not provide decoding of the process.
Project communication and discussion
If any aspect of the design remains unclear and you need to ask a question to clarify the situation, simply click on the chat icon available in the top bar (or the C key).
You can then click on any design element and write your question or comment. After writing your question, press the V key to return to the normal cursor.
Please note that not all project members are automatically notified of new questions and comments. If you need to make sure a comment is seen by the intended participants, use the @ symbol, just like in Slack and social media.
All posted comments will be visible to anyone with access to the project – private conversations are not provided. Once an issue has been successfully resolved, it can be marked as resolved, after which the replies and comments will be greyed out.
Conclusion
We reviewed all the basic principles of working in Figma – now you know how to navigate in the project files; get the right data about fonts, colours, distances between objects; export design elements; communicate with colleagues.
If you need more information about the functionality of the service we reviewed, please refer to the official Figma documentation.