Enable Developer Options on Galaxy M20 [+Useful Tricks]
Samsung has launched some budget-friendly smartphones recently, and Galaxy M20 is among them. This smartphone packs some amazing features that most of the users find interesting and helpful. To get more out of this, there’s something called ‘Developer Options’, once enabled, you can do a lot more on your device. In this tutorial, we’ll help you enable Developer Options on Samsung Galaxy M20 and discuss some important features.
Most of the time, this menu is accessed only to enable USB Debugging and apply some custom animations. Whereas, there are many more features exist within this menu that can help you improve user experience drastically. Basically, the Developer Options menu is built for Android Developers for some purposes. For users like us, there are plenty of options that we can use to customize our smartphone thoroughly.
We can customize animations, the size of the on-screen contents (DPI), keep our eyes on running services and a lot more. This menu is embedded within the Settings and through some actions, we can activate and deactivate it anytime we want. Since this menu comes inbuilt, so accessing and using it won’t harm your phone in any manner. Neither it would void the warranty on your phone.
Thus, you can use this menu anytime you want. Before you can use that, you’ll need to enable this menu on your phone. Through this guide, we’ll help you enable the Developer Options on your Samsung Galaxy M20 smartphone. You must know that using this menu without knowledge can hamper performance and general functions of the phone.
Therefore, you should use this mode quite precisely. To help you get started with Developer Options on Samsung Galaxy M20, we will discuss some important uses of this menu. Thus, you can get the benefits of this menu right away. Almost, every smartphone manufacturer keeps this menu hidden for some reasons. You can use this mode to access some core functionalities of this phone. You can easily customize animations and background apps. That should outcome better performance and stability.
If you ever wish to update firmware manually or gotta use Odin flashing software, you would need to enable the USB Debugging first on your phone. And there are many more benefits of using this menu. There’s a certain method that you need to follow. That method will activate the Developer Options on your Galaxy M20 smartphone. Once enabled, this menu can be used to improve the user experience, performance, and stability.
So, if you’ve been looking to improve performance on your phone through whitehat method, you better use this menu along with some cleaning actions. Now, we should stop talking about this menu and move further. the following instructions shall help you enable Developer Options on Samsung Galaxy M20.
How to Enable Developer Options on Samsung Galaxy M20
- Open ‘Settings’ menu on your phone.
- Now, scroll down and tap on ‘About Phone’.
- Then, tap on ‘Software Information’.
- Now, tap 7 times on the Build Number.
- Thereby, you should see a message ‘Now, you’re a developer’
- That’s it, the Developer Options menu has been activated on your phone and you can access it through Settings.
Thereafter, you can access the Developer Options directly from the
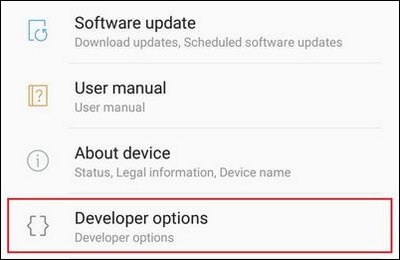
That’s how we can enable Developer Options on Samsung Galaxy M20 smartphone. This method works on most Samsung smartphones. So, if you’re having any other variant or model, you can apply the same steps. However, there can be a slight difference due to the different Android versions.
So, if you don’t find this method working, try to find the Build Number in the Settings. The rest of the steps remain the same. Now, one can proceed further and enable USB Debugging and access other features.
Here are some best things that you can do on your Samsung Galaxy M20 using the Developer Options.
Best Developer Options tips and tricks for Samsung Galaxy M20
1# Enable USB Debugging
It becomes essential while performing some manual actions like firmware update, custom recovery installation, using Odin and so on. Also, if you intend to use the Samsung Smart Switch application for file transfer or management purpose, there you would need to enable USB Debugging.
The following instructions will help you enable USB Debugging on Samsung Galaxy M20 smartphone:
- Open Settings.
- Tap on Developer Options.
- Now, look for USB Debugging.
- Enable this option.
- Exit this mode.
That’s how you can enable USB Debugging on your phone. The same way, you can deactivate this option.
2# Customize Animations
If you want to make your phone a bit snappier, then you can customize animations on your phone. The Samsung Galaxy M20 is loaded with Android Pie operating system. That brings out different visuals throughout the interface.
In order speed up the Android Interface, we can reduce extent and duration of the animations. That will make most of the actions snappier a bit. That should make you feel that your phone is running faster.
The following instructions are set to help you reduce animations:
- Open Settings.
- Tap on Developer Options.
- Now, look for “Windows Animation Scale”, “Transition Animation scale” and “Animator duration scale”.
- Tap on each entity and change the default value to 0.5X.
- Exit this menu.
This will instantly improve the overall performance on your phone. Make sure that you perform a reboot after applying these settings.
3# Improve Readability (customize DPI)
Did you find that reading text a problematic thing on Samsung Galaxy M20? If yes, you just need to apply this action. The Developer Options menu allows users to customize the DPI value (Dot Per Inch). This value directly affects the size of the on-screen content (doesn’t affect the screen resolution).
Thus, we can improve the size of the text and on-screen content like icons without reducing the screen resolution. Additionally, increasing the size of the on-screen contents improve performance to some extent.
Here’s how you can manage DPI on your phone:
- Open the Settings.
- Again, tap on Developer Options.
- Now, look for “Smallest Width” or “Minimal Width”.
- Change the default value with 360 or above.
- Exit this mode and reboot your phone.
4# Set Default USB configuration
While we connect our Android phone to our computer or laptop, a pop up appears where we need to manually select whether we want to access internal memory or something else.
Within the Developer Options, we get an option to set a default USB configuration. Thus, you can set whether you want to access the Internal memory when you connect your phone to the computer or something else. And once selected, you don’t need to select any option while connecting your phone.
The default USB configuration would be used. Just follow the below steps to configure this thing on your phone:
- Open the Developer Options.
- Look for ‘Select USB Configuration’
- Tap on it and select the required USB configuration.
Now, go on and try connecting your phone to your computer. This should reduce your efforts.
5# Track running services
If you’re a bit concerned about performance and suspect that one or more applications are consuming most of the power resources, you better track the running services. The Developer Options menu serves as an option to observe the running services. You can get enough information about the consumption of resources like the battery, Internet data, memory, and storage.
Thus, you can observe thoroughly which app or apps are consuming most of the resources. Or simply, you can find out why the battery is being drained so fast on your phone.
- Open the Settings menu.
- Now, tap on the Developer Options.
- Then, tap on ‘Running services’.
- Now locate the app that might cause the problem and stop it to see if that works.
That’s how you can use the Developer Options to keep your phone running smooth and fast all the time. That ends our list of best tips and tricks that one can apply using the Developer Options. To learn more useful things, must check out: 10 best Developer Options tips and tricks for Samsung Galaxy phones.
That ends our tutorial here that explains how to enable Developer Options on Samsung Galaxy M20 and use it effectively. We hope that our readers would find this tutorial helpful. If you do, share your thoughts in the below comment section. We would love to hear from you make this tutorial even better.

thanks guys for open another door for me and have a better Android experience
enable developer options.
KEEP IT UP! THANKS
You’re most welcome!
can u plz let me know how to enable multi user/guest mode in m20
Hi Avinas, open Settings on your phone and under system settings, you should find an option like multiple users or similar on. Or just swipe down the notification panel and tap on user icon.
Thank you for ur valuable response,but such options can’t be found in the phobe,can u plz look into it and help me
Hi Dipak, I have tried your tips in m20, but there is no such system setting under settings.
That’s why I am unable to complete the steps suggested by you for enabling guest mode in m20.
Request you to provide stepwise solution if you have any
Sir. How to mirror Link Samsung Galaxy m20 with honda Cars.. Thanks for the help for many people.
My phone screen takes about 15-20 second to screen on after tapping power button when phone is on