How to Install Android 9 Pie on Redmi Note 3
Released two years ago, the Redmi Note 3 is Xiaomi’s one of the best selling smartphone. In the terms of sales, it outnumbers other smartphones with huge numbers. However, it couldn’t receive some solid support from the manufacturer. You might be waiting for the next update, the Android 9 Pie, however, there are greater chances that it won’t this update. There’s nothing to worry about until we have custom ROMs. In this tutorial, we’ll help you update your Redmi Note 3 to latest Android 9 Pie operating system by installing an Android 9 based custom ROM. That should bring performance improvements, new features, and UI.
The PixelExperience ROM has been published for Redmi Note 3. It is based on Google’s Android 9 operating system builds. While you get the latest software on your phone, this ROM brings most of the Google Pixel’s features like the launcher, wallpapers, icons, and boot animation. If you’ve been looking to update your Redmi Note 3 to Android 9 Pie, then this ROM would the ideal one. Currently, this ROM is in beta stage, so you can expect some minor bugs. Otherwise, this custom firmware is good enough to use it as a daily driver. It also includes all Google applications. So, you don’t have to install Gapps while installing this firmware.
Currently, most of the aspects are working fine expect; Hardware encryption and SELinux Enforcing. Both the things are rarely necessary for most of the users. We can expect these errors to be removed in future updates/builds. The rest of the features are working fine on this smartphone. While this ROM updates your Redmi Note 3 to the latest firmware, it also improves performance and other aspects. You can expect better performance, better customization, and user-interface. In simpler words, it provides you different opportunities to improve the user experience on this smartphone. Must see our tutorial on how to speed up Redmi Note smartphones for better performance.
When it comes to tweaking our Android phone, the custom ROMs are pretty helpful. However, sometimes things could go in the opposite direction. Basically, these custom ROMs are built and distributed by third-party developers and have not connection to Xiaomi and Google in any manner. That means, if you choose to flash this Android 9 based firmware on your phone, it will void the warranty on your phone. You better read all the terms related to the warranty on your phone. This process voids the warranty on the phone. If you wish to get it back, you gotta install the stock firmware on your phone. That will restore your phone along with warranty and other aspects.

Since we are discussing custom firmware here, we could end up bricking our phone. It happens that we try to flash a custom ROM and end up bricking our phone. So, you better create a complete backup of your phone. That includes messages, contacts, videos, photos, documents and other downloads. Once we perform this action, there is no way to revert it or restore the deleted/corrupted files. Currently, there are tons of applications that help to backup an Android phone. Either you can back up your phone to your computer or use online services like Google Drive, Photos, or OneDrive. That’s your call, whether you back up your files offline or online.
There is one more thing that you should know. To flash this PixelExperience ROM on your Redmi Note 3, you need a TWRP recovery. This ROM cannot be flashed using the stock recovery mode. Basically, the stock recovery image has many restrictions that won’t allow users to install any sort of third-party aspects. Therefore, you must install the TWRP recovery on your phone. Then, you’ll be able to flash this ROM successfully and update your phone to the latest Android firmware. Before we proceed any further, we must focus on below prerequisites:
Prerequisites
- This custom firmware has been developed only for Redmi Note 3 and it’s not supposed to be used or implement on any other device. You should check the device model number before you move further. You can find the device model number under the ‘About Phone’ section.
- This ROM has no relation with Xiaomi or Google in any way. It has been developed and distributed by third-party developers. Therefore, installing this custom firmware voids the warranty on your phone. Or something bad happens to your phone, only you’ll be responsible for that.
- The flashing process wipes the internal memory completely. It deletes all the stuff stored under the phone. So, a general backup is highly suggested.
- Most importantly, to flash this firmware, you require a custom recovery like TWRP. Without this recovery, it is not possible to flash this firmware on your phone. Therefore, you should first install this recovery and then read this tutorial further.
- If you’ve already installed the TWRP recovery, then you can back up your current firmware. If anything bad happens after or you don’t like this ROM, you use that backup to restore the previous firmware on your phone. Just get into the TWRP recovery menu, and use Advanced options to backup firmware on your phone (NANDROID backup).
- At last, charge your phone at least 50%, that is enough to accomplish this task.
Now, you’re all set to update your phone to the latest Android 9 Pie firmware using the custom ROM. Just follow the below instructions:
How to flash Android 9 based ROM on Redmi Note 3
- First, download this ROM for Redmi Note 3 from here (same ROM for Note 3 and Note 3 Pro). After that, transfer this ROM to your mobile, remember the name and location of the file.
- Now, turn off your phone using the Power Off menu.
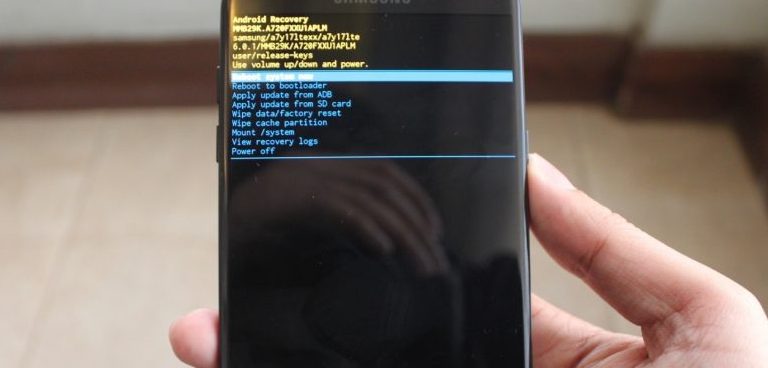
- Get into the Recovery mode:
- Press both Volume Down and Power buttons and hold them together.
- Once the boot menu or logo appears, release the buttons.
- Now choose the Recovery mode and enter into it.
- You should be entered into the TWRP recovery mode.
- Now, tap on Install button, load the downloaded ROM package file.
- Flash the ROM using the on-screen instructions.
- Once the installation is completed, tap on ‘Wipe’ and perform this action.
- Then, exit this mode.
Your phone should restart now and take you to the setup screen soon. There enter your Google account details and customize other settings. It might possible that for the very first time, it would take several minutes to turn ON. There’s nothing to worry, it happens.
That’s it, you’ve successfully updated your Redmi Note 3 to latest Android 9 Pie operating system. Now, you could get the experience of the latest Android software along with other Pixel aspects.
We hope that our readers would like this tutorial. Don’t forget to share your comments, views, and thoughts below. We would love to hear from you and improve our tutorials. If you stuck anywhere, do let us know.

hello do you have your youtube channel
Hi Aryan, we currently do not have a YouTube Channel. Let me know how I can help you or share your thoughts!