The Dentist-Approved Guide to Electric Toothbrushing Technique: Exact Steps, Science, and Mistakes to Avoid (2026)
You bought the right electric toothbrush. But you might still be using it wrong.
Here’s the thing: the average person brushes for just 45 to 70 seconds daily. That’s less than half the recommended time, according to the Academy of General Dentistry.
And it’s not a small group. More than 130 million Americans now use electric toothbrushes. Yet most still scrub like they hold a manual brush.
This guide fixes that. It breaks technique down by brush type. It shows the exact angle, pressure, and timing dentists recommend.
You’ll also learn the fluoride trick most guides skip entirely. So let’s get your two minutes working harder.
5 Things You’re Probably Doing Wrong Right Now
Most brushing mistakes are invisible until your dentist points them out. Here are the five that matter most.
- You scrub back and forth. Electric brushes do the motion for you. So scrubbing adds nothing and wears enamel.
- You press too hard. Most people apply two to three times more pressure than needed, per reporting in AZ Big Media.
- You skip inner surfaces. Only 58.9% of power-brush users reach all inner tooth surfaces, according to a study in the International Journal of Dental Hygiene.
- You rinse right after. That habit washes away protective fluoride. Spitting alone keeps it working.
- You rush. The two-minute target exists for a reason. Cutting it short leaves plaque behind.
The good news? Each mistake has a simple fix. We cover all of them below.
Why Technique Still Matters With an Electric Toothbrush
Technique matters because the brush handles motion, not placement. You still control where the bristles go.
Many people assume electric means automatic. It doesn’t. The motor cleans only what you point it at.
In our experience, this single misunderstanding drives most brushing failures. So let’s look at what the science actually shows.
What the research says about electric versus manual
Electric brushes clean better, but the gap depends on technique. Still, the numbers are clear and consistent.
After three months of use, electric brushes remove about 21% more plaque than manual ones. That figure comes from a 2024 review reported by Yahoo Health.
The gum health gains are larger still. One 2025 meta-analysis tracked gingivitis patients across 21 trials.
The results? The newest oscillating-rotating brushes moved 88% of users to healthy gums. Manual brushes moved only 21%, per data in PMC.
That’s a four-fold difference. But it only happens when the brush is used correctly.
The “technology without technique” problem
People switch to electric brushes but keep their old habits. The tool upgrades, apparently, the technique does not.
And this shows up in the data. Nearly all power-brush users reach their outer surfaces.
Inner surfaces tell a different story, though. Only 58.9% reach every inner surface, reports the International Journal of Dental Hygiene.
What does that mean in practice? Four in ten people leave plaque on the tongue side. The brush works fine. The aim is off.
How bad technique causes gum recession
Too much pressure pushes gums down and exposes roots. It’s the most common technique injury.
There’s even a measurable threshold. Forces above roughly 2.9 newtons can cause recession and notching over time, according to clinical guidance summarised by Snow.
So what does 2.9 newtons feel like? Roughly the weight of a small apple resting on the brush.
A simpler tell: if your bristles splay flat against your teeth, you’re pressing too hard. Ease off immediately.
Here’s a side-by-side comparison of healthy gumline versus recession from over-brushing:
Gum sits high on the tooth
The gum margin covers the root. No sensitive root surface is exposed.
Gum pulled down, root exposed
Excess pressure pushes the gum down. The root shows and feels sensitive.
Sonic vs. Oscillating-Rotating: Your Technique Should Change
Your technique should match your brush type. Sonic and oscillating brushes work differently, so you guide them differently.
To put it simply, this is the single biggest gap in most brushing advice. Few guides explain it. Here’s the clear version.
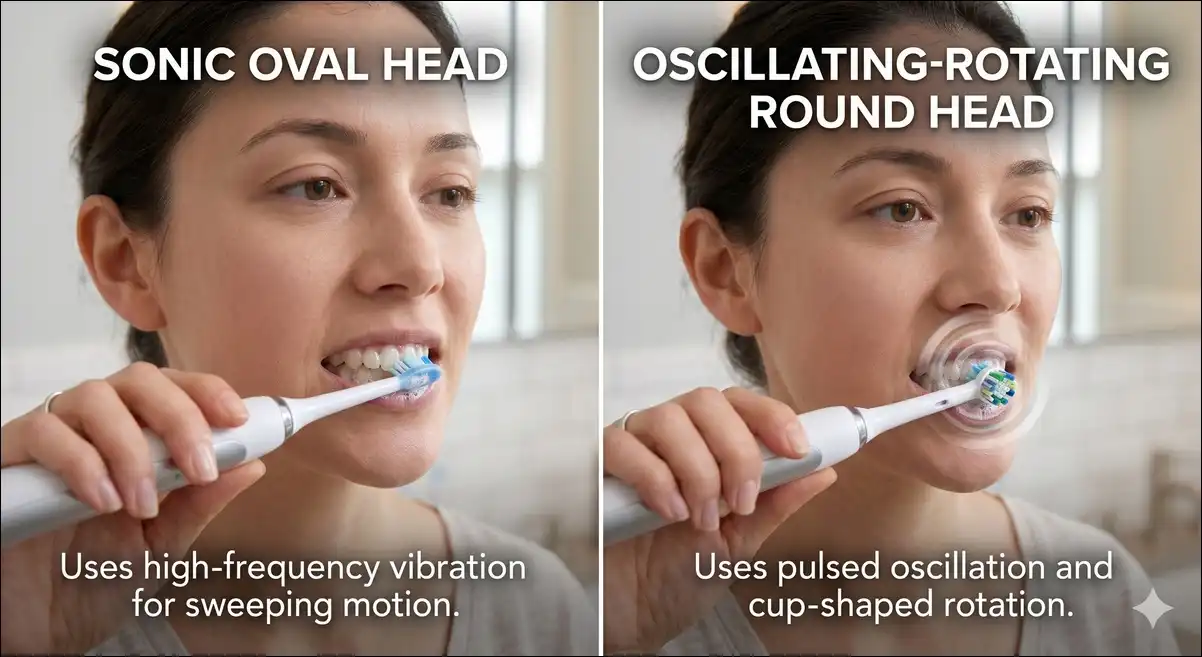
How oscillating-rotating brushes work
Oscillating-rotating brushes use a small, round head. It spins back and forth rapidly.
These heads move at around 1,300 to 8,800 rotations per minute, according to Ordo. The motion cups each tooth.
So the correct technique is tooth by tooth. Hold the head on one tooth for a few seconds.
Then move slowly to the next. Let the spinning do the cleaning. Don’t drag it quickly.
How sonic brushes work
Sonic brushes use a longer head and vibrate at high speed. Here the technique is glide, not pause.
These brushes move at 24,000 to 40,000 strokes per minute, as per Ordo. That speed creates fluid movement.
And that fluid pushes saliva and toothpaste between teeth. It cleans spots the bristles never touch directly.
So you glide steadily along the gumline. Trace the teeth in a smooth, slow sweep. The fluid action does the extra work.
Side-by-side technique comparison
The table below shows how technique differs between the two brush types.
| Feature | Oscillating-Rotating | Sonic |
|---|---|---|
| Head shape | Small, round | Longer, oval |
| Speed | 1,300–8,800 RPM | 24,000–40,000 strokes/min |
| Core motion | Tooth-by-tooth, pause briefly | Glide steadily along teeth |
| Best for | Deep cleaning, braces | Sensitive gums, between teeth |
| Pressure cue | Very light contact | Barely touch the surface |
Which type is right for you?
Choose based on your mouth, not the price tag. Both clean well when used correctly.
That said, sensitive teeth or gums favour sonic. A 2024 report found sonic models give a gentler clean than oscillating ones, per Yahoo Health.
On the flip side, deep cleaning and tight spots favour oscillating-rotating. The small head reaches back teeth and braces well.
Worth Noting: The “better” brush is the one matching your anatomy. A sonic brush wasted on a scrubber still underperforms.
The Complete Step-by-Step Electric Toothbrushing Technique
The correct technique is eight simple steps. Each takes seconds. Together they cover everything dentists recommend.
This sequence follows American Dental Association guidance. We recommend you follow it twice daily for best results.
Step 1: Set up the right way
Start with a pea-sized amount of fluoride toothpaste. More doesn’t clean better. It just creates foam.
Now, one common slip: people turn the brush on too early. Instead, place the brush against your teeth first, then switch it on. That prevents toothpaste splatter, advises Carine Glades Dental Care.
Step 2: Hold it like a pencil
Grip the handle with your fingertips, not your fist. This small change prevents most pressure problems.
Why does it work? A loose grip removes hand tension. And that tension is what drives scrubbing and hard pressing, notes Philips Sonicare.
Remember, the brush is built to do the work. Your job is placement, not force.
Step 3: Angle the bristles at 45 degrees
Point the bristles at the gumline, tilted 45 degrees. This is the most important position.
The angle lets bristles clean above and just below the gum margin. The ADA recommends this exact angle.
Here’s why it matters: plaque hides where teeth meet gums. The 45-degree tilt reaches that hiding spot directly.
Step 4: Use the quadrant method
Divide your mouth into four sections. Spend 30 seconds on each. That hits the two-minute target evenly.
The four quadrants are upper left, upper right, lower left, and lower right. Move through them in order.
Most brushes pulse every 30 seconds. That signal tells you to switch quadrants.
And it fixes a common habit. People spend too long on easy front teeth and rush the back ones.
Step 5: Clean all three surfaces
Every tooth has three surfaces. Clean each one: outer, inner, and chewing.
The outer surface faces your cheek. The inner faces your tongue. The chewing surface sits on top.
For inner front teeth, tilt the brush vertically. Use gentle up-and-down strokes.
One reminder: inner surfaces are the most neglected. So give them deliberate attention every session.
Step 6: Trace the gumline gently
Run the brush head softly along your gums. Don’t press or scrub. Let it glide.
Why the care? The gumline is where gum disease starts. Plaque builds there first and fastest.
Keep the contact light. The goal is to clean the margin, not massage it aggressively.
Step 7: Brush your tongue
Sweep the brush head across your tongue, back to front. Do this for a few seconds.
Here’s the payoff: your tongue harbours bacteria that cause bad breath. Cleaning it improves freshness noticeably, according to DC Dental Clinic.
Some brush heads include a tongue cleaner on the back. Use it if yours has one.
Step 8: Spit, don’t rinse
Here’s the trick most people miss. After brushing, spit out the toothpaste. Don’t rinse with water.
The reason is simple. The leftover fluoride keeps protecting your enamel. Rinsing washes that benefit away.
UNIQUE INSIGHT: This is the easiest oral health upgrade available. It costs nothing and takes zero extra time.
Here’s a step-by-step electric toothbrushing technique from setup to spitting without rinsing:
Set up
Pea-sized fluoride toothpaste.
Fingertip grip
Hold it like a pencil.
45-degree angle
Tilt toward the gumline.
Quadrant method
30 seconds per section.
Three surfaces
Outer, inner, chewing.
Gumline
Glide gently, no scrubbing.
Tongue
Sweep back to front.
Spit, don’t rinse
Keep the fluoride working.
The 7 Most Common Electric Toothbrushing Mistakes
Most mistakes come from old manual-brush habits. The good news? Each one has a quick fix.
Below are the seven errors dentists see most. Find yours and correct it today.
Mistake 1: Scrubbing like a manual brush
Scrubbing back and forth is the top mistake. The reason: electric brushes already provide the motion.
Adding your own scrubbing doesn’t clean more. It wears enamel and irritates gums instead.
So the fix is simple. Hold and guide. Let the brush spin or vibrate on each tooth.
Mistake 2: Pressing too hard
Pressing hard feels thorough. It’s not. It damages tissue.
In fact, most people press two to three times harder than needed, per AZ Big Media. They never notice.
So watch your bristles. If they flatten against the teeth, lighten up. A pressure sensor helps catch this.
Mistake 3: Skipping inner surfaces
Inner surfaces get forgotten constantly. And the data proves it.
Only 58.9% of power-brush users clean every inner surface, found the International Journal of Dental Hygiene. The rest miss the tongue side.
The fix is awareness. Consciously turn the brush to inner surfaces in every quadrant.
Mistake 4: Rushing the two minutes
Two minutes feels long. So most people quit early. Far too early.
How early? Average brushing time runs around 45 seconds in some studies, per Gold Coast Dental. That’s a quarter of the goal.
So use your brush’s built-in timer. Trust the quadrant pulses. Stay until it shuts off.
Mistake 5: Rinsing after brushing
Rinsing washes away the fluoride you just applied. That undoes part of the work.
Spit out the excess instead. Leave the thin fluoride film in place, advises DC Dental Clinic.
If you must rinse, use a fluoride mouthwash. Plain water removes the protective layer fastest.
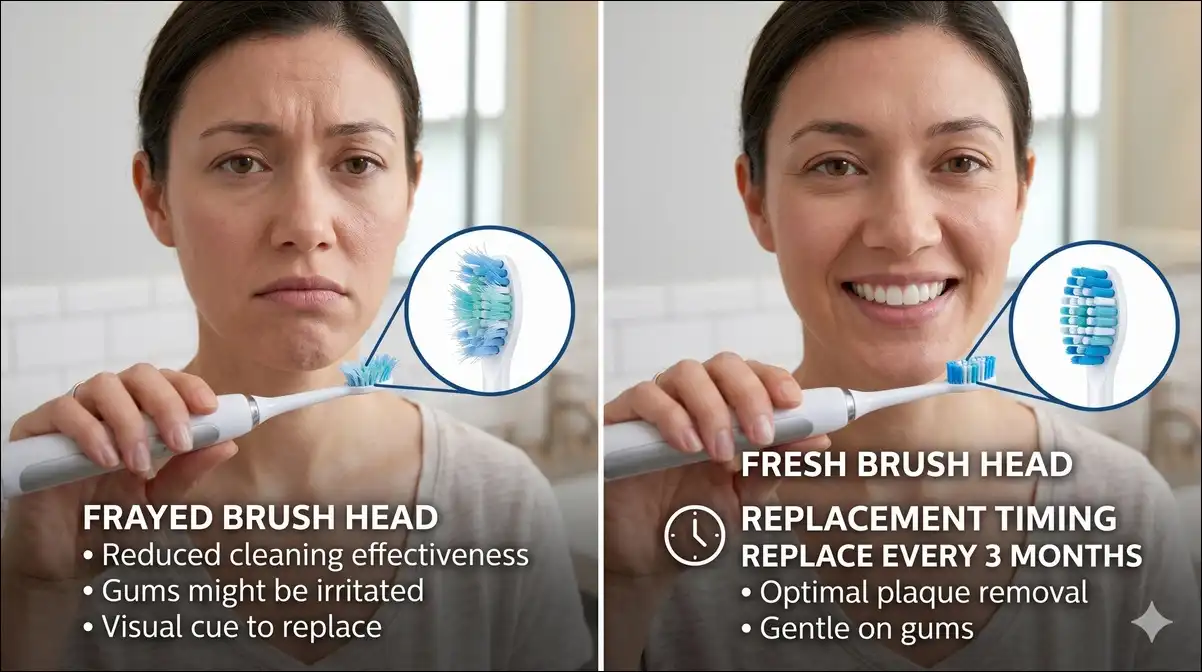
Mistake 6: Using an old brush head
Worn bristles clean poorly. Still, many people ignore this entirely.
Replace heads every three to four months, or sooner if frayed, says the ADA. Effectiveness drops as bristles bend.
Yet 42% of people don’t replace heads on schedule, per Electric Teeth. So set a phone reminder.
Mistake 7: Storing the brush wrong
Storage is the forgotten step. And it affects hygiene more than people think.
Store the brush upright and let it air dry. Closed containers promote bacterial growth, warns the ADA.
Worth Knowing: Soaking a brush in 3% hydrogen peroxide cut bacterial load by about 85% in one study cited by the ADA. Few people know this.
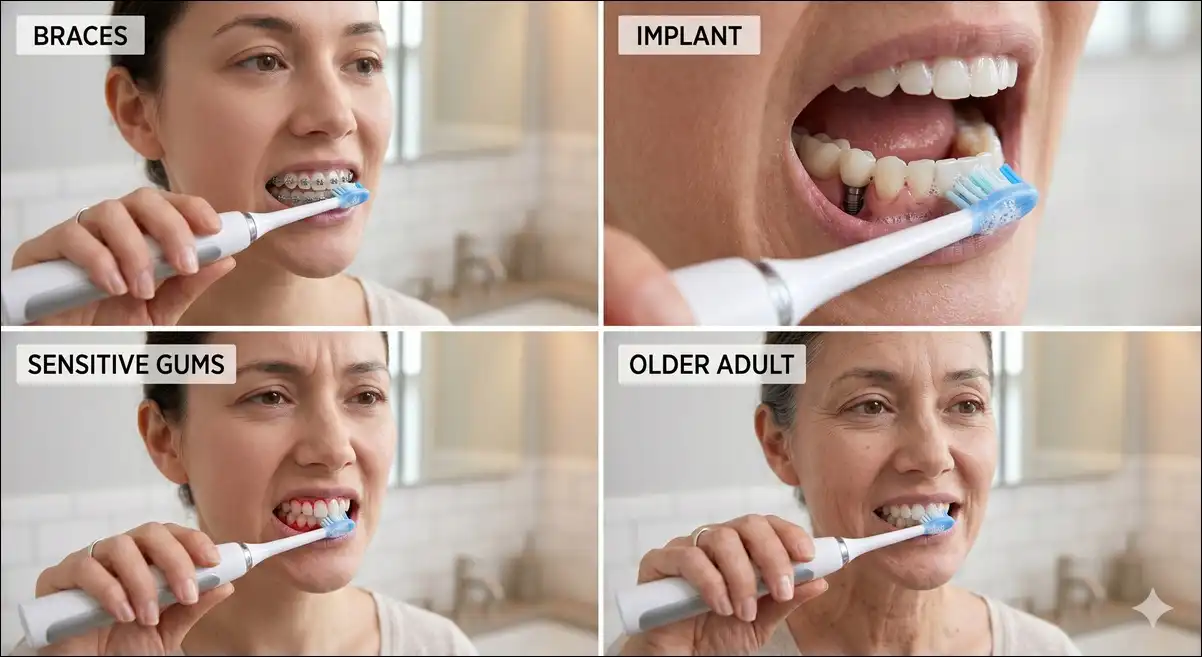
Electric Toothbrushing Technique for Special Situations
Your technique should adapt to your situation. Braces, implants, sensitive gums, and age all change the approach.
Most guides ignore these groups. This section covers all of them in one place.
Brushing with braces
Braces trap food around brackets and wires. So your technique needs extra targeting.
Use an orthodontic or compact brush head. Angle it to reach above and below each bracket.
And electric brushes help here. The consistent motion cleans around hardware better, notes Westrock Orthodontics. Add interdental brushes for tight gaps.
Above all, focus on the gumline and the area around wires. That’s where white-spot lesions form.
Brushing with dental implants
Implants need gentle but thorough cleaning. Here, infection around the gum is the main risk.
A sonic brush with a soft head works well. So does a non-abrasive toothpaste.
Better still, pair the brush with a water flosser for deep cleaning. Replace the soft head every three months.
In short, the goal is plaque removal without irritating the implant site. Light pressure protects the surrounding tissue.
Sensitive teeth and gums
Sensitivity calls for the gentlest approach. Pressure and bristle choice matter most.
So switch to your brush’s sensitive mode. Use the softest available head. Press barely at all.
And sonic brushes suit sensitive mouths well. Their gentler action causes less discomfort, according to Yahoo Health.
What if your gums bleed at first? Don’t stop brushing. Light, consistent brushing usually reduces bleeding over time.
Older adults and limited dexterity
Electric brushes shine for anyone with reduced hand control. The motor compensates for the motion.
In fact, a 2024 meta-analysis found electric brushes especially help adults 65 and older. They significantly improved gum health, reports Yahoo Health.
So choose a model with a larger handle. It’s easier to grip with arthritis or weak hands.
And a rechargeable brush keeps power steady. That matters when consistent motion is the whole benefit.
Children
Kids benefit from electric brushes too. They often lack the dexterity for good manual technique.
The proof? In children aged 7 to 9, electric brushes removed 51.9% more plaque than manual ones. That finding comes from a study in NCBI.
Still, supervise young children while they brush. Use a child-sized head and a smear of fluoride toothpaste.
Timers and fun features help build the habit. They make the two minutes feel achievable.
Smart Brush Features That Improve Your Technique Automatically
Smart features fix technique problems without effort. They catch mistakes you can’t feel yourself.
That said, the technology doesn’t replace good habits. But it nudges you toward them constantly.
Pressure sensors
Pressure sensors detect when you press too hard. Then they alert you or slow the motor.
And this solves a hidden problem. Most people apply far too much force unknowingly.
Over time, the feedback retrains your hand. You learn the right pressure by feel.
Quadrant timers
Quadrant timers pace your brushing into even sections. They pulse every 30 seconds.
What does that prevent? Front-teeth favouritism. People naturally over-brush easy spots and rush the back.
So the timer enforces balance. Each part of your mouth gets equal time.
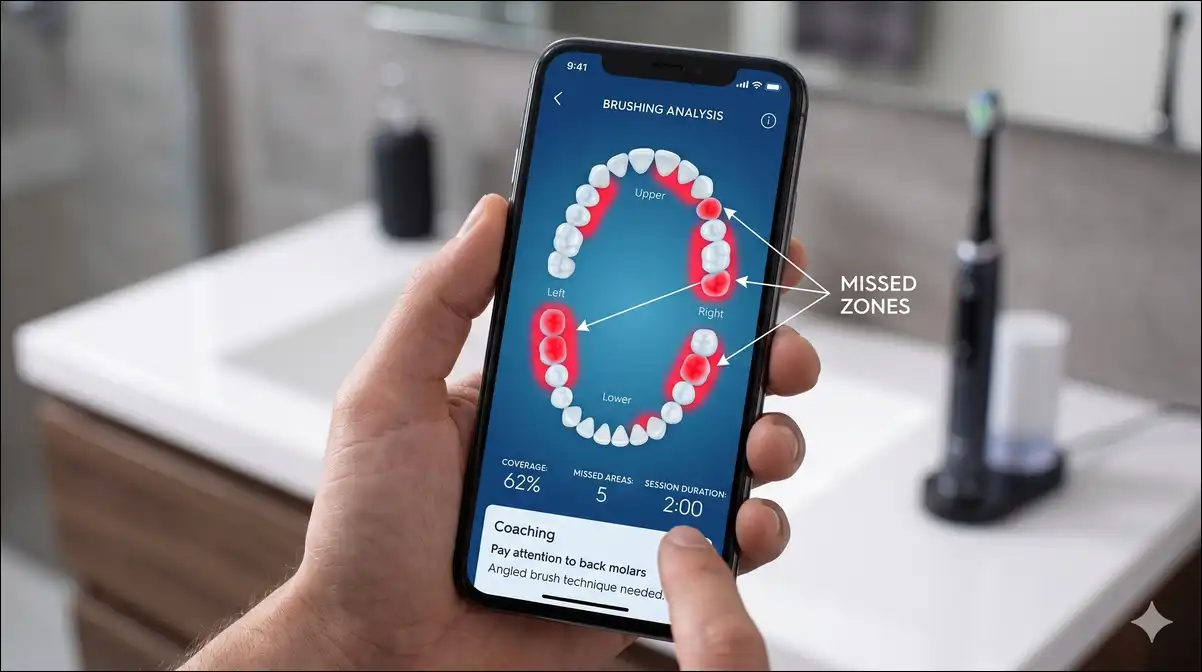
App-based coaching and zone mapping
Some brushes connect to apps. They map which zones you missed and track your habits.
In practice, these tools add feedback and guidance. They can reduce friction and build stronger routines.
Still, the research is developing. App layers haven’t clearly beaten standard power brushes in trials, per a ClinicalTrials.gov study description.
Do you actually need a smart brush?
Honest answer: not everyone does. It depends on your habits.
If you already brush gently for two minutes, a smart brush adds little. The features help people who rush or press hard.
For those people, though, the coaching matters a lot. For careful brushers, a basic timer brush is enough.
So spend your money where it helps. We’ve found that technique beats features every time.
Frequently Asked Questions About Electric Toothbrushing Technique
Should I brush before or after breakfast?
Brush before breakfast, or wait 30 minutes after eating. Acidic foods soften enamel temporarily.
Brushing right after acidic food can wear that softened enamel. Waiting lets it reharden first. Brushing before breakfast avoids the issue entirely.
How much toothpaste should I use?
Use a pea-sized amount for adults. That’s all you need. More toothpaste doesn’t clean better, it just produces foam.
For children under three, use a rice-grain smear, advises the ADA. Age three and up gets a pea-sized amount.
Can I use an electric toothbrush if my gums bleed?
Yes, in most cases. Gentle brushing usually helps bleeding gums improve, because bleeding often signals early gum inflammation from plaque.
Don’t scrub harder to “clean it out.” Use a soft head and light pressure instead. If bleeding lasts for weeks, see your dentist.
How do I know if I’m pressing too hard?
Watch your bristles and listen to your brush. If the bristles splay flat, you’re pressing too hard. The motor may also slow or change pitch.
A pressure sensor removes the guesswork. It alerts you the moment you exceed safe force.
Should I brush or floss first?
Floss first, then brush. This order clears debris before the fluoride goes on.
Flossing loosens plaque between teeth. Brushing afterward sweeps it away and coats the area with fluoride. The two work as a pair, not substitutes.
How long until correct technique shows results?
Gum improvements can appear within a week. Plaque reductions start even sooner.
One study saw bleeding-site reductions of 45% or more after just one week of correct power brushing, per PMC. Lasting change builds over weeks.
Final Thoughts: The Brush Is 20%, Technique Is the Rest
The brush matters less than how you use it. Technique drives your real results.
To put it plainly: a $300 smart brush used wrong loses to a $30 brush used right. The motor cleans only where you guide it.
So remember the three non-negotiables. Angle the bristles at 45 degrees. Brush a full two minutes with quadrant pacing. Hold gently with a fingertip grip.
And don’t forget the eighth step everyone skips. Spit, but don’t rinse. Keep the fluoride working.
In our experience, the fastest improvement most people make isn’t buying a new brush. It’s slowing down, lightening pressure, and finishing the full two minutes.
Beyond that, match your technique to your brush type. Adapt it to your situation. Then let the brush do its job.
One last tip: at your next checkup, ask your dentist to watch your brushing pattern. A 30-second demonstration can correct years of habit.
In short, your teeth don’t need a more expensive brush. They need a better two minutes, twice a day.