How to take screenshots on Chromebook
Just like mobile smartphones, the Chromebook has an ability that helps users to take a screenshot of a program or anything that is being displayed on the screen. There can be different situations where one would require to share something present on the screen with someone else. That could be an error or something that you want to capture immediately. That’s where you can use this inbuilt ability and take a screenshot on Chromebooks. This tutorial works for all Chromebooks.
Since Chromebooks come with a keyboard, that makes possible to capture the current screen in different ways. There are different key-shortcuts that one can use based on our requirements. Or else, you could use the side-buttons when using the Chromebooks in the tablet mode – almost similar to what we usually do on our mobile phones. Additionally, to empower these sleek Notebooks, there are tons of extensions. Especially, there are many extensions that help to carry out screenshots.
Apart from all the above methods that we have mentioned, there’s one more way. If you’re using Samsung Chromebooks or Pixel (with Pen), the stylus is the thing that you needed to take screenshots. There’s no doubt that this feature/ability is really helpful. While using our mobile phone, laptop or a Chromebook, we might face some errors or something that we would want to share. Thus, through screenshots, we can easily share that error or screen with appropriate people. For us, we use this ability to build our tutorials and resource lists.
For you, the purpose would be different. If you’re having a Chromebook then you shouldn’t miss learning how to take a screenshot on it. There are different ways to do that. Either one can use the keyboard shortcuts, side buttons or a dedicated application. And for Stylus powered Chromebooks, there’s an additional method to capture screenshots on a Chromebook. Through this guide, we would these different methods. We hope that our readers would like them.
If there’s any suggestion or something interesting that you want to share, use the comment section. We would love to hear from you. Now, we shall get started learning different methods that you can use to screenshot on your Chromebook.
How to take a screenshot on Chromebook using Keyboard shortcuts
- Open the page or screen that you want to capture.
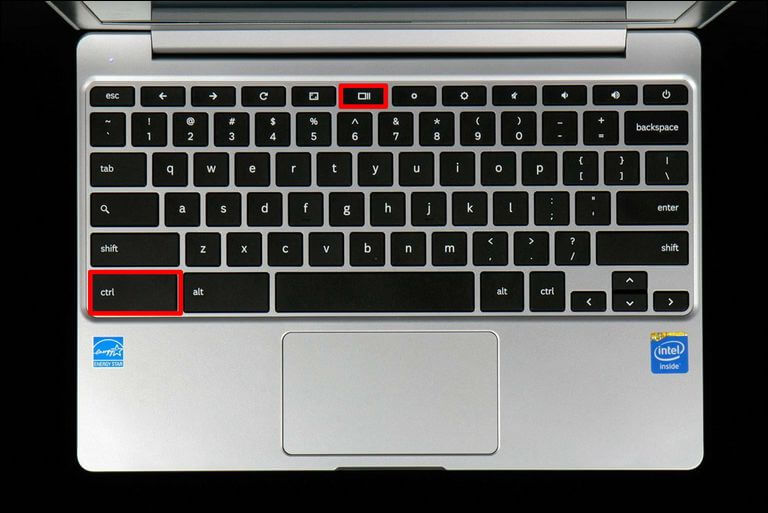
- When you’re ready, hit Ctrl + window switch key
- If you want to capture a specific area on the screen, just press Ctrl + Shift + window switch keys.
- Then select the area that you want to capture.
- That’s it, the screenshot has been captured.
There are different shortcuts to capture screenshots using the Keyboard. Every Chromebook is blessed with a keyboard. Even if you’re using an external one, there’s a specific shortcut for that as well.
So, if you’re using an external keyboard, use the following shortcut:
- Ctrl + F5 – to capture the whole screen.
- Ctrl + Shift + F5 – to capture a specific area on the screen.
That’s how we can easily take screenshots on Chromebooks using the keyboard shortcuts. If you’re used of using a keyboard most of the time (like we use our laptop), then this method should be an ideal one for you.
After the screenshot is captured, it saved under ‘Downloads‘ folders. From there you can save to another drive or sync to online drives like a Google Drive, or one that you use.
Or else, for tablet mode users, the side buttons come helpful in this task. In the next method, we detail the steps you needed for that purpose.
How to take screenshots on Chromebooks in Tablet Mode
For those who prefer tablet mode rather than using Chromebooks like a Notebook, for the convenience, side buttons have been embraced. While these buttons help you control volume, power menu and a few more actions, when pressed in a certain pattern, they are helpful in taking screenshots just like our regular tablet PCs and smartphones.
The method relatively simple and we are pretty sure that you would be able to master it in the very first attempt. However. there’s one limitation that you should know. In tablet mode, this method works to capture the entire screen. There’s no option to capture a certain area like we can use keyboard shortcuts. Further, you should remember the orientation of the volume buttons as they won’t change when screen orientation changes.
Here’s how you can take screenshots on a Chromebook in a tablet mode:
- Open the app/program, extension, web page or screen that you want to capture.
- When you’re ready, press Volume Down and Power buttons at the same time.
- That should capture the current screen on your Chromebook.
That’s the way to capture screenshots on this notebook when in tablet mode. If you wish to capture a certain part on the screen or specific problem, you should use the keyboard method or the one that we are going to discuss.
Taking screenshots using an extension
Chromebooks are specifically designed to work along with Google Chrome extensions. And there are countless extensions that make them a great workstation. Whether you want to edit your documents or chill with online music, only extensions that you need for that purpose.
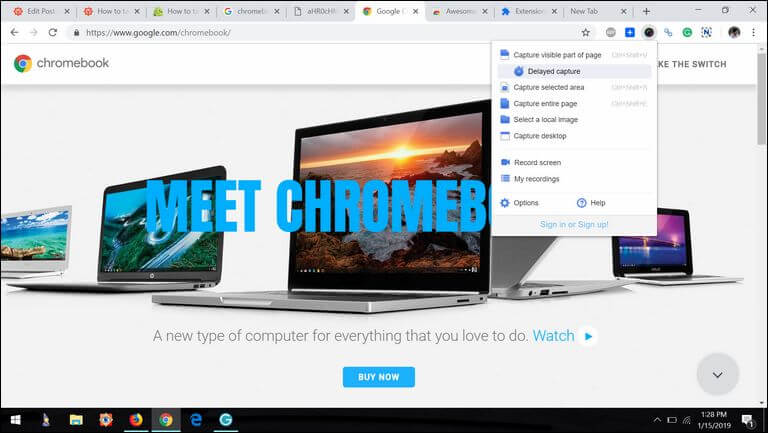
For taking screenshots, there are multiple extensions are available for this purpose. To get better productivity and abundance of features: Awesome Screenshot and Nimbus Screenshot.
No matter if you want to capture a screenshot or record videos on Chromebook, these two extensions that plenty of features to dissolve all of your needs into a peaceful work. Both extensions are completely free to download and use. However, you might find some restrictions while recording video and putting your logo on the media files.
If you’re satisfied with the free version of these extensions, you can support the developers by upgrading to the Pro version. Personally, we use Awesome Screenshot extension on Google Chrome to capture the whole screen or a specific part. There’s one more way of doing this; using the stylus.

How to use Stylus to take screenshots on Chromebooks
For those having Samsung’s Chromebooks or Pixelboox (with its pen) must’ve used the stylus for different this. While this Pen is used to control most of the aspects on these Notebooks, possibly, you could get more out of it. If you’ve been using your Chromebook for a long time, you must have already known this feature. And if you don’t know or you’re just a new owner, we’ve got you covered through this tutorial.
Through the Stylus pen, you can easily capture the whole screen or manually select the region that you want to screenshot. While using the Stylus pen, at the lower right of the bar, there you get a specific menu for this pen. You just open that menu, then you can capture the entire screen or select some area on the screen using the pen. That’s how you can use this pen for taking screenshots on Chromebooks.
That ends our tutorial here that explains different methods to take a screenshot on Chromebook. If you ever have to do these tasks, you can choose any of these methods. We hope that our readers would find this tutorial helpful. Share your thoughts and feedback in the comment section below. We would love to hear from you and bring more useful content to our readers.