How to apply thermal paste to a CPU
Applying thermal paste to your CPU is a key step to keep it cool and running smoothly. Thermal paste fills tiny gaps between your processor and cooler, helping transfer heat away from hot chips like AMD Ryzen 7000 or Intel 15th Gen CPUs. With rise of powerful processors for gaming, content creation, and AI tasks, good cooling is more important than ever—poor heat management can throttle performance or damage your chip.
That is why we have prepared an article which in detail tells you what thermal paste is better to buy, as well as provides clear step-by-step instructions on how to prepare and directly apply thermal paste on the CPU. At the end of the article, we attach a video, the author of which clearly shows how to apply thermal grease to the processor in an extremely simple way.
How to choose thermal paste for the processor?
It is better not to save on the purchase of thermal paste. It is advisable at once to refuse to buy the cheapest variations of such substance because the effectiveness of their use often leaves much to be desired. It is better to buy products at a medium or high cost.
Picking the right thermal paste improves cooling and protects your CPU. Here’s what to know in 2025:
Types of Thermal Paste:
- Non-Conductive: Safe and common (e.g., Arctic MX-6, Noctua NT-H2). Won’t short-circuit if it spills—ideal for beginners.
- Conductive (Liquid Metal): High performance (e.g., Thermal Grizzly Conductonaut), but risky—can damage components if misapplied. Use only for advanced builds or direct-die cooling.
- Pre-Applied: Many AIO and air coolers (e.g., Cooler Master, NZXT) come with paste. Good for first use, but reapply a custom paste for better results.
Key Factors:
- Thermal Conductivity: Look for 8+ W/mK for gaming or overclocking (e.g., Thermal Grizzly Kryonaut, 12.5 W/mK).
- Ease of Use: Creamy pastes (e.g., Arctic MX-6) are easy to apply and clean.
- Durability: High-quality pastes last 1-2 years before drying out—check reviews.
Recommendations:
- Budget: Arctic MX-6 ($5-$12, reliable for most CPUs).
- Performance: Thermal Grizzly Kryonaut ($15-$25, great for Ryzen 7000, Intel 15th Gen).
- All-Round: Noctua NT-H2 ($10-$15, easy to use, long-lasting).
Note: Check your CPU and cooler needs—high-power chips (e.g., Ryzen 9 7950X) benefit from top-tier paste. Avoid cheap, low-quality options from unknown brands.
How often should I change the thermal grease on my CPU?
The first application of thermal paste is needed during the assembly of the computer. Therefore, if you order a system unit assembly in a store or from a private master, make sure that the responsible persons apply thermal paste.
Unscrupulous assemblers often ignore this procedure in order to save money or because of banal laziness. Then you only need to change the thermal paste on the processor with a frequency of about once every 1-1.5 years.
If the computer at this time is still under warranty, you should entrust the application of thermal paste specialists service center. If the warranty period is out, you can change the thermal paste yourself.
How to apply thermal paste to the processor correctly?
Applying thermal paste is made only after proper preparation, which includes the following steps:
Applying thermal paste correctly boosts cooling for your CPU. Here are steps and methods for 2025 hardware:
- Prepare Your Setup:
- Ensure the CPU is seated in its socket (e.g., AM5, LGA 1700) and the surface is clean and dry.
- Work in a dust-free area to avoid debris on the paste.
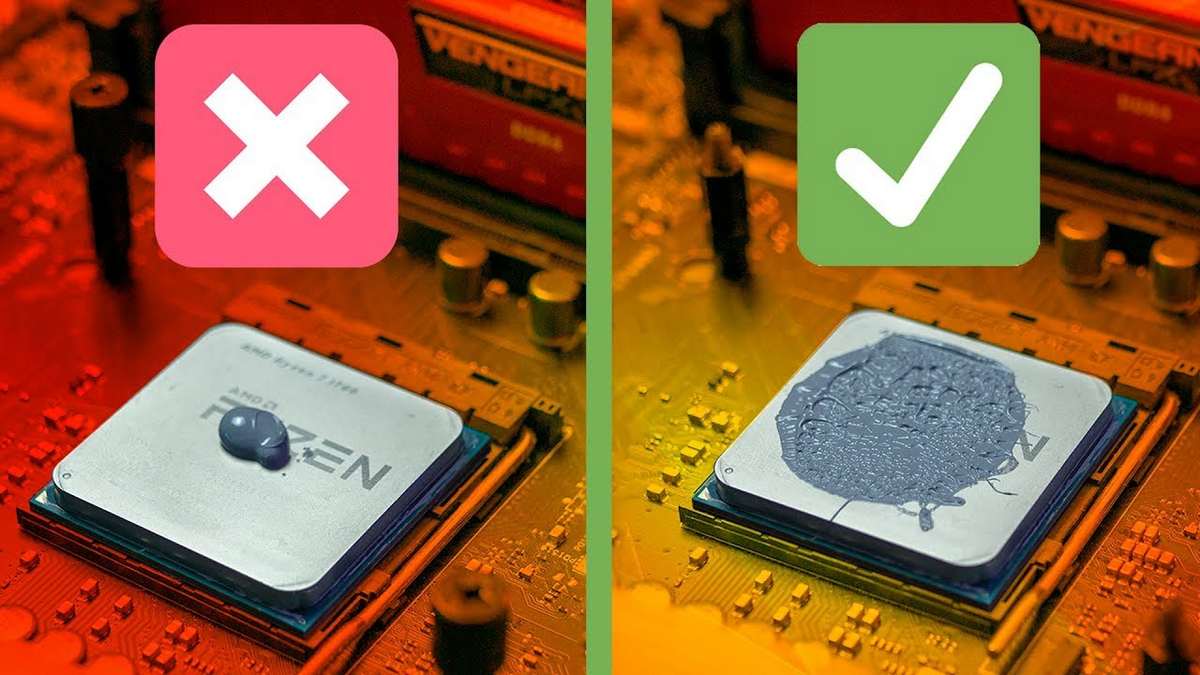
- Choose an Application Method:
- Pea-Sized Dot: Place a pea-sized (4-5 mm) dot of paste in the center of the CPU. Best for most CPUs (e.g., Intel Core i7, Ryzen 5) and air coolers.
- X Pattern: Draw a thin “X” across the CPU with paste. Works well for larger chips like Ryzen 9 7950X or Intel i9-14900K with uneven heat spreaders.
- Spread Method: Apply a thin layer with a plastic spudger or card. Use for precise coverage, but avoid air bubbles—good for AIO liquid coolers.
- Note: Avoid too much paste; a thin, even layer (1-2 mm) is ideal. Check your cooler’s manual—some AIOs come with pre-applied paste.
- Apply the Paste:
- Squeeze the thermal paste tube gently to place the amount needed (e.g., pea-sized dot or X pattern) on the CPU’s heat spreader.
- Don’t touch the paste with your fingers to avoid oils or contamination.
- Install the Cooler:
- Align your cooler (air or AIO) over the CPU, lower it evenly, and secure it with screws or clips per the manual.
- Tighten screws in a cross pattern (e.g., top-left, bottom-right, top-right, bottom-left) to apply even pressure—don’t overtighten!
- The cooler’s pressure spreads the paste into a thin layer for optimal heat transfer.
- Check and Test:
- Plug in your PC, boot it, and use software like HWMonitor, Core Temp, or Ryzen Master to check CPU temps (aim for 30-60°C idle, under 90°C at load).
- If temps are high, reapply paste or check cooler contact.
Tip: For modern CPUs, reapply paste every 1-2 years or after removing the cooler, as it can dry out.
Here’s a complete video walkthrough for your help:
Final Words
Applying thermal paste to your CPU is vital for keeping modern chips like AMD Ryzen 7000 or Intel 15th Gen cool and efficient. In 2025, with powerful PCs for gaming, AI, and more, good paste and proper application prevent overheating and boost performance.
Clean the surface, choose a quality paste like Arctic MX-6 or Noctua NT-H2, apply it with a pea-sized dot or X pattern, and secure your cooler evenly. Check temps and troubleshoot issues to keep your system running smoothly.
That ends this guide that helps you put the thermal paste on the CPU correctly. We hope that our readers find this tutorial helpful. If you have any problems or queries, do let us know.